How To Use the Tar Command on Linux: A Complete Guide
Tar is an essential command on Linux. As a sysadmin, I use it almost every day for backups, software installations or file transfers. But even so, remembering the right syntax and options is not straightforward. This is why I’m sharing this short guide on how to use it, with everything you need to know.
On Linux, the “tar” command allows users to manage archive files (create, extract, compress). Archive files are generally compressed and bundle many files together (typically for backup or software distribution purposes).
In this article, I’ll start with the basic syntax and options you can use with this command, then add some useful examples you’ll typically use on Linux, and end with some ninja tips for more advanced users.
Command syntax
The main syntax for the “tar” commands looks like this:tar <options> <archive-file> <files-or-directory>
We’ll see different examples in the following article that will make everything more clear, but in short:
- Options are used to tell tar exactly what to do with the archive. There are many features, and so many options available (creating an archive, extracting files, compressing them, etc.).
- The archive file is simply the name of the file we want to create or extract files from (e.g. archive.tar).
- The files or directories are either the files we want to add to the archive or where we want to extract the contents of the archive.
Warning: If you try this command for the first time, be sure to practice in a safe environment, ideally without administrative privileges. If you’re not careful and mix up the command arguments, you can quickly start renaming files you shouldn’t (like system files).
Usage examples
The tar command is typically used to create archives or to extract files from them. That’s the most important case you should try, and if possible, remember. So let’s start with these basic examples.
Creating an uncompressed archive
Creating an archive means grouping several files (or the contents of a folder) into a single file: the archive. This can be used for backup purposes, or to share many files at once (upload online, on a network share, etc.).
If you’re a Windows guy, that’s typically what you do when you select “Compress to ZIP file”, but in this case, there is no compression (we’ll get to it soon).
The main syntax to create an archive with tar looks like this:tar -cf <archive> <files>So for example:tar -cf archive.tar ubuntu-release-metrics/
Uncompressed archives are generally named with the “.tar” extension.

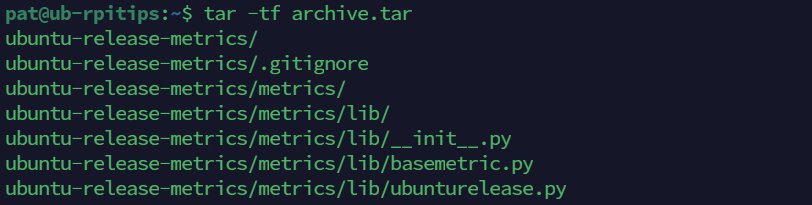
“ubuntu-release-metrics” is a test folder, with the source code of a project I downloaded from GitHub. With this command, all the project files are grouped in the archive.tar file.
The “-c” option is for “create”, and “-f” for file (we specify the destination file). Quite logical for now.
Download your exclusive free PDF containing the most useful Linux commands to elevate your skills!
Download now
Note: you can find all the main options near the end of this page.
Extracting files from an archive
Now, if you already have the “.tar” archive and want to extract the files from it, it’s almost the same syntax:tar -xf <archive>By default, files are extracted in the current folder, so there is no need to specify the second argument.
You already know the “-f” option, and “-x” is for “eXtract” (less logical, but ok).
If you want to specify a destination directory for the files, you need to add the “-C” option, like this:tar -xf archive.tar -C tmp/

This way all files are extracted to “tmp/”, and it avoids creating a mess in the current directory if the archive is just a bunch of single files grouped without a proper structure.

Join Our Community!
Connect, learn, and grow with other Raspberry Pi enthusiasts. Support RaspberryTips and enjoy an ad-free reading experience. Get exclusive monthly video tutorials and many other benefits.
Learn moreListing content from an archive
By understanding how to create archives, and extract files from them, you’re pretty much set. But another interesting option is to list the files from the archives, without extracting them.
With the Tar command, the “-t” option can be used to list all files from an archive, like this:tar -tf archive.tar
By the way, once you know all the files present in the archive, you can add a parameter to the previous command, to extract only one specific file.
For example:tar -xf archive.tar ubuntu-release-metrics/metrics/lib/ubunturelease.py
Creating compressed archives
I’ve covered the basic uses of the Tar command in the previous section (compress, extract, etc.). But to be honest, we rarely use these commands without compression.
I mentioned that on Windows you generally use “Compress to ZIP file”, it’s similar on Linux. We usually create a compressed archive using different compression formats (gzip, bzip2 or xz for example) and not just the tar extension.
Creating a compressed archive instead of a simple archive uses a similar command syntax, takes about the same amount of time but saves disk space usage and speeds up file transfers.
I’ll show you the 3 main compression formats used on Linux, but you’ll quickly see that there are no significant differences in the command lines you use, and they are all based on the previous ones we saw.
Using Gzip archives
The most common archive compression format you’ll find when downloading things online is probably still Gzip. It’s a good compromise between speed and compression, so it’s often the default.
To create a compressed archive with Gzip, the syntax is:tar -czf <archive> <files>
Yes, it’s almost the same as seen previously, we are just adding the “-z” option to specify we want compression with Gzip. So, for example:tar -czf archive.tar.gz ubuntu-release-metrics/
Download your exclusive free PDF containing the most useful Linux commands to elevate your skills!
Download now
I forgot the extension in my screenshot, but Gzip archives are generally named with the “.tar.gz” extension.
Then, it’s the same idea to extract files from a Gzip archive. We use the same “-xf” parameters, but add the “-z” option:tar -xzf <archive> -C <destination>

Using Bzip2 archives
Bzip2 is another compression format that is often used on Linux systems. It’s known for better compression than Gzip, but it’s a bit slower. So, it’s a good option to get smaller archive files and don’t mind waiting a bit during compression or extraction.
Note: You may need to install it on your system before you can use this method. For example, on Debian or Ubuntu servers:sudo apt install bzip2
The commands are nearly the same when dealing with Bzip2 archive or Gzip archives. The only change is that Bzip2 uses the “-j” option instead of “-z”.
- Creating a Bzip2 archive:
tar -cjf archive.tar.bz2 ubuntu-release-metrics/ - Extracting files from a Bzip2 archive:
tar -xjf archive.tar.bz2 -C tmp/
See? The only thing to remember is the second parameter, to use the proper compression format.
Using Xz archives
Finally, “xz” is another format you may come across from time to time. It offers the best compression, so it’s often used for large projects (like distribution images), but it’s more demanding on CPU resources and takes more time to create or decompress.
The additional option for the “xz” format is “-J”, so taking the same examples:
- Creating an Xz archive:
tar -cJf archive.tar.xz ubuntu-release-metrics/ - Extracting files from an Xz archive:
tar -xJf archive.tar.xz -C tmp/
Make sure to add the “.tar.xz” extension to your file names to remember which compression format was used.
Advanced tips
Now that we’ve covered the basics of creating, extracting, and compressing archives, let’s look at some ninja tips that can be useful in more advanced cases.
Adding files to an existing archive
In some cases, you might be interested in adding files to an existing archive, without recreating it from scratch.
There are two options to update an existing archive:
- -r : (Append) Will add the specified file at the end of the archive files, without checking for duplicates. It can’t replace or modify files that are already in the archive (even if it’s the same name).
- -u : (Update) Will update the archive, including newer versions of files already in it.
It’s generally safer and faster to use the first option unless you have a specific reason (like keeping a mirror of the live folder on your system).
Once your choice is made, the command syntax is the same anyway, for example:tar -rf archive.tar new_file.txt
tar -uf archive.tar new_file.txt

In this example, file4.txt is added to my archive file, whatever option I use.
Excluding files
Another interesting option to have in mind when dealing with tar archives is the “–exclude” parameter. As the name suggests, it allows you to skip files when creating or extracting them.
A typical syntax looks like this:tar -cf archive.tar --exclude=<pattern> <files>Where the pattern defines which files to skip (You can use a wildcard character like * to skip extensions).
So, for example:tar -cf files.tar --exclude="file4.txt" *.txtWill add all TXT files in files.tar, except file4.txt

Note: The position of the –exclude parameter in this command is critical. It must be between the archive name and the input files. It won’t work if you try to use it at the beginning or the end.
Options summary
As promised, here is a summary of all the main options you can use with the Tar command on Linux:
- -c: Create a new archive.
- -x: Extract files from an archive.
- -C: Specify where to extract the files.
- -v: Verbosely list files processed.
- -f: Specify the filename of the archive.
- -z: Filter the archive through
gzip(use for.gzor.tgzfiles). - -j: Filter the archive through
bzip2(use for.bz2files). - -J: Filter the archive through
xz(use for.xzfiles). - -t: List the contents of an archive.
- -u: Update an existing archive (only append files newer than the ones in the archive).
- –exclude: Exclude files or directories.
- -r: Append files to the end of an archive.
- -p: Preserve permissions.
We’ve seen most of them in examples, and the other ones are self-explicit. But you can always check the documentation for more advanced things and details on specific options:
man tar.
Download your exclusive free PDF containing the most useful Linux commands to elevate your skills!
Download now
Alternatives
Tar is pre-installed on most Linux distributions and works pretty well, so there is really no need for an alternative. But you might come across other Linux commands that are closely related, and can sometimes be used for similar purposes.
For example, when dealing with backups, “rsync” is often preferred to “tar”, especially when mirroring files and sending them to a remote location. Rsync can quickly compare a source and destination folder, copy only the updated files and compress them during the transfer.
You can read my guide about the “rsync” command here for more details.
Sometimes, we may also use other commands to compress (or extract) files on Linux. For example, tools like Zip, 7zip or rar are sometimes used instead of tar. You also have commands like “gzip” or “gunzip” that can deal with compression directly, without using tar in the first place.
If you want to learn more Linux commands, you can check this article with the top 50 Linux commands everyone must know when working on Linux systems.
Download your exclusive free PDF containing the most useful Linux commands to elevate your skills!
Download now
Reminder: Remember that all the members of my community get access to this website without ads, exclusive courses and much more. You can become part of this community for as little as $5 per month & get all the benefits immediately.
Additional Resources
Overwhelmed with Linux commands?
My e-book, “Master Linux Commands”, is your essential guide to mastering the terminal. Get practical tips, real-world examples, and a bonus cheat sheet to keep by your side.
Grab your copy now.
VIP Community
If you just want to hang out with me and other Linux fans, you can also join the community. I share exclusive tutorials and behind-the-scenes content there. Premium members can also visit the website without ads.
More details here.
Need help building something with Python?
Python is a great language to get started with programming on any Linux computer.
Learn the essentials, step-by-step, without losing time understanding useless concepts.
Get the e-book now.