How To Use ‘rsync’: The Complete Linux Command Guide
Rsync is one of the most useful file management tools available on the Linux command line. It can be used in many ways, which makes it a bit complicated to understand at first. My mission today is to simplify it as much as possible and show you some basic uses that are both powerful and useful.
In a nutshell, rsync (remote-sync) is a powerful tool used in synchronizing files and directories in local or remote locations. It is highly versatile, and capable of handling local file transfer, copying files to remote servers, and managing complex synchronization tasks.
We will start with basic details, and from there, move on to more complex tasks and features. You can also check out the table of contents to go to a specific topic that you may want to check out.
Command Syntax
The most basic form of the rsync command syntax includes the following:rsync <option> <source> <destination>
Each of these arguments can be explained in the following way:
- <option>: This argument is destined for all the options that you want to apply to the file transfer.
- <source>: This is the source file or directory that you want to transfer.
- <destination path>: This is the destination directory where the files/directories will be stored.
It doesn’t matter what kind of task you will deal, you will always keep this syntax as the base, either for local or remote (in those cases, adding a user and address will be necessary).
Usage Examples
Copy Files/Directories Locally
For transferring files locally on the same computer, the syntax is represented in the most basic way possible and is particularly similar to using the Linux cp (copy) command:
rsync <source file/directory> <destination path>
If you’re new to the Linux command line, this article will give you the most important Linux commands to know, plus a free downloadable cheat sheet to keep handy.

Copy Files/Directories Locally to Remote
In this case, you are now going to transfer a file from one computer to another, in other words, remotely. You must specify not only the user of the remote computer but also the network address, like this:
rsync <source file/directory> user@address:<destination path>
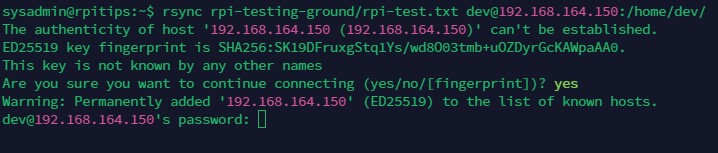
Let’s see a real example, where I send a file to another remote computer with the user “dev”. In this case, the user will be “dev” and the network address will be 192.168.164.150:
rsync rpi-testing-ground/rpi-test.txt dev@192.168.164.150:/home/dev/
If this is the first time you are transferring a file to a particular host, you may see a message related to SSH (because it is the default method of rsync) asking you if you want to continue the connection. You should say yes, and then you will be asked to input the user password.
Transfer files/directories and all their sub-directories and files (Recursively)
So far, we have only transferred a single file locally or remotely. But… What about a whole folder?
To transfer an entire folder that may include more subdirectories or files, you must include a new option, which is the -r or –recursive argument. This allows the file transfer to affect the contents of the folder and not just a single file.
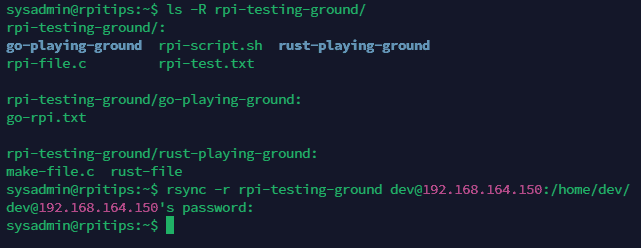
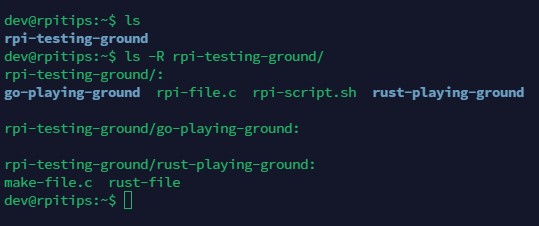
In my example, we can see the different directories and files that are in the content of the main folder:
Download your exclusive free PDF containing the most useful Linux commands to elevate your skills!
Download now
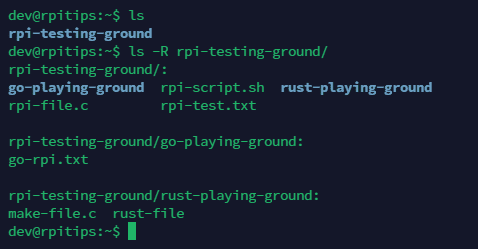
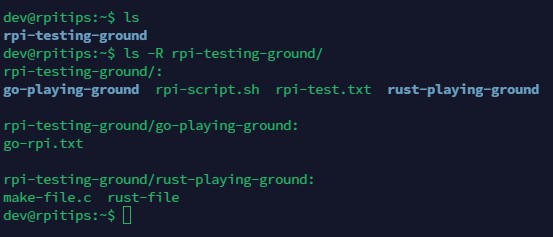
On this occasion, we will see that not only was the folder copied, but everything inside it as well.
Now, there is a little trick, by placing the / at the end of the source folder directory, you can change the way the files are transferred. We can define that when copying the folder, so in that way, only the content will be copied and not the folder itself.
rsync -r rpi-testing-ground/ dev@192.168.164.150:/home/dev/

Preserving the entire directory path while transferring files
Now, considering the previous point, we can talk about another feature, which affects the structure of the file transfer, and that is the case of the “relative” option. Which allows you to leave the specified source directory intact when transferring the folder.
You can specify the relative option by adding the argument -R when running the command:
rsync -R <source/file directory> <destination path>
If the specified directory was “/etc/home/dev/testing-ground-rpi”, not only the source folder will be copied, but the whole address itself will be copied. In this example, I will be using this syntax:
rsync -Rr /home/sysadmin/rpi-testing-ground/ dev@192.168.164.150:/home/dev/

Join Our Community!
Connect, learn, and grow with other Raspberry Pi enthusiasts. Support RaspberryTips and enjoy an ad-free reading experience. Get exclusive monthly video tutorials and many other benefits.
Learn moreNote: It is necessary to add the recursive option to the command since we need to transfer folders when using the relative option.
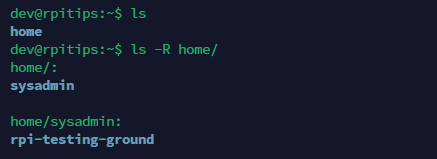
So, after copying the folder remotely in the dev user, the full directory will be “/home/dev/home/sysadmin/rpi-testing-ground”. This is useful in cases where you work with complex directory structures.
Excluding files
You can exclude files and folders you want to specify when transferring them. There are different ways to specify it, which we are going to explain in parts.
First of all, to exclude a file or directory, we must be clear about the syntax of the command, which will include the name of the file, a fragment of the file name or a list. This is demonstrated with the following syntax:
rsync --exclude 'PATTERN'
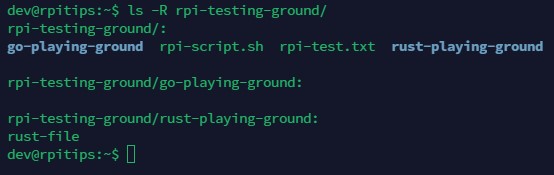
Let’s consider the following example, with the following directory that is made up of different folders and files:
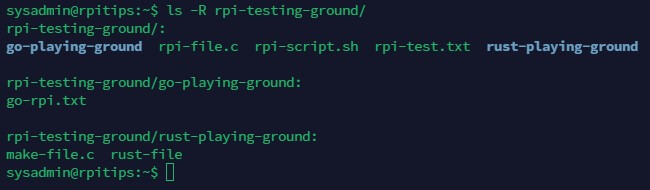
In case you want to exclude a single file from the whole folder, we can specify the file name like this:
rsync -r --exclude 'rpi-file.c' rpi-testing-ground dev@192.168.164.150:/home/dev/
Now, let’s go a little further, what if we don’t want any files with the extension “txt”? We can specify to ignore it by using “*.txt”, where we can express * as everything in the folder, so if we put it together with the extension type, we can specify to exclude all the txt files:
rsync -r --exclude '*.txt' rpi-testing-ground dev@192.168.164.150:/home/dev/
Following the same idea, we can exclude an entire folder with its sub-directories and files, specifying the folder name, you can do it as follows:
rsync -r --exclude 'go-playing-ground' rpi-testing-ground dev@192.168.164.150:/home/dev/

Now, what if we want to be even more specific and don’t want to write such a long command? To avoid putting many exclusions in the same command or repeating it in different ways, we can specify it in a txt file (which must be in the same directory where the rsync command is going to be executed).

rsync -r --exclude-from={exclude-list.txt} rpi-testing-ground dev@192.168.164.150:/home/dev/
Including files
Leaving exclusions aside, we can now turn our attention to inclusions. Inclusions work differently because everything is included by default when transferring files. You need to exclude all files to specify which ones you want to include. You can do this with the following syntax:
rsync --include='PATTERN' --exclude='*'
Download your exclusive free PDF containing the most useful Linux commands to elevate your skills!
Download now
This is a classic way to use include files. In situations where there are a large number of files and folders, it is easier to specify which ones you want to include rather than specifying which ones you don’t want to include (otherwise the list would be too long).
We can specify all files in a folder using the “*” expression.
In the same way as when excluding files, to specify a single file, we only need to specify the name of the file we want to include:
rsync -r --include='rpi-test.txt' --exclude='*' rpi-testing-ground/ dev@192.168.164.150:/home/dev/
With this in mind, we can apply the same when specifying folders to allow only the chosen folder when transferring files.
rsync -r --include='go-playing-ground/***' --exclude='*' rpi-testing-ground/ dev@192.168.164.150:/home/dev/
You may notice that I added the /*** expression at the end of the inclusion rule, and that is because it allows me to select all the files and subdirectories of the inclusion folder.

Finally, we can specify using a list of the files or directories to include. This is useful when you have situations where you have a large number of files and you only need a few files or directories. In the same way that to exclude, the list must have all the files that we want to include, this way:
rsync -r --include-from="list.txt" --exclude='*' rpi-testing-ground/ dev@192.168.164.150:/home/dev/
This way, only the specified files will be transferred.
Configure and Use Daemon rsync Server
One of the attractive features of rsync is its native ability to start as a background service (or daemon). This allows you to centralize your files on one device so that other client devices can access and download files or folders that are available. This is useful in situations where several remote computers need to access the same file or folder.
To start rsync as a daemon, it is necessary to configure the instance that will run in the background, this can be done by modifying the /etc/rsyncd.conf file (if you do not find the file, you must create it). A basic configuration that we can propose is the following:
pid file = /var/run/rsyncd.pid
lock file = /var/run/rsync.lock
log file = /var/log/rsync.log
[Raspberry_Module]
path = /home/sysadmin/sync
comment = Raspberry Pi Tutorial Module
read only = yes
list = yes
Which we can split in the following way:
- The name of our module is “Raspberry_Module” but you can change or choose the name you want to specify as the module (and then use it to access it on the clients).
- pid, lock, log file: These parameters define the paths for the process ID file, lock file, and log file, respectively. The PID file stores the process ID of the running daemon, the lock file prevents multiple instances of the daemon from running, and the log file records daemon activity.
- path: Specifies the local directory that will be used to synchronize directories and files to others, everything inside the chosen folder will be shared with others attempting to access it.
- read only: This setting defines whether files and directories can be downloaded or uploaded. If set to “no”, the files can only be downloaded by other clients, otherwise if set to “yes”, only files can be uploaded to the rsync server.
- list: If set to yes, it allows clients to list the available modules. This helps discover which directories are available for synchronization.
If you want to see the complete list of parameters you can use in the configuration, you can see it in the rsyncd.conf manual or just using the command man rsyncd.conf.
After creating the rsync configuration file, you can start rsync as a daemon with the following command:
rsync --daemon
Note: You may be required to run the command with sudo privileges.
Using the clients, we can visualize the available modules as follows:
rsync -r rsync://ADDRESS:PORT/
Note: The default port when starting rsync as a daemon is port 873.

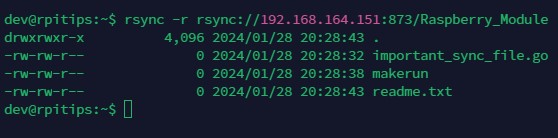
Having the name of the module we want to specify, you can also select the module to display the contents you can access:
rsync -r rsync://192.168.164.151:873/Raspberry_Module
And finally, to copy the files, just specify the path to the target directory:
rsync -r rsync://192.168.164.151:873/Raspberry_Module /home/dev/

To end the rsync process, you must display the process ID using the following command:
ps aux | grep "rsync"

With the ps aux command, we can display all the processes running on the system, while with grep we can filter only the information related to rsync. If you want to know more about grep, you can take a look at my dedicated article about grep.
Once we have the process ID, we just need to use the kill command to end the process.

Main Options
General
- -v, –verbose: Displays different types of information during the transfer. Placing one -v provides details of the transferred files while placing two -v’s includes information about the skipped files and additional information at the end.
- –progress: Displays a progress bar that allows you to see the process of the file transfer.
- –-stats: Allows you to view detailed statistical information about files.
- -e, –rsh=COMMAND: Allows you to select a communication method other than the default rsync one (which is SSH), among which you can use rsh.
- -h, –human-readable: Used to display rsync information in a human-readable form, showing formats with suffixes K, M or G.
File Transfer
- -a, –archive: This is the equivalent of performing -rlptgoD, so it allows you to preserve most directory and file features (users, groups, links, etc).
- -r, –recursive: Allows rsync to copy all sub-directories and all files inside it.
- -R, –relative: Allows you to keep the full path to the directory specified in the command when transferring it.
- -d, –dirs: Copies the folders that are in the directory, but will not copy their contents.
- -L, –copy-links: Copies all content that is pointed to by the symlinks instead of copying only the symlink.
- -u, –update: Forces rsync to ignore files that are newer in the destination, in case you have two files the same in both source and destination.
- –ignore-existing: Forces rsync to ignore files that are already present in the destination.
Performance
- –z, –compress: Enables file compression during transfer to reduce data. It is useful on connections that are low-performance or slow.
- -W, –whole-file: Disables rsync’s option to use the delta-transfer algorithm, forcing it to send the file as-is. It is useful when the local network bandwidth is high speed or when it is used locally.
- –bwlimit=KBPS: Specifies the maximum transfer rate when using rsync. It is useful to stabilize the bandwidth speed range and on large files.
If you want to see the complete list of options available, you can use the command man rsync or just rsync -h.
Tips
Considerations while using SSH with rsync
Because rsync uses by default the SSH connection method, there are several considerations to keep in mind when using rsync:
- Verify that the user and the destination folder are compatible, in other words, that the user has write permissions on the destination folder.
- Do not use root as user, preferably, create a specific user for rsync. This works as a security practice and also to avoid problems in case the root user is not enabled by SSH.
Efficient way to handle large files
An efficient way to handle large files when using rsync is to use the –partial option, which comes in handy for this type of situation.
rsync --partial <source> user@remote:<destination>
With this option, rsync keeps a part of the transferred file at the destination, so when interrupting the download, it allows us to resume the transfer and not start from the beginning.
Showing progress while copying data
Having progress tracking during a transfer can be useful, especially for large files. You can enable the display of a real-time progress display with the –progress or -P option.
rsync -rP <source> <destination>
Alternative
scp
One of the most common alternatives to rsync is scp (secure-copy), which works as a very simplified version of rsync that allows you to remotely copy directories or files. It is useful when you need to copy files in a simple way or for doing a quick task.
Download your exclusive free PDF containing the most useful Linux commands to elevate your skills!
Download now
Related Questions
What are the differences between rsync and the other file transfer tools?
Rsync stands out from the other file transfer tools primarily because of its “Delta Transfer” algorithm, which allows only files that are different from the destination to be transferred. This improves the transfer time, as well as the ability to continue any unfinished transfers.
On the other hand, rsync offers a very flexible and efficient control. It allows you to centralize the transfer to a single server using rsync as a daemon, and control the transfer of files.
How does rsync handle file conflicts?
Rsync handles file conflicts in different ways, by default, if the destination contains files that are the same as the source. It will proceed to ignore the identical files and only copy the different ones.
On the other hand, there are different cases in which you can specify to ignore the files in case they are newer in the destination or just ignore all of them anyway.
Download your exclusive free PDF containing the most useful Linux commands to elevate your skills!
Download now
Want to chat with other Raspberry Pi enthusiasts? Join the community, share your current projects and ask for help directly in the forums.
Additional Resources
Overwhelmed with Linux commands?
My e-book, “Master Linux Commands”, is your essential guide to mastering the terminal. Get practical tips, real-world examples, and a bonus cheat sheet to keep by your side.
Grab your copy now.
VIP Community
If you just want to hang out with me and other Linux fans, you can also join the community. I share exclusive tutorials and behind-the-scenes content there. Premium members can also visit the website without ads.
More details here.
Need help building something with Python?
Python is a great language to get started with programming on any Linux computer.
Learn the essentials, step-by-step, without losing time understanding useless concepts.
Get the e-book now.