How To Install a tar.gz File on Ubuntu. A step-by-step guide
Most of the time, applications are now distributed via the package manager, the app store, snaps, or individual packages. But sometimes, they are only available in a compressed archive, like a tar.gz, that we don’t necessarily know what to do with. If you are in this situation, here is what to do.
In most cases, applications still distributed as tar.gz are just an archive of files that are ready to use. But sometimes, it’s the source code of the program, and it has to be compiled for your system before using it (this can be done with a few command lines).
It’s difficult to give you a short answer to this question, but I’ll make sure to address several examples in this tutorial, so you can find the one that fits your situation and offers a solution.
What exactly are tar.gz files on Linux?
Tar.gz files are simply compressed archives of files and directories. If you are more familiar with Windows, it’s like a Zip file within the Microsoft environment.
Tar.gz is a combination of two technologies:
- The “tar” part stands for “tape archive”, and allows us to gather several files in one piece (in the old days, it was putting several files on the same tape).
- The “gz” part stands for “gzip”, it’s a file compression algorithm.
This file format is often used to create backups (one compressed file storing all the essential files on your PC), but can also be used by software editors, to deliver their applications.
In summary, a tar.gz file can be anything: source code, installer, binaries, or random files. The file extension itself is not what’s important, it doesn’t help you to know what to do with it.
If you want to install some kind of software on your computer and download a tar.gz file, you’ll have to extract it to be able to see the files inside it and understand what to do with them.
In the next section, I’ll explain how to extract files from a tar.gz archive, then we can move to the installation part after that.
How to extract files from a tar.gz archive
Tar.gz files are supported natively on most Linux distributions. That’s why they are often used by software editors.
Whether you have a desktop environment or not, extracting files from a tar.gz archive shouldn’t be complicated. Let’s see how to do it.
Download your exclusive free PDF containing the most useful Linux commands to elevate your skills!
Download now
With a GUI
If any graphic user interface (GUI) is installed on your Linux system, the tar.gz format is probably already recognized by your distribution.
For example, with Ubuntu, if you double-click on a tar.gz file, you’ll get this message:

Keep the default application (Archive Manager), and click on “Open” to see the files in it.
Once the archive is opened, you’ll see the files and directories stored in it and can use the app menus to extract them wherever you want.
Another option is to right-click on the file in your Downloads folder. On Ubuntu, you’ll have access to “Extract” and “Extract to…” directly from this menu:

Join Our Community!
Connect, learn, and grow with other Raspberry Pi enthusiasts. Support RaspberryTips and enjoy an ad-free reading experience. Get exclusive monthly video tutorials and many other benefits.
Learn more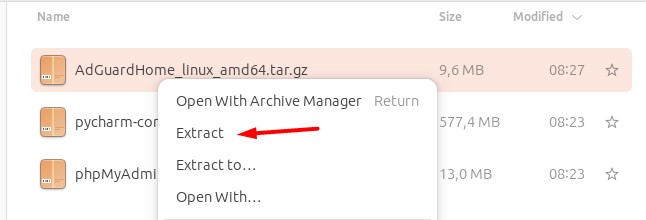
By using one way or the other, you should get a folder containing all the files that were included in the archive. You can then move to the next part to understand what to do with them.
In a terminal
And if you don’t have a GUI, or want to use the terminal instead, the command used in the background is “tar”, which can handle gzip compressed files natively.
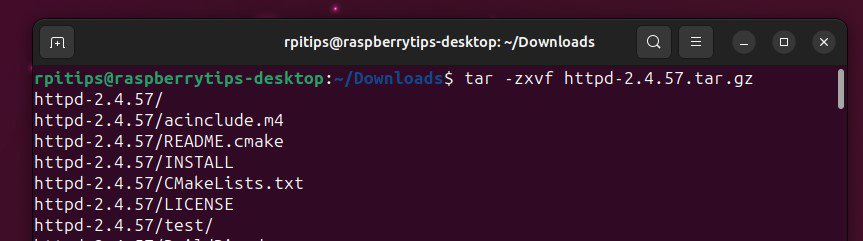
To extract a tar.gz file to the current directory on Linux, simply use:tar -zxvf <filename>
And if you are wondering, here are the options I generally use when extracting a tar.gz file:
- -z: The archive file is compressed with Gzip.
- -x: Ask to extract the files from the archive.
- -v: Verbose. List files processed while extracting them.
- -f: Filename is specified in the command line.
If you’re new to the Linux command line, this article will give you the most important Linux commands to know, plus a free downloadable cheat sheet to keep handy.
Download your exclusive free PDF containing the most useful Linux commands to elevate your skills!
Download now
How to install an application distributed as a tar.gz
Once the content of tar.gz archive is extracted, it’s time to analyze the files to understand what to do with them.
Quickly analyze the files
In most cases, extracting a tar.gz archive will create a new folder on your computer, will all the files in it. Start by moving to this folder and taking a look at its content. Use the file explorer, or these commands in a terminal:cd <folder>
ls
The goal here is to see if there is any kind of hint that can help us to decide what these files are. With experience, you’ll quickly find patterns and understand what to do with them.
For example, after testing the extraction of the Apache archive in the previous section (http-2.4.57.tar.gz), I see all these files:

I have highlighted files that tell me that we typically have the source code here, and we need to compile it, but it depends on the app you try to install, in general, it will be:
Download your exclusive free PDF containing the most useful Linux commands to elevate your skills!
Download now
- Software sources: like in the Apache example. A tar.gz file containing files like “configure”, “Makefile” or “build” is typically the source code of the application, that needs to be compiled and installed manually.
- Binaries: Files are ready to use. You’ll generally have a file with the name of the application that you can run directly.
- Installation script: Typically a file named “install.sh” or “something.run”, that you can run to get the application installed “automatically”.
I’ll give you one example for each scenario in the following, but let’s see first how to know which case you are in.
Check the documentation
The easiest way to know how to install a tar.gz file on Linux is to check the official documentation. The editor will generally explain what to do with the file once downloaded.
It’s not so common anymore to get a tar.gz file, and editors know that it’s a pain point for their users to have to figure out what to do with it and install it. So, they will generally have at least a few lines on the download page explaining what to do with it.
Also, check in the extracted files, you’ll often have a README, INSTALL or DOC file giving you more details. For example, with Apache, the documentation URL is mentioned in the README file.
3 examples
Case 1: Software sources
If you identify that the files included in the archive look like my previous screenshot with Apache, including “configure”, “makefile” or “.cpp” files, you are typically in this scenario, where you have to compile the program yourself before you can use it.
You’ll likely need a few prerequisites, at least the command to build a C or C++ program, like this meta package:sudo apt install build-essentialDouble-check the documentation to find a list with the requirements of the packages, or you’ll likely get a ton of errors during the next step.
Once done, the installation is generally in three main steps:
- Step 1 – configure: A first script is run that will check that you have all the prerequisites installed on your system. You’ll get an error each time a package is missing.
It can be 3 packages as well as 300, that’s why finding the information on the editor’s website is really helpful and will save you a lot of time.
The main command to do this is:./configureBut there are often parameters that can be used to adjust the options for the installation, so once again, make sure to read the documentation first.
You’ll typically have an error like this if a prerequisite is missing: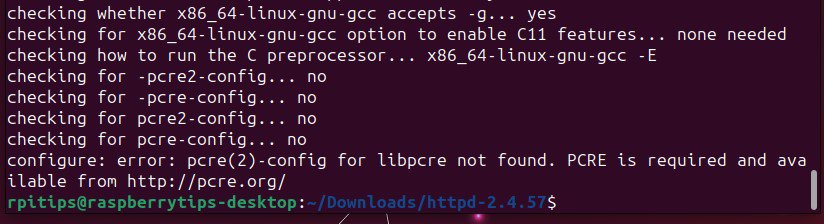
In this case, you’ll have to find how to install it (on Ubuntu, APT will have most of them), and start again, until you get to the end without any errors: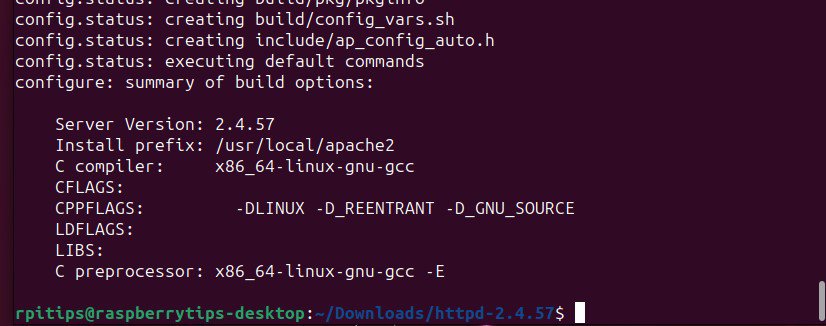
- Step 2 – make: We can now start the code compilation, to build the program for your system environment. This step is generally done with the command:
make
And looks like this:
- Step 3 – make install: The last step is to install the application on your system. This means the files will be copied to your main system files architecture, default configuration files created, etc.
The command to do this is:sudo make installAnd you’ll see the details of everything that is done:
My goal here is just to explain the general steps to follow when you install a program from the source code. Steps, commands, and options might be different for all applications and depend on your environment.
In summary, when you get a tar.gz file with the source code of an application in it, these are generally the steps to follow to install it on your system:./configure
make
sudo make install
If you have any doubts, you can always run the first command and see what happens. At worst, you’ll get an error telling you no such script is available, and you’ll know that you are not in this case.
Note: This was really to give you an example. If you want to install Apache on Linux, click on the link and install it via the package manager, it’s way easier ;-).
Case 2: Files are ready to use
Sometimes, applications are distributed as binaries included in a tar.gz file. They are ready to use, we’re just looking for something more complicated when it’s straightforward.
For example, PyCharm, a text editor for Python developers, can be downloaded as a tar.gz file on their website. When you extract the files, you’ll get something like this:
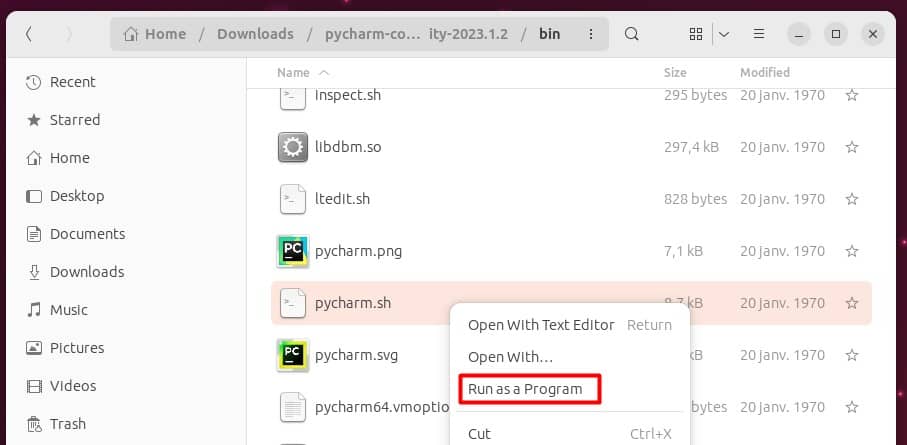
It looks like source code, but if you run “pycharm.sh” directly, the app will open, and you can start using it. It’s probably a good idea to move the files away from your Downloads folder but it works directly, no installation is required.
Another example, that works a similar way (even without a GUI), is AdGuard Home. It’s an ad-blocker, running as a server. As illustrated by the screenshot below, there is almost only one file in the tar.gz archive, and when you run it the app starts directly.
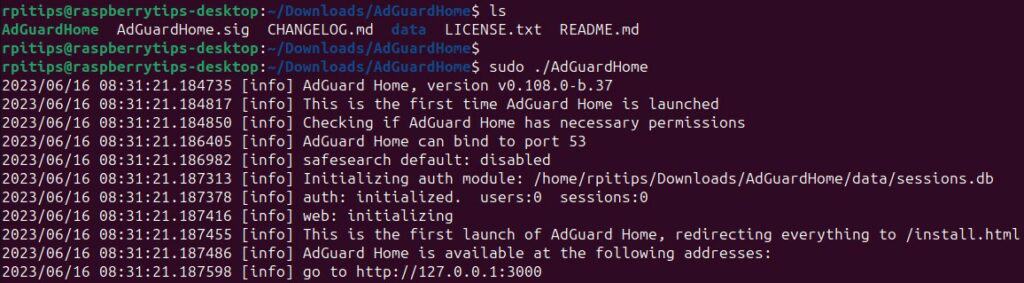
In a terminal, you can run an app with:./<filename>Or, like with AdGuard, if root privileges are required:sudo ./<filename>
Related: Ubuntu Server: How To Enable The Root User (Login & SSH)
Case 3: An installation script is included
And the last scenario you may encounter is that a manual installation is required, but the editor helps you with an installation script.
You’ll typically have a file named “install.sh” inside the extracted folder.
Run it from a terminal with:./install.shAnd follow the instructions to complete the installation.
The current trend is rather to make you download the installation script directly (from GitHub or other platforms), rather than giving it to you via a tar.gz archive, but you may still encounter this scenario with some applications.
Anyway, I hope this article gave you a better overview of the possibilities and what you should do with a tar.gz archive.
In summary, to install a tar.gz file on Ubuntu:
- Extract the files.
- Check the developer’s documentation or the extracted files list for clues.
- Follow the instructions to compile, install or run the application, depending on the situation.
And if you need more tutorials about Linux or Ubuntu, here are a few suggestions:
- Ubuntu Backup Essentials: Tips and Tricks from a sysadmin
- 17 Security Tips From A Pro To Protect Your Linux Server
- How To Easily Map A Network Drive On Ubuntu (GUI & commands)
Download your exclusive free PDF containing the most useful Linux commands to elevate your skills!
Download now
Reminder: Remember that all the members of my community get access to this website without ads, exclusive courses and much more. You can become part of this community for as little as $5 per month & get all the benefits immediately.
Additional Resources
Overwhelmed with Linux commands?
My e-book, “Master Linux Commands”, is your essential guide to mastering the terminal. Get practical tips, real-world examples, and a bonus cheat sheet to keep by your side.
Grab your copy now.
VIP Community
If you just want to hang out with me and other Linux fans, you can also join the community. I share exclusive tutorials and behind-the-scenes content there. Premium members can also visit the website without ads.
More details here.
Need help building something with Python?
Python is a great language to get started with programming on any Linux computer.
Learn the essentials, step-by-step, without losing time understanding useless concepts.
Get the e-book now.