SunFounder Pi Power Review: Everything you need to know
When you have important services running on your Raspberry Pi, you can’t rely on the main power system to stay up 24/7. For example, data storage can be corrupted quickly if you get too many power cuts, and dealing with a 3D printing task stopped in the middle is not much fun.
Using an uninterruptible power supply (UPS) with a battery for a Raspberry Pi server will avoid most of these problems. If the power supply is unstable or interrupted, the battery will automatically take over and keep the Raspberry Pi up and running.
The SunFounder PiPower is a product built just for this and I had the chance to test it for you. Here are my first impressions after a week of using it.

SunFounder PiPower
UPS for your Raspberry Pi, with battery
To be completely transparent with you, SunFounder sent me this product to review it. I’m free to share my honest thoughts about it with you but I didn’t pay for it. I don’t think it influenced my review, but just so you know everything.
Features
On paper, the SunFounder PiPower is a simple product. It’s basically a stand with a battery (7.4V, 2000mAh) that can be plugged into a Raspberry Pi (4, 3, and all B/B+ series) but also similar boards like Banana Pi, Odroid or Libre Computer alternatives.
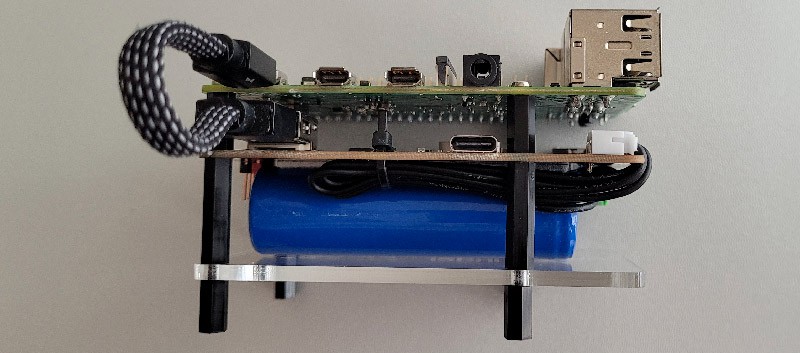
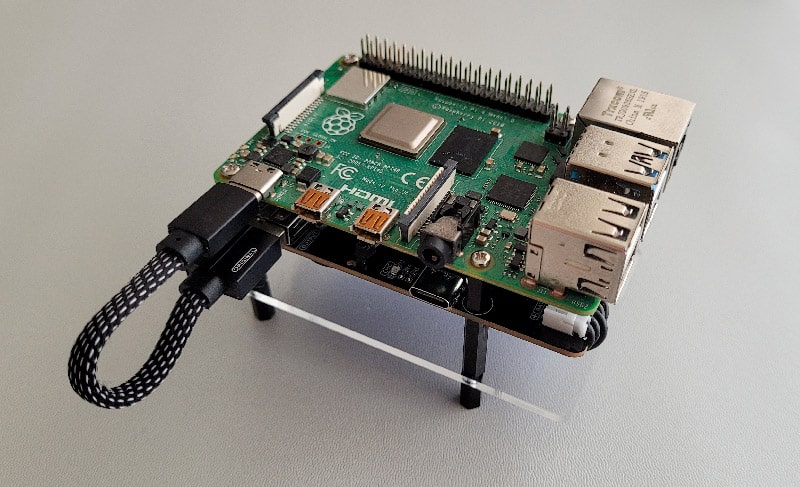
You have 3 layers in this little pyramid:
- The Raspberry Pi, on top of the stand.
- The PiPower board, linked to the Raspberry Pi via a USB cable (USB-C and micro-USB cables are included) and connected to the main power supply with another USB-C socket.
- The Battery, stuck to the PiPower board with double-sided adhesive tape.
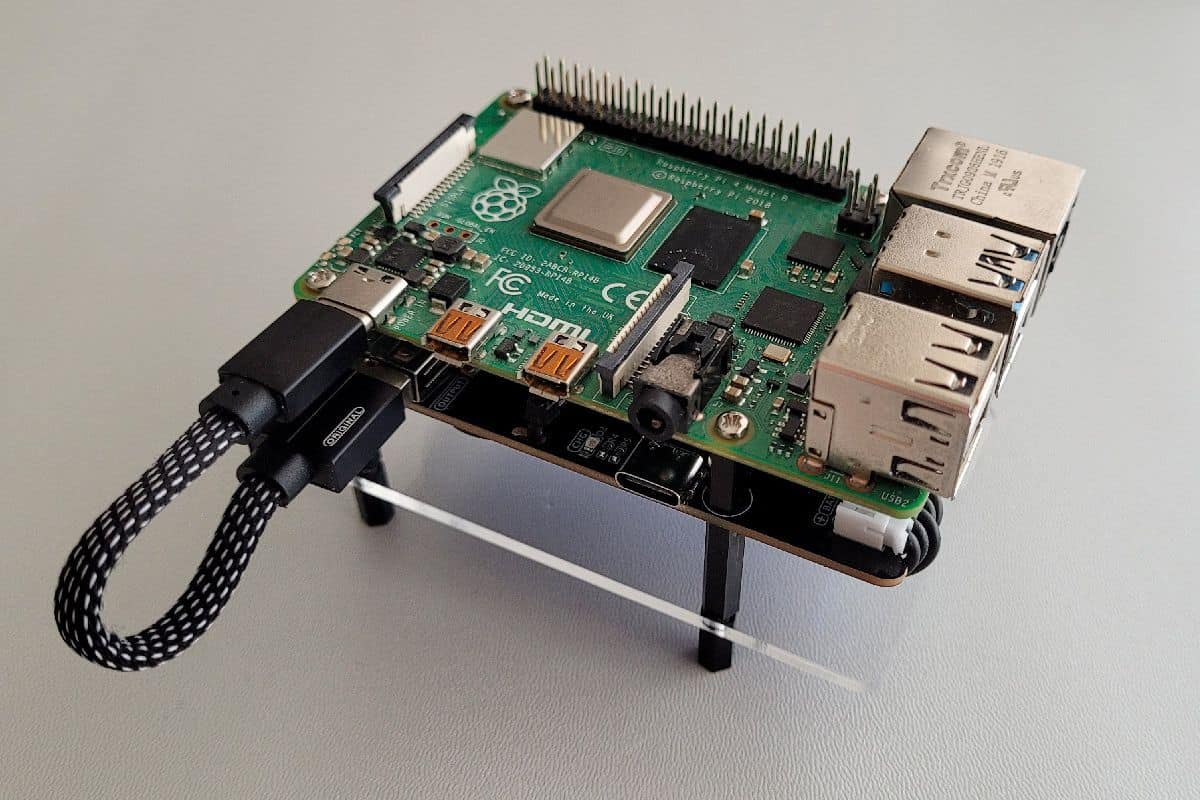
It looks like this once assembled:
The product costs around $25 at the time of writing (check the price here), which I think is a fair price with the battery and the cables included. If you need that extra security to protect your data and give you peace of mind, it’s definitely worth it.
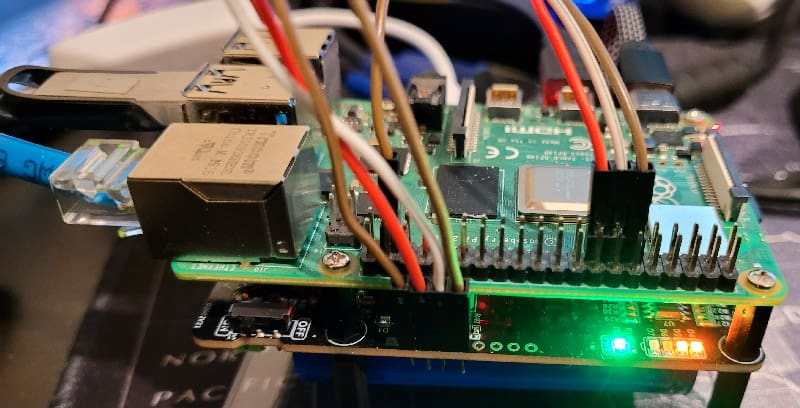
On the PiPower board, you have a power switch to turn the whole thing on and off, 4 LEDs to quickly see how much battery is left, and a few IO pins (optional) if you want to link them to the Raspberry Pi to get more data:
- CHG: Charging status (high when the battery is charging).
- IN_DT: Input detect (high when there’s USB power input).
- LO_DT: Low voltage status (high when low battery voltage is detected).
- BT_LV: Get the battery voltage. It’s an analog signal, so an ADC is required to read the value (not included).
- EN: Switch signal. Turn off the PiPower.
There are also a few additional 5V and ground pins on the board if needed for your project.
It's a free PDF guide containing every Raspberry Pi Linux command you should know!
Download now
Assembly
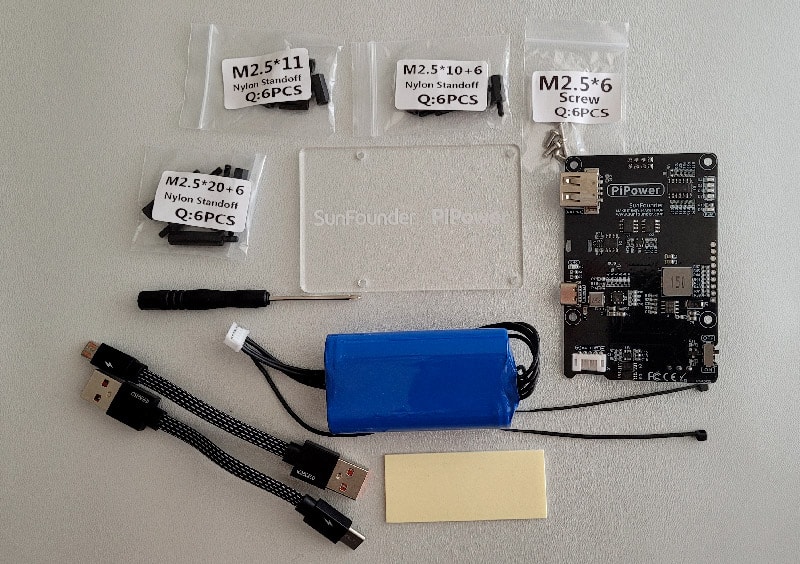
The product is delivered in a complete kit with the battery, cables, board, adhesive and screws included. Here is what’s inside the box:
- Pi-Power module (the main board).
- A battery (it wasn’t with previous versions of the product, it’s now included so you don’t have to buy one separately).
- The acrylic plate that will be under the battery.
- USB-C cable and micro USB cables, so it works with most Raspberry Pi models (and some alternatives).
- Screws, standoffs, screwdriver, adhesive tape and cable tie for the assembly.
- A printed manual for the assembly.
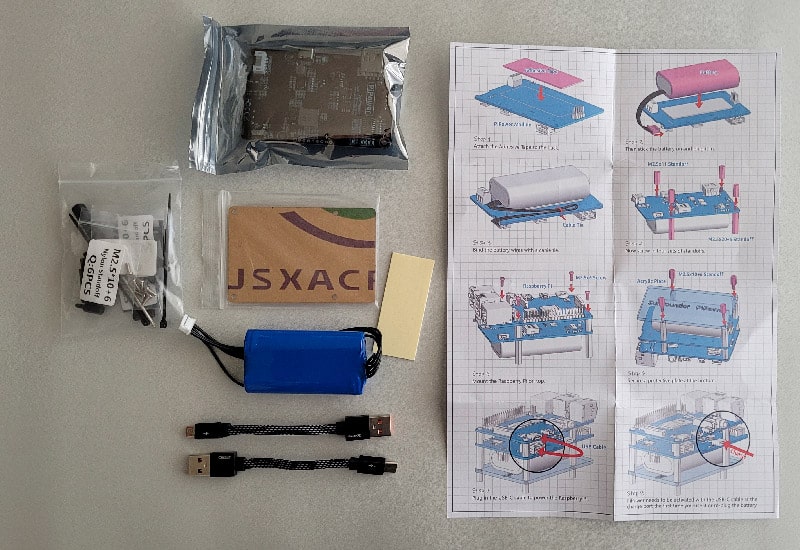
As always with SunFounder products, the assembly is made easy as they include a step-by-step manual, printed and in color.
If you are lost in all these new words and abbreviations, request my free Raspberry Pi glossary here (PDF format)!
Download now
The other thing I like about their products is that all screw bags are identified with the same names as in the manual, and you always have a few spare parts in case you lose one (for example, when 4 screws are required, 6 are included in the bag).

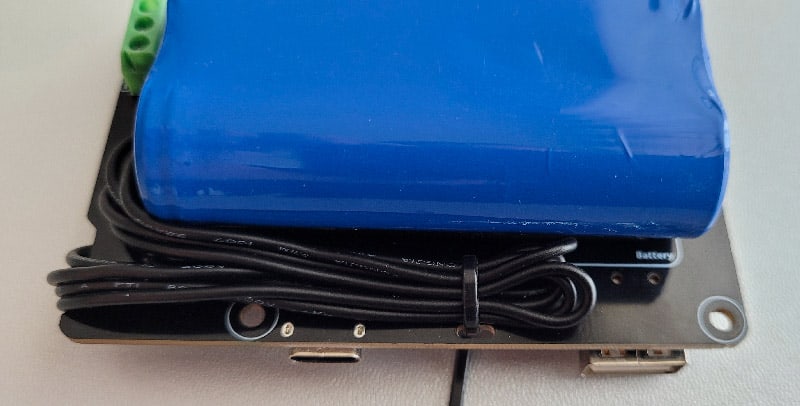

Overall, the assembly is not complicated. You stick the battery to the Pi Power board, and then it’s just standoffs at each layer, with screws on top to fix the Raspberry Pi board.
It took me less than 30 minutes while taking pictures, and I’m clearly not the best at this, so you can expect to do it in 10 to 15 minutes I think.
Once completed, the whole thing looks like this:
No power supply is included, so you’ll need to use your own with it. I’m using a Raspberry Pi 4 with the official power supply for the review and I recommend doing the same.
You need to make sure the power supply you use can charge the battery faster than the Raspberry Pi drains it. It’s not an issue with the official power supply, but I guess it might be with a standard phone charger or, even worse, if the whole thing is plugged into a USB port on your PC.

Join Our Community!
Connect, learn, and grow with other Raspberry Pi enthusiasts. Support RaspberryTips and enjoy an ad-free reading experience. Get exclusive monthly video tutorials and many other benefits.
Learn moreRecommended reading: How to Power a Raspberry Pi: Pro Tips for Every Use
It's a free PDF guide containing every Raspberry Pi Linux command you should know!
Download now
Reminder: Remember that all the members of my community get access to this website without ads, exclusive courses and much more. You can become part of this community for as little as $5 per month & get all the benefits immediately.
Review
SunFounder PiPower
UPS for your Raspberry Pi, with battery
There are many use cases for this type of product. I did a few tests for you and I will share my results and my overall thoughts, but you are welcome to ask in the community if you have specific questions about this product.
Autonomy tests
The main test I had to do was to test if the power supply switched properly from one mode to another and how much time the battery will keep the Raspberry Pi up.
On the official website, they announce between 3 and 4 hours of autonomy.
Let’s see what I got in real tests.
Test 1: Raspberry Pi OS Lite
My first attempt was using my Raspberry Pi 4, with Raspberry Pi OS Lite (64 bits) on a USB stick. I was connected via Ethernet and nothing else was plugged in.
I was expecting a battery life of around 2 hours when starting the test (battery autonomy on product descriptions is often overestimated). But to my surprise, the Raspberry Pi stayed up for 5 hours and 23 minutes.
So, 3 to 4 hours seemed fair. To be clear, there was nothing running on the Pi, so if you run any kind of server that does tasks in the background or with a few users it will probably go out of power faster.
But you can expect 5h30 max, and most likely between 3 and 4 hours for normal usage.

Test 2: Raspberry Pi OS with Desktop
To get a better idea of the battery life range, I did a second test, using Raspberry Pi OS with Desktop this time. I had the web browser open on RaspberryTips and a mouse and keyboard plugged in via USB.
Well, this time, I only got 3 hours and 40 minutes of uptime before the battery ran out.
That’s a big difference, isn’t it?
I first thought I made a mistake, maybe the battery wasn’t fully charged or something like that. But I did another test and got the same result.
If you are lost in all these new words and abbreviations, request my free Raspberry Pi glossary here (PDF format)!
Download now
So yes, there is a big difference in autonomy between a light operating system doing nothing and a desktop environment even when not doing much (I wasn’t actively browsing or playing games or whatever).
Autonomy tests summary
In short, the Pi Power can keep a Raspberry Pi on for as long as 5 hours and 23 minutes on the Lite edition of the operating system, but less than four hours when a more greedy system and apps are used.
| Autonomy test | Raspberry Pi OS Lite | Raspberry Pi OS Desktop |
| Battery life | 5h23 | 3h40 |
If your plan was to use a Raspberry Pi completely wireless (outdoors for example), this will probably be a bit limited.
You can likely leave a minimal operating system running for a few hours if it doesn’t run too many tasks in the background (maybe for a camera project taking wildlife pictures?), but you can’t expect to have it running all night without another power supply.
Even with solar panels plugged in it won’t last the whole night, so you might need a bigger battery for that kind of project.
Power switches
One thing that works really well is the switch from one power source to another. The Pi Power will instantly switch to the battery if your main power supply goes down.
In general, I only got one “low voltage warning” message on the system when it switched (the one I explain in this other article). But it switched directly, with no reboot, no errors, it was perfect.
That’s why I really think this is a good product for when you don’t have a reliable power supply (or want to prevent any shutdown due to power cuts).
Especially when you have services running all the time with different users, it is a good safety net.
I remember when I was running a Minecraft server, any unscheduled crash or reboot caused major issues in the game (rollbacks, corrupted maps, lost items, …). And many home servers can get similar issues. At only $25, it will quickly pay for itself.
Battery indicators
I want to say a brief word about the battery indicators, the 4 LEDs on the Pi Power board.
In the documentation, they explain the LEDs meaning like this:
- 4 LEDs on: voltage > 7.8V
- 3 LEDs on: voltage > 7.36V
- 2 LEDs on: voltage >6.96V
- 1 LED on: voltage > 6.6V
- 4 LEDs off: voltage <6.6V, batteries need to be charged.
One thing that wasn’t clear to me is that 4 LEDs on doesn’t mean the battery is fully charged. So, I made some mistakes at first while testing the autonomy with a battery that wasn’t fully charged.
To fully charge the battery for my autonomy tests, I had to shut down the Raspberry Pi (via the power switch), let the battery charge to max (waiting for the red LED near the USB-C port to turn off) and only then was it OK to start the test.
I guess you can get to max charge with the Pi running, but there is no indicator telling you exactly what percentage your battery is at (unless you use the GPIO pins I mention in the next paragraph). You only know that it’s between 7.8V (4 LEDs on) and 8.4V (max).
Advanced features (GPIO Pins)
One last thing I want to mention is the GPIO pins on the Pi Power board.
You have several additional 5V and GND pins if you need to protect other things in addition to the Raspberry Pi. HATs can use the main GPIO pins, but if you have other electronic components it can keep them running too.
There are also a few pins near the status LEDs:
I listed them earlier in the article, they provide information about the power supply status. For example, you can detect if the USB power input works, and if it’s not the case, plan the proper actions to avoid any disruption before the battery goes down too.
The documentation provided by SunFounder on how to use these pins is thin to say the least (you just have the port list, no code is provided).
One pin (LO_DT) is particularly useful, as you can monitor its value to know when to shut down the Pi. By configuring it as an input in a Python script (I explain how in this other article), you can detect when it comes up and shut down the Raspberry Pi properly as soon as the last LED turns down.
I think they could have included a way to connect the Raspberry Pi to the board directly via USB and provided a script to shut down the Pi automatically when the battery is almost flat. But anyway, it’s better than nothing.
Alternatives?
To give you more context, I decided to do similar tests with my power bank (it’s almost the same as this one on Amazon).
It’s an old power bank (I bought it 3 or 4 years ago and have used it quite a lot). It’s a 25000mAh battery (3.7V) vs 2000mAh (7.4V) for the one included with the SunFounder Pi Power pack.
The same test with Raspberry Pi OS Desktop kept the Pi on for 5 hours and 16 minutes (7h29 on the Lite edition). So, it seems more suited for projects where you need to keep the Pi running on the battery for a very long time.
The Pi Power has many advantages that a typical power bank doesn’t include: it’s built for Raspberry Pi, it’s a compact format, you can monitor the remaining battery life via LEDs and GPIO, etc.
A power bank is also generally more expensive too (check the price here). Maybe using both for outdoor projects is a good idea. You add the two battery lives together and keep the advantages of the SunFounder UPS.
Overall, the Pi-Power is an excellent UPS power supply to keep your Pi running 24/7 even during short power disruptions. Just don’t get this product if the goal is to keep your Pi running for a long time without electricity, a power bank or bigger batteries will do a better job for this.
And if you try it, please let me know how your experience was with it!
Whenever you’re ready, here are other ways I can help you:
The RaspberryTips Community: If you want to hang out with me and other Raspberry Pi fans, you can join the community. I share exclusive tutorials and behind-the-scenes content there. Premium members can also visit the website without ads.
Master your Raspberry Pi in 30 days: If you are looking for the best tips to become an expert on Raspberry Pi, this book is for you. Learn useful Linux skills and practice multiple projects with step-by-step guides.
The Raspberry Pi Bootcamp: Understand everything about the Raspberry Pi, stop searching for help all the time, and finally enjoy completing your projects.
Master Python on Raspberry Pi: Create, understand, and improve any Python script for your Raspberry Pi. Learn the essentials step-by-step without losing time understanding useless concepts.
You can also find all my recommendations for tools and hardware on this page.