How to Properly Shut Down Your Raspberry Pi (Avoid data loss)
When a Raspberry Pi is not shut down properly, you run the risk of irreversible damage to the data on the SD card. In this article, we’ll explore the different ways to perform a proper shutdown avoid this issue.
The shutdown options from the main menu, or the “shutdown” command in the terminal are the easiest solutions to properly stop the Raspberry Pi. Other options include using a push button or scripts.
In this post, I will guide you through several ways to properly shut down or reboot the Raspberry Pi, including tips to implement interesting techniques to manage the shutdown and reboot of the Raspberry Pi so that you will have ideas to implement it according to your Raspberry Pi use case.
If you’re looking to quickly progress on Raspberry Pi, you can check out my e-book here. It’s a 30-day challenge where you learn one new thing every day until you become a Raspberry Pi expert. The first third of the book teaches you the basics, but the following chapters include projects you can try on your own.
Why is it important to shut down your Raspberry Pi safely?
Stopping the power abruptly cuts the data write operation to the SD card forcibly, which may cause irreversible damage to the data on the SD card.
The Raspberry Pi system is a living entity. Processes are running all the time in the background, even if you have no application opened. If you simply cut the power supply, the data that was being written during that time might be incomplete or worse.

Proper or safe shutdown, as the name suggests, is a standard procedure to make sure that the Pi runs required routines when transitioning from power on to power off state without damaging it.
When you don’t shut down your Raspberry Pi properly, you run the risk of losing data or corrupting your SD card. The goal of this article is to explain how to avoid that.
How to Shut Down and Reboot a Raspberry Pi Properly?
The safest way to turn off a Raspberry Pi is to either use the Shut Down Options from the desktop main menu or the command “shutdown” in a terminal.
There are ways to properly shut down and reboot your Raspberry Pi, which we discuss below. Ultimately, the safest choice will depend on your configuration or how your Raspberry Pi is being accessed.
Shut Down the Raspberry Pi from the GUI
Shutting down the Raspberry Pi is easy in the operating system (OS) version with desktop GUI.
It's a free PDF guide containing every Raspberry Pi Linux command you should know!
Download now
The ‘Shutdown Options’ feature allows users to shut down, reboot, and logout (in case of multiple user accounts) locally in Raspberry Pi (without remote access). The following are steps to shut down or reboot the Raspberry Pi locally from Desktop GUI.
- Step 1: Close any running programs or applications.
It is always a good practice to make sure you turn off all of your programs or applications before shutting down or rebooting the Raspberry Pi. Doing this will prevent damage to the programs you have running. - Step 2: Select actions from Shutdown Options.
Open the Shutdown Options (by clicking it) from the Raspberry Pi desktop GUI icon menu on the task panel. A dialog box with three actions to choose from will appear: Shutdown, Reboot, and Logout. Select Shutdown to shut down your Raspberry Pi.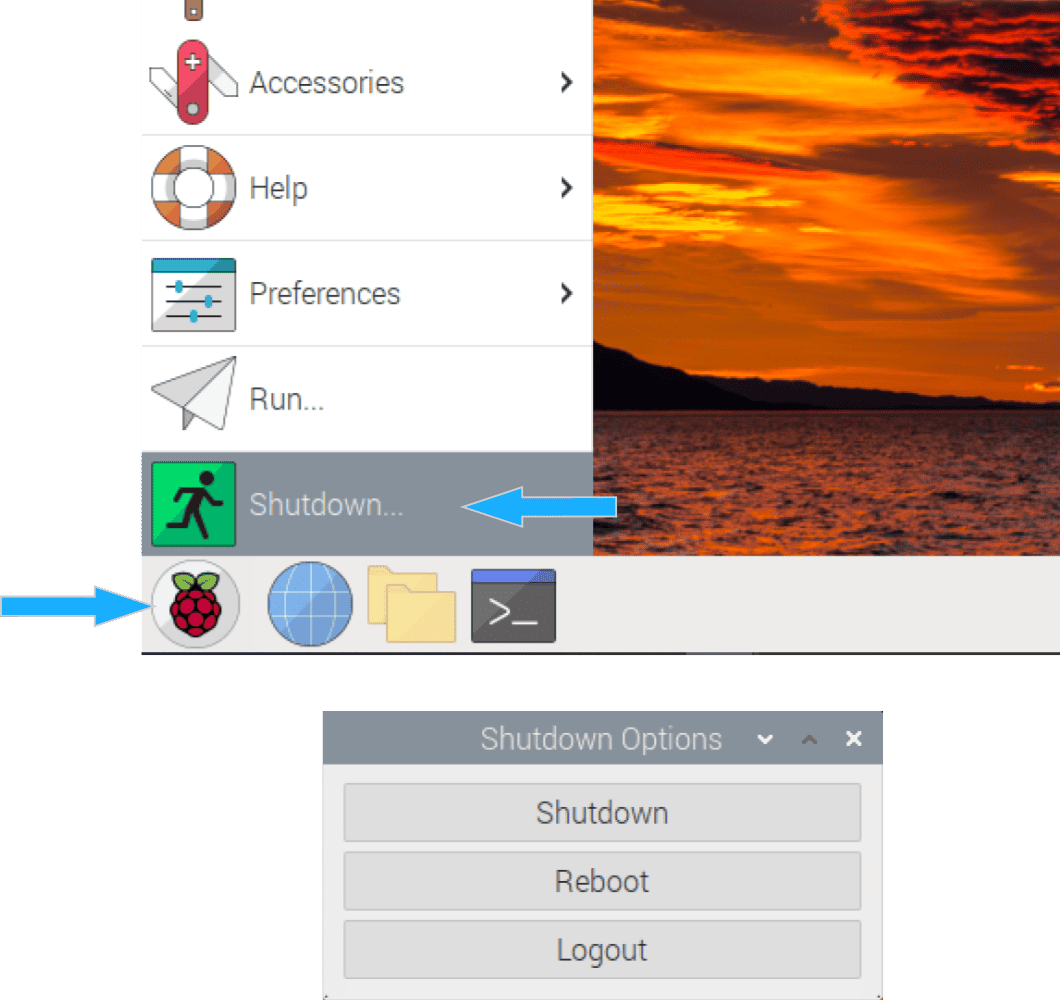
- Step 3: Wait for the shutdown to complete.
If Shutdown is selected, make sure that the Raspberry Pi shutdown process is complete before unplugging the power cable or connecting something to the Raspberry Pi (i.e. camera). You can check if the shutdown process is complete by checking if the green LED stops blinking.
Shut Down Remotely using Remote Desktop
It is also possible to shut down the Raspberry Pi remotely using the ‘Shutdown Options’ feature in its desktop GUI through the remote desktop.
You can shut down or reboot the Raspberry Pi using a remote desktop by:
- Step 1: Open remote desktop connection to Raspberry Pi.
Using a VNC viewer from the computer you want to remotely control your Raspberry Pi from is the most common way to establish a remote connection.
To enable the connection, you must activate the VNC feature in your Raspberry Pi first.
You can read my tutorial about VNC for more details about this procedure. - Step 2: Follow the same shutdown procedure explained in the previous section.
Main menu > Shutdown > Shutdown options.
Shut Down Locally from the Terminal
Another common way to shut down your Raspberry Pi is from the Terminal.

Join Our Community!
Connect, learn, and grow with other Raspberry Pi enthusiasts. Support RaspberryTips and enjoy an ad-free reading experience. Get exclusive monthly video tutorials and many other benefits.
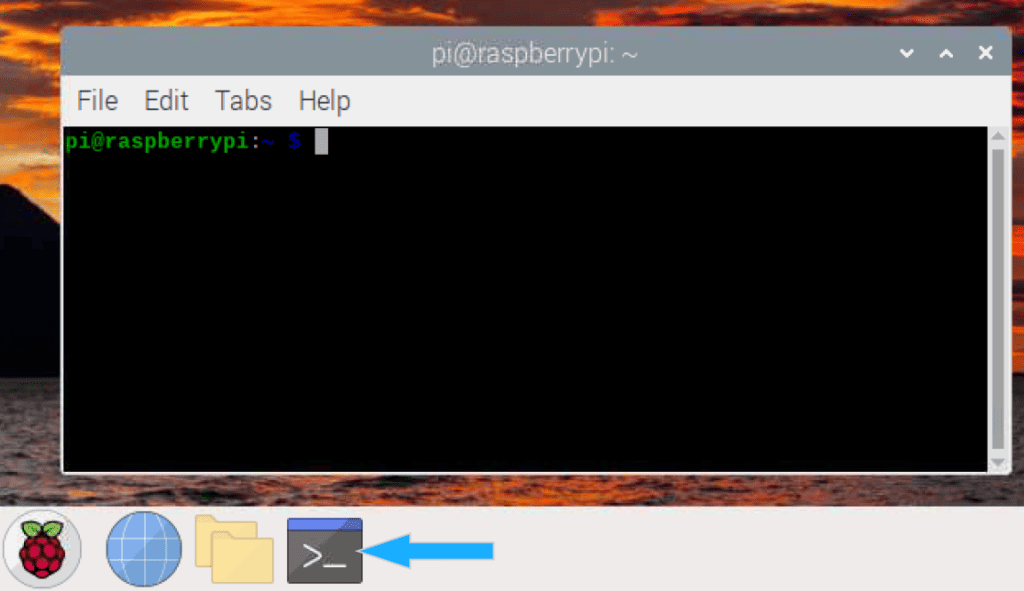
Learn moreStep 1: Open or access the Terminal.
For the OS with desktop GUI, the Terminal window can be opened by clicking the Terminal icon on the task panel.
You may also know that there are OS versions of Raspberry Pi for ‘headless’ operation (like Raspberry Pi OS Lite), meaning it has no desktop GUI. If your Raspberry Pi is in headless mode, using the terminal is the only way to interact with Raspberry Pi. The terminal can be seen when you connect your Raspberry Pi to a monitor.
Step 2: Use the command to shut down or reboot the Raspberry Pi.
Commands to shut down or reboot the Raspberry Pi from the Terminal (Note: in these commands, the purpose of sudo is to run it as a superuser or admin):
- Shut down the Raspberry Pi right away:
sudo shutdown nowOr more explicitly using -h (halt) option:sudo shutdown -h now - Reboot the Raspberry Pi right away:
sudo reboot nowOr:sudo shutdown -r now - Shut down the Raspberry Pi in one minute:
sudo shutdown - Schedule the Raspberry Pi shut down at a specific time:
sudo shutdown 06:00 - Cancel the scheduled shut down:
sudo shutdown -c
Are you a bit lost in the Linux command line? Check this article first for the most important commands to remember and a free downloadable cheat sheet so you can have the commands at your fingertips.
Shut Down Remotely via SSH
The more interesting way, and possibly the most common, to remotely access your Raspberry Pi is using SSH. This method is especially common for a Raspberry Pi in ‘headless mode’ where connecting to the desktop remotely is not an option.
When you’re connected to Raspberry Pi via SSH, you can work remotely on Raspberry Pi the same way as you can in the local Terminal window.
- Step 1: Connect to the Raspberry Pi via SSH.
To connect to your Raspberry Pi using SSH, you must enable the SSH server in your Raspberry Pi first. Details of connecting to your Raspberry Pi using SSH are described here. - Step 2: Use commands to shut down or reboot the Raspberry Pi.
Once you are connected to the Raspberry Pi via SSH, you can use the same commands as described in the previous section: Shut Down Locally from the Terminal.
It's a free PDF guide containing every Raspberry Pi Linux command you should know!
Download now
How to Program Proper Shut Down of The Raspberry Pi?
Now that you know the importance of shutting down your Raspberry Pi properly, you might find it interesting to design a mechanism to manage the shutdown and reboot of your Raspberry Pi in a better way.
Mount a Push Button to GPIO for Shutdown or Reboot
You can utilize a momentary push button to trigger a proper shutdown or reboot of the Raspberry Pi. You can follow the steps below to mount a push button to GPIO, write Python code, and finally test the push button to trigger the shutdown.

Step1: Build a Connection Prototype
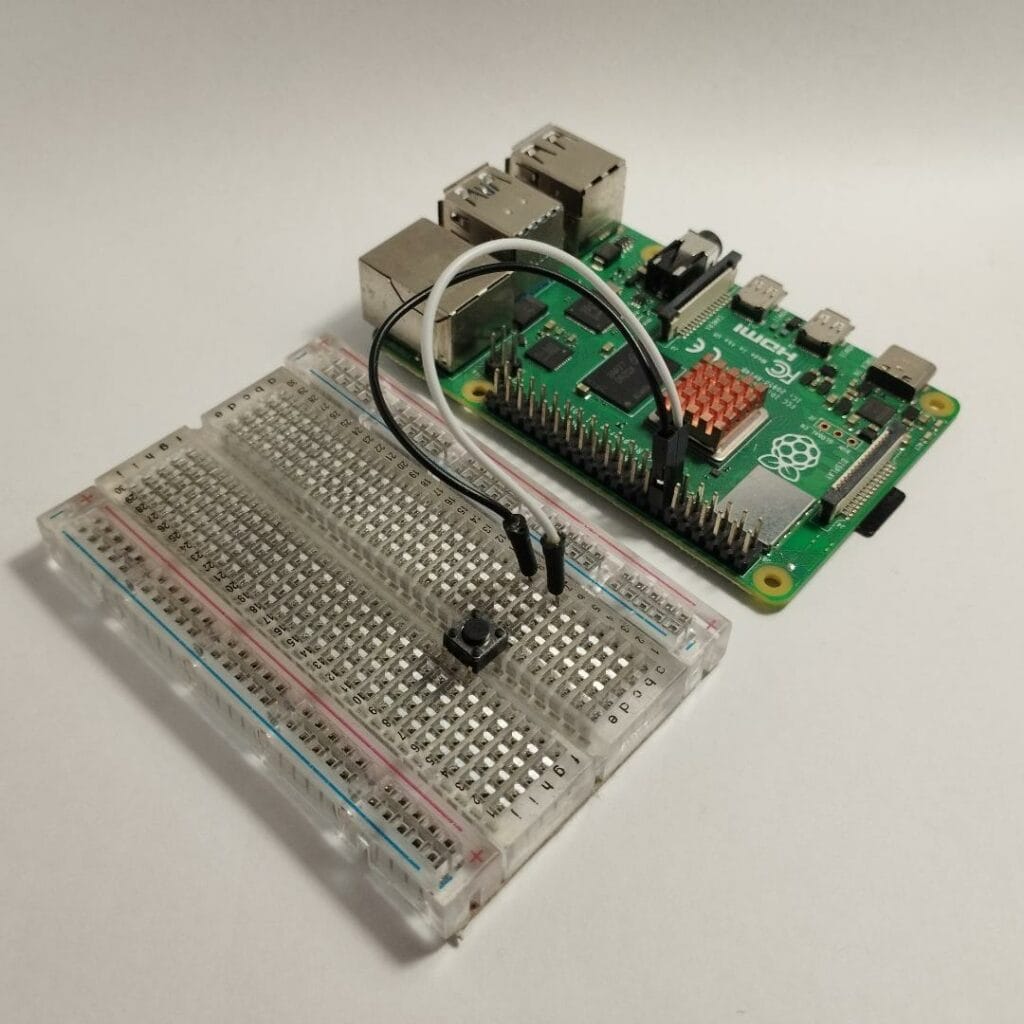
To have a ‘shut down button’, you will need to connect one GPIO pin and Ground from the Raspberry Pi to the momentary push button (a push button that pops back to its original position when it isn’t being pushed).
For this example, I’m using GPIO 27 (or physical pin 13) and Ground (at physical pin 14). You can check my article for Raspberry Pi pinout information.
It's a free PDF guide containing every Raspberry Pi Linux command you should know!
Download now
You can also make use of jumpers and breadboard to make the connections as shown in the following figure:
Step 2: Write Python Code to Monitor the Button State: Shut Down or Reboot
I have prepared code that you can use to reboot (when the button is pushed for 1 second) or shut down (when the button is pushed for longer than 3 seconds) your Raspberry Pi.
On your Raspberry Pi, you can copy the code below (let’s call it Shut Down Button Program) and paste it into a text editor in your Raspberry Pi (i.e. Nano) and save it as shutdown_button.py in a location that you prefer (note: please remember where you save this!).
Short hint: To create shutdown_button.py and save it, you can use nano as a text editor by typing this command:sudo nano shutdown_button.pyNano will open, and you can paste the code.
When done, press CTRL+X and confirm the saving with Y.
import time
import asyncio
import subprocess
import RPi.GPIO as GPIO

# Specify the GPIO Pin where the shut down button is connected to
shutdown_btn = 27
# Button state monitor interval (set every 0.5 second to avoid intense loop)
t_interval = 0.5
# Counter to be considered as shutdown (set to 2 seconds)
t_shutdown = 2

# Setting the GPIO as input will internal Pull-Up
GPIO.setwarnings(False)
GPIO.setmode(GPIO.BCM)
GPIO.setup(shutdown_btn, GPIO.IN, pull_up_down=GPIO.PUD_UP)

# Command for shutdown
shutdown_cmd = ['sudo', 'shutdown', '-h', 'now']
# Command for reboot
reboot_cmd = ['sudo', 'shutdown', '-r', 'now']


def shutdown_reboot(action_name, command):
    # Printing the action (Shutting down... or Rebooting...) to the STDOUT
    print (f'{action_name}...')
    # Executing the shut down or reboot
    subprocess.run(command)


def main(shutdown_btn, t_interval, t_shutdown):

    while True:

        # Wait to avoid intense loop
        time.sleep(t_interval)

        if GPIO.input(shutdown_btn) == False:
            # Button is pressed. Initialize the time counter
            time_count = 0
            while GPIO.input(shutdown_btn) == False:
                # Start counting the press time
                time.sleep(t_interval)
                time_count += 0.5

                # Shut down if the press time is more than t_shutdown
                if time_count >= t_shutdown:
                    shutdown_reboot('Shutting Down...', shutdown_cmd)

            # Reboot
            shutdown_reboot('Rebooting...', reboot_cmd)
            # Break the loop anyway
            break


if __name__ == '__main__':
    main(shutdown_btn=shutdown_btn, t_interval=t_interval, t_shutdown=t_shutdown)
Step 3: Make the Shut Down Button Program Automatically Run at Startup
To run the Shut Down Button Program automatically every time your Raspberry Pi is booted, follow the steps below:
- Open the rc.local file with nano text editor by typing the following command in the Terminal:
sudo nano /etc/rc.local - Modify the rc.local file by adding the following line before the exit 0 line:
python /home/pi/shutdown_button.py &
Make sure to use the file name and path of where you saved the Shut Down Button Program in the previous step. In this example, the complete path to the file is /home/pi/shutdown_button.py. - When done, close the file by pressing CTRL+X and confirm the saving with Y.
More options: How to Auto Start a Program on Raspberry Pi? (4 ways)
Step4: Reboot the Raspberry Pi and Test the Button
Reboot the Raspberry Pi (either by using sudo reboot from the Terminal or using the Shutdown Option in the desktop version).
When you reboot your Raspberry Pi, you can test the function of the button.
According to the code, the Raspberry Pi should reboot if the button is pressed momentarily (for about 0.5-1 second) and shut down if the button is pressed longer for more than about 2.5 seconds.
You can try to modify the time interval (in seconds) to check the button state and waiting time (in seconds) for shutdown by changing the t_interval and t_shutdown respectively.
Shutdown or Reboot on Program Error / Exception (Advanced)
Another interesting (but more advanced) way you can manage the shutdown or reboot of your Raspberry Pi is to trigger it in the event of a program error or exception.
You may consider a case where the Raspberry Pi functions as an edge computing or IOT device and needs to handle the program error or exception (can be any scenario) by rebooting or even shutting it down.
The implementation of this shutdown or reboot method depends on the application. So, we can only provide a code snippet to give you an idea of how to implement it.
Try Except
In Python, you can manage any exception (program execution error event) using try and except block. By knowing that the code within the except block is executed when there is an exception, we can put the command to reboot or shut down the Raspberry Pi.
The code snippet below illustrates how you can implement this scenario. The main program can be added inside the try block. In the following example, the program simply sleeps for 3 seconds and throws an exception. The exception will cause the code at the except block to be executed, which is calling the function shutdown() that shuts down the Raspberry Pi.
import time
import os
import subprocess

def shutdown():
    # Shutdown routine
    os.system('sudo shutdown -h now')
    subprocess.run(['sudo', 'shutdown', '-h', 'now'])

def main():
    try:
        # The main program can be written here
        print ('sleeping...')
        time.sleep(3)
        raise Exception ('shutting down')

    except:
        print ('Exception. Shutting down')
        shutdown()


if __name__ == '__main__':
    main()
It's a free PDF guide containing every Raspberry Pi Linux command you should know!
Download now
Reminder: Remember that all the members of my community get access to this website without ads, exclusive courses and much more. You can become part of this community for as little as $5 per month & get all the benefits immediately.
How to Deal with Usage When Proper Shutdown is Not Possible?
There are many possible applications where the Raspberry Pi functions in a way that the users have no access (or at least it is not convenient) to properly shut down the device. Examples of these applications are kiosk devices, and stand-alone video capture devices, just to name a few.
As I previously mentioned, the risk of SD card corruption is present when the write operation is cut abruptly. By knowing this fact, ‘Read-Only mode’ can be enabled in order to manage the risk of SD card corruption from improper shutdown.
In this mode, the ability for the Raspberry Pi to write new data (creating, changing, and deleting files) permanently to the SD card is disabled, so no permanent information can be written to the SD card.
The following are steps to enable the Read-Only mode:
- Step 1: Open the Terminal.
- Step 2: Open the Configuration Menu of the Raspberry Pi using the following command:
sudo raspi-config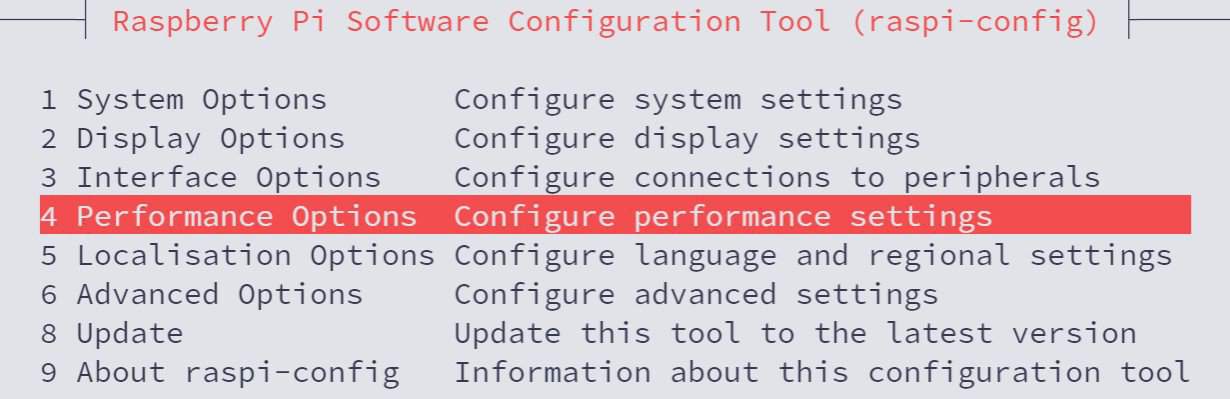
- Step 3: Select and enter Performance Options then Overlay File System.

- Step 4: The tool asks if you would like the overlay file system to be enabled.
Select “Yes” to enable it. Wait for the Raspberry Pi to update the normal root files. - Step 5: Press enter to confirm the message that the overlay file system has been enabled. A message confirming the ‘boot partition is to be write protected’ will appear. You can confirm this by selecting Yes and then hitting Enter.
- Step 6: Confirm the message that ‘The boot partition is now in read-only’.
- Step 7: Exit the configuration menu and reboot the Raspberry Pi using any method. After the reboot, the Raspberry Pi is completely in Read-Only Mode.
Note: to disable the Read-Only mode, follow the above steps and select No instead of Yes in Step 4.
Demonstration
To demonstrate that the Raspberry Pi is now in Read Only mode, you can follow the steps below:
- Create a new (empty) file. In the desktop version, this can be easily done by right-clicking on the desktop area and selecting New File. Note that the new file should now appear on the desktop.
- Reboot the Raspberry Pi.
- After the reboot, confirm that the newly created file is no longer present on the desktop.
Whenever you’re ready, here are other ways I can help you:
The RaspberryTips Community: If you want to hang out with me and other Raspberry Pi fans, you can join the community. I share exclusive tutorials and behind-the-scenes content there. Premium members can also visit the website without ads.
Master your Raspberry Pi in 30 days: If you are looking for the best tips to become an expert on Raspberry Pi, this book is for you. Learn useful Linux skills and practice multiple projects with step-by-step guides.
The Raspberry Pi Bootcamp: Understand everything about the Raspberry Pi, stop searching for help all the time, and finally enjoy completing your projects.
Master Python on Raspberry Pi: Create, understand, and improve any Python script for your Raspberry Pi. Learn the essentials step-by-step without losing time understanding useless concepts.
You can also find all my recommendations for tools and hardware on this page.