Headless Ubuntu Server Installation: A Comprehensive Guide
Setting up a Linux server when you don’t have a monitor has been tricky, and in some cases, impossible. This is now a thing of the past with Ubuntu Server’s new headless installation feature. Let me explain the process.
Ubuntu Server’s headless installation can be done using the autoinstall configuration file. The file contains essential setup parameters like partitioning, package selection, profile details, and network configuration – allowing for seamless deployment without needing physical interaction.
I will guide you through the entire process of this headless Ubuntu Server installation. You will also understand how the Ubuntu ISO file is built by extracting and repackaging its files. Finally, you’ll enjoy the automatic installation of your Linux server.
Pre-requisites for Ubuntu headless installation
Below are some requirements for this project.
Hardware and Software
- Download Ubuntu Server ISO:
The autoinstall feature only works with Ubuntu 20.04 LTS or newer versions. So, it’s best to choose the latest releases, like Ubuntu Server 22.04 LTS, for compatibility and to access the newest features. - A Linux distribution: The instructions described in this post will only work on most Linux systems. In my case, I am using Ubuntu. However, all the tools I have used can be installed on any other system, including Arch-based and RHEL-based distributions.
If you are on a Windows computer, I recommend setting up the Windows Subsystem for Linux (WSL) and installing Ubuntu.
If you are on macOS, the instructions in this tutorial will work perfectly. However, there might be a slight difference in how you install some of these tools. - 7-zip: This is a command line tool that allows users to create, modify, and extract files in various archive formats, including the widely used .zip and .7z formats.
If you are on Ubuntu, use the command below to install it:sudo apt install p7zip-full
If you are on macOS, use Homebrew.brew install p7zip - xorriso: This command line tool is used to create, manipulate, and extract ISO image files.
You can install it on Ubuntu using the command:sudo apt install xorrisoIf you are on macOS, use the command:brew install xorriso - Prepare the Server Hardware:
Once you’ve completed the configurations outlined in this tutorial, you’ll have an ISO file ready to install the Ubuntu server headless.
You can install the Ubuntu server on bare metal or as a virtual machine. Ensure each platform is connected to an active network and has a storage partition prepared for the server installation.
Optional skills
- Basic Command Line Experience:
We will get a little technical when preparing the autoinstall configuration file. We will execute several terminal commands and bash scripts.
This tutorial assumes you are well-versed with the Linux terminal commands. You don’t have to be a pro, but some experience would make the setup process much smoother. Going through our Linux command cheatsheet can be helpful.
Understanding the Ubuntu server auto-install feature
The auto-install feature allows you to install the Ubuntu server without needing a keyboard or display monitor.
Think of it as a “Plug n Play.” In most cases, you will find people calling this method an “unattended,” “hands-off,” or “preseeded” installation.
This feature is exclusively supported in Ubuntu Server 20.04 LTS or later and Ubuntu Desktop 23.04 LTS or later versions. Today, however, we will only talk about the server installation. You can try the same procedure for the desktop version and tell us your experience.
Ubuntu Server auto-installation Methods
There are two methods that you can use to install an Ubuntu server headless:
- Directly on the installation media: This method allows embedding the autoinstall configuration directly onto the installation media, allowing for automated setup during the installation process. This is the method that we will use for this tutorial.
This method embeds the autoinstall configuration file directly into the installation media, typically as a YAML file. This YAML file contains instructions dictating how the Ubuntu system should be configured during installation. - Providing #cloud-config user data: This method involves providing configuration directives within cloud-config user data during the boot process, which is then processed by cloud-init. This allows for automated configuration of various aspects of the system during initialization.
This method is widely used in cloud environments such as AWS, Azure, and Google Cloud Platform, but you don’t need to worry about that for this tutorial.
The structure of an auto-install config
You now understand the two methods available for configuring Ubuntu for auto-installation. For this post, we assume you intend to install Ubuntu Server on a VM or bare-metal without using cloud hosting solutions.
Therefore, we’ll opt for Method 1, which involves creating an auto-config YAML file containing all our instructions. This method is also known as preseeding.
To understand the auto-config file, let’s look at the auto-install file generated when I installed Ubuntu Server on my Virtual Box VM.
Yes! When you install the Ubuntu Server the usual way (manually), it will generate an auto-install file in the /var/log/installer directory. This file is named “autoinstall-user-data”.
Download your exclusive free PDF containing the most useful Linux commands to elevate your skills!
Download now

Now that you understand the auto-config file let’s prepare our Ubuntu ISO file for headless installation.
Steps to install Ubuntu “headless”
Let’s have a quick overview of the steps we will follow in this tutorial.
- Step 1. Extract the ISO file:
Here, we will extract the Ubuntu image files to manipulate them and add our configuration files. - Step 2. Configure auto-install data:
Here, we will prepare the autoinstall configurations, and create the autoinstall YAML file with all our custom options. - Step 3. Edit the Grub configuration file:
In this step, we will edit the Grub configuration file and add a custom “menu-entry” that will appear on the Ubuntu boot screen. - Step 4. Package the ISO file:
Finally, after all the configurations, we will package our files into a new ISO file that we will use to install Ubuntu headless. - Install Ubuntu server headless:
Using the ISO file we prepared, we can install the Ubuntu server headless as a virtual machine or on a bare-metal server.
Prepare Ubuntu ISO for headless Installation
I believe you already have your ISO file with you. Remember, it should be Ubuntu 20.04 LTS or later. In our case, we will be using Ubuntu 22.04 LTS.
Follow the steps below.
Step 1. Extract the ISO
As I said earlier, we will need to get a bit technical. Launch your terminal and use the ‘cd’ command to navigate to the directory where you have stored the Ubuntu Server ISO file.
To keep our working directory clean, let’s create a folder where we will put all the extracted files:mkdir source-files

Join Our Community!
Connect, learn, and grow with other Raspberry Pi enthusiasts. Support RaspberryTips and enjoy an ad-free reading experience. Get exclusive monthly video tutorials and many other benefits.
Learn more
Next, we need to extract the ISO file. Use the command below and remember to replace the indented part accordingly:7z -y x <Ubuntu-ISO-File-Name> -osource-files
Let’s look at this command in detail.
- 7z: This is a command-line utility for compressing and decompressing files.
- -y: This is an option for 7-Zip that stands for “yes.” It instructs 7-Zip to assume “Yes” as the answer to all prompts.
- x: This is the extract command for 7-Zip. It tells 7-Zip to extract files from the specified archive.
- <ubuntu-ISO-File-Name>: This is the placeholder for the name of your Ubuntu ISO file. Replace it with the actual name of the ISO file you want to extract.
- -osource-files: This is an option for 7-Zip that specifies the output directory where the extracted files will be placed. In this case, the extracted files will be placed in a directory named “source-files.” You can change “source-files” to any directory name of your choice.

After a successful extraction, navigate to the directory we created earlier, “source-files,” where everything was stored. You will notice several files and folders extracted when you ran the ls command on this directory.
Here, we are interested in one folder – [BOOT]- containing our boot images. I want us to move this folder up one directory as we will need it when packaging the ISO file.
Use the commands below:cd source-files
mv '[BOOT]' ../BOOT

If you’re new to the Linux command line, this article will give you the most important Linux commands to know, plus a free downloadable cheat sheet to keep handy.
Step 2. Configure auto-install data
Now, we have come to the sweetest part of this tutorial. That is preparing the auto-config file. This file will contain all the configurations we would have needed to do manually during the Ubuntu server installation.
Below is a sample auto-config file I prepared. I took the generated file when I manually installed the Ubuntu server on Virtual Box, then modified it a little.
#cloud-config
autoinstall:
  identity:
    hostname: raspberrytips
    password: $6$0pBFJFpldJ5c$8wHXpCwT3skkFsJ3Bg9c1lel3TQCr3Qn4U9n6HKucCN73MjKCGjMzv27P9eFw8Ow1uUdPFJy6.kW.GW97Yh.Z/
    realname: Raspberry Tips
  kernel:
    package: linux-generic
  keyboard:
    layout: us
    toggle: null
    variant: ''
  locale: en_US.UTF-8
  ssh:
    allow-pw: true
    install-server: true
  updates: security
  version: 1
  shutdown: reboot
Let us quickly go through this file in detail:
- autoinstall: This section contains directives for the automated installation process.
- identity: Specifies identity-related configurations such as hostname, real name, and password.
- hostname: Sets the hostname of the system to “raspberrytips.”
- password: Hashed password for the user account. I have looked at how to generate a Linux-hashed password in the section below.
- realname: Sets the user’s real name to “Raspberry Tips.”
- kernel: Specifies the kernel package to be installed (in this case, “linux-generic”).
- keyboard: Specifies keyboard layout configurations.
- layout: Sets the keyboard layout to “us”.
- locale: Sets the system locale to “en_US.UTF-8”.
- ssh: Specifies SSH-related configurations.
- allow-pw: Allows password-based SSH authentication.
- install-server: Installs the SSH server during setup.
- updates: Specifies update preferences (in this case, “security”).
- version: Specifies the version of the autoinstall configuration (version 1).
- shutdown: Specifies the action to be taken after installation completion (in this case, “reboot”).
Tip: You must have realized that my password looks gibberish. Linux stores passwords in the /etc/shadow file in an encrypted format. Therefore, that is the encrypted version of my password.
But how did I encrypt it? Follow the steps below.
Download your exclusive free PDF containing the most useful Linux commands to elevate your skills!
Download now
- First, make sure ‘mkpasswd’ is installed. It’s usually a part of the whois package. You can install it if you don’t have it:
sudo apt install whois - Once installed, you can use ‘mkpasswd’ to encrypt your password. For example:
mkpasswd -m sha-512
This will prompt you to enter the password you want to encrypt.
You can utilize my sample file above and modify it according to your preferences. Alternatively, you can visit the official Ubuntu page for a detailed understanding of the structure of the auto-config file.
We will modify our extracted ISO file and add this auto-config file. Use the ‘cd’ command and navigate to the ‘sources-files’ directory:cd sources-files
Here, we will create one directory, “server,” containing two files, “meta-data” and “user-data.” We will add our configurations inside the “user-data” file. The meta-data file is used for advanced configurations.
mkdir source-files/server
touch source-files/server/meta-data
touch source-files/server/user-data
Once done, please navigate to the server directory we created and open the user-data file using the nano editor shown below.
cd source-files
cd server
nano user-data
This is where we will add our configurations. In my case, I will paste the sample configurations I showed you earlier.

Once done, save the file Ctrl + S and exit Ctrl + X.
Step 3. Edit the Grub configuration file
While inside the sources-files directory, navigate to the “boot/grub” directory. You should see the grub configuration file when you run the ‘ls’ command.
cd boot/grub
ls
Tip: Be careful when running the “cd boot/grub” command. If you write “/boot/grub,” the directory will switch to your systems’ boot directory. That is a high risk as you will end up modifying your system’s boot files.
The first step is to change the permissions of the “grub.cfg” file, which is typically read-only by default. To accomplish this, we’ll use the ‘chmod’ command:chmod 644 grub.cfg

Now, we can comfortably edit the grub configuration file. I love using the Nano editor, but you can use Vim or any other editor you choose:sudo nano grub.cfg
The first parameter we will edit is the “set timeout.” When you start Ubuntu, you will see a boot screen that prompts you to select the image you want to boot. By default, the timeout is set to 30 seconds.
We will reduce it to 5 seconds because we don’t need to select anything. Remember, this is a headless installation:set timeout=5
Next, we’ll add a new “menuentry” to the grub.cfg file. Essentially, this means we’re adding another option that will appear on the Ubuntu boot screen.
It’s essential to place this new “menuentry” at the top of the existing entries so that it will be automatically selected during boot.
menuentry "Autoinstall Ubuntu Server" {
    set gfxpayload=keep
    linux   /casper/vmlinuz quiet autoinstall ds=nocloud\;s=/cdrom/server/  ---
    initrd  /casper/initrd
}
Let’s have an in-depth look at two parameters in this “menuentry” configuration:
- menuentry “Auto Install Ubuntu Server”: This line defines the menu entry’s title that will appear on the Ubuntu boot screen. In this case, it’s named “Auto Install Ubuntu Server”.
- linux /casper/vmlinuz quiet autoinstall ds=nocloud;s=/cdrom/server/ —: This line specifies the Linux kernel (vmlinuz) and its boot parameters:
- /casper/vmlinuz: Specifies the path to the Linux kernel image (vmlinuz) within the Ubuntu installation media.
- quiet: This parameter suppresses most boot messages, resulting in a quieter boot process.
- autoinstall: Indicates that the installation process should be automated using the autoinstall feature.
- ds=nocloud\;s=/cdrom/server/: Specifies the location of the cloud-init configuration data. In this case, it’s set to use a local directory (/cdrom/server/) on the installation media.
- —: Marks the end of kernel parameters.
Save the file and exit.

Step 4. Package the ISO file
Now that we have done our configurations, it’s time to package all our files into one ISO file that we can use to install the Ubuntu server.
To do that, navigate to the “source-files” directory and execute the command below:
xorriso -as mkisofs -r \
  -V 'Ubuntu 22.04 LTS AUTO (EFIBIOS)' \
  -o ../ubuntu-22.04-autoinstall.iso \
  --grub2-mbr ../BOOT/1-Boot-NoEmul.img \
  -partition_offset 16 \
  --mbr-force-bootable \
  -append_partition 2 28732ac11ff8d211ba4b00a0c93ec93b ../BOOT/2-Boot-NoEmul.img \
  -appended_part_as_gpt \
  -iso_mbr_part_type a2a0d0ebe5b9334487c068b6b72699c7 \
  -c '/boot.catalog' \
  -b '/boot/grub/i386-pc/eltorito.img' \
    -no-emul-boot -boot-load-size 4 -boot-info-table --grub2-boot-info \
  -eltorito-alt-boot \
  -e '--interval:appended_partition_2:::' \
  -no-emul-boot \
  .
Now, let’s have a quick look at some of the parameters I have used in this command.
- xorriso: The command-line tool for creating and manipulating ISO filesystem images.
- -as mkisofs: This option instructs xorriso to emulate the behavior of the mkisofs command, which is used for creating ISO images.
- -r: This option stands for “Rock Ridge” and enables Rock Ridge extensions, allowing longer file names and POSIX permissions to be stored in the ISO image.
- -V ‘Ubuntu 22.04 LTS AUTO (EFIBIOS)’: This option specifies the volume label of the ISO image as “Ubuntu 22.04 LTS AUTO (EFIBIOS).”
- -o ../ubuntu-22.04-autoinstall.iso: This option specifies the output file name and path for the generated ISO image.
- –grub2-mbr ../BOOT/1-Boot-NoEmul.img: This option specifies the Master Boot Record (MBR) file to be used for the ISO image. It points to the 1-Boot-NoEmul.img file located in the BOOT directory.
- -partition_offset 16: This option specifies the offset in kilobytes from the start of the ISO image where the partition table should be placed.
- –mbr-force-bootable: This option ensures that the MBR is marked as bootable, indicating that the ISO image can be used to boot a system.
- -append_partition 2 28732ac11ff8d211ba4b00a0c93ec93b ../BOOT/2-Boot-NoEmul.img: This option specifies the second partition of the ISO image, including its size and the path to its boot image (2-Boot-NoEmul.img).
- -appended_part_as_gpt: This option specifies that the appended partition should be treated as a GUID Partition Table (GPT) partition.
- -iso_mbr_part_type a2a0d0ebe5b9334487c068b6b72699c7: This option specifies the type of the ISO MBR partition.
- -c ‘/boot.catalog’: This option specifies the path to the boot catalog file, which contains information about the bootable images in the ISO image.
- -b ‘/boot/grub/i386-pc/eltorito.img’: This option specifies the path to the El Torito boot image used for BIOS booting.
- -no-emul-boot -boot-load-size 4 -boot-info-table –grub2-boot-info: These options configure the boot process for the ISO image, specifying that it should use El Torito booting without emulation, with a boot load size of 4 sectors, and including boot information for GRUB2.
- -eltorito-alt-boot: This option enables alternative El Torito booting, allowing additional boot configurations.
- -e ‘–interval:appended_partition_2:::’: This option specifies the boot image interval for the appended partition.
- -no-emul-boot: This option specifies that the boot image should not be emulated.
- .: This specifies the directory containing the files to be included in the ISO image.

This process should take a little time. Once done, navigate to the directory where you created the “sources-files” folder and run the ls command. You should see the new ISO file we just packaged, “ubuntu-22.04-autoinstall.iso.”

Install Ubuntu Server headless
That’s it! We have completed the complex part. Now you have an ISO file that you can use to install Ubuntu Server on a bare-metal server or as a virtual machine unattended.
If you want to install the Ubuntu server on a PC directly, you have to burn the ISO file to a USB drive. You can use many applications to do that, but I recommend Balena Etcher. Check out this article, which gives you a detailed guide to installing and using Balena Etcher.
If you are installing the Ubuntu server as a virtual machine using an app like VMware or VirtualBox, you don’t need to create a bootable USB drive. You only need the ISO file.
Tip: Some virtual machine software like VirtualBox tends to implement “unattended” installation features for various operating systems, including Ubuntu. However, we don’t want this feature for our ISO as it might interrupt the booting process. Therefore, ensure you tick the option “skip unattended installation.”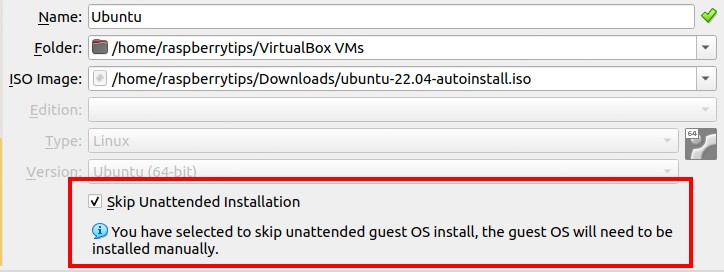
Download your exclusive free PDF containing the most useful Linux commands to elevate your skills!
Download now
Wrapping Up
After installing Ubuntu Server headless using autoinstall, you can proceed with configuration as you would with any other Ubuntu installation. Begin by ensuring all packages are up-to-date by running the following commands:sudo apt update
sudo apt upgrade
You may also enhance security by configuring the firewall or transitioning to SSH-key authentication instead of passwords.
For further customization and optimization of your server, consider exploring additional configurations such as setting up user accounts, installing specific software packages, or configuring services according to your requirements.
Download your exclusive free PDF containing the most useful Linux commands to elevate your skills!
Download now
Want to chat with other Raspberry Pi enthusiasts? Join the community, share your current projects and ask for help directly in the forums.
Additional Resources
Overwhelmed with Linux commands?
My e-book, “Master Linux Commands”, is your essential guide to mastering the terminal. Get practical tips, real-world examples, and a bonus cheat sheet to keep by your side.
Grab your copy now.
VIP Community
If you just want to hang out with me and other Linux fans, you can also join the community. I share exclusive tutorials and behind-the-scenes content there. Premium members can also visit the website without ads.
More details here.
Need help building something with Python?
Python is a great language to get started with programming on any Linux computer.
Learn the essentials, step-by-step, without losing time understanding useless concepts.
Get the e-book now.