How To Use ‘fdisk’: The Complete Linux Command Guide
Fdisk is a command line used on Linux to handle everything related to the partition table on a storage drive. But using it can be challenging, and with this kind of command, a mistake can mean losing all your data. We don’t want that, so let me explain how to use it safely.
In short, ‘fdisk’ is a command-line utility on Linux for managing partitions on a hard disk. It can list, create, modify or delete partitions on any storage device attached to the system.
You can use the table of contents below to go directly to what you’re looking for or read on to make sure you don’t miss anything.
Command syntax
The syntax for the ‘fdisk’ command looks like that:sudo fdisk <options> [device]
Here are a few explanations to clarify this syntax:
- sudo: Administrator privileges are required for everything when using fdisk, even to just list the current partitions, so using “sudo” as a prefix, or switching to root is mandatory.
- Options: There are a few options you can use directly in the command line to get information about a device or all devices. We’ll list them later.
- Device: This is optional, if not provided, you’ll get information about all connected devices and detected partitions. If used, it can be an entire drive (like /dev/sdb) or a specific partition (/dev/sdb1).
One important thing to know about fdisk is that there are two modes:
- Command-line mode: using the previous syntax, you’ll generally use that to see the existing partition table.
- Interactive mode: opening a more complete tool, where you can see but also edit the partition table for a specific device.
An analogy for these two modes is something like the ‘cat’ command (to see all the content of a text file) and the ‘nano’ command (to see and edit its content).
Usage examples
But let’s take a few typical examples of how to use ‘fdisk’ to make this a bit more concrete: listing the current partitions, creating a new partition table on a blank drive or expanding an existing partition (if there is space left on the device).
List partitions
To list existing partitions on a storage drive, the command syntax will look like this:sudo fdisk -l <device>
Download your exclusive free PDF containing the most useful Linux commands to elevate your skills!
Download now
Remember, sudo is mandatory to get administrator privileges, “l” stands for “list” and the device name is generally something like “/dev/sda” for the main drive, “/dev/sdb” for a secondary drive, etc.
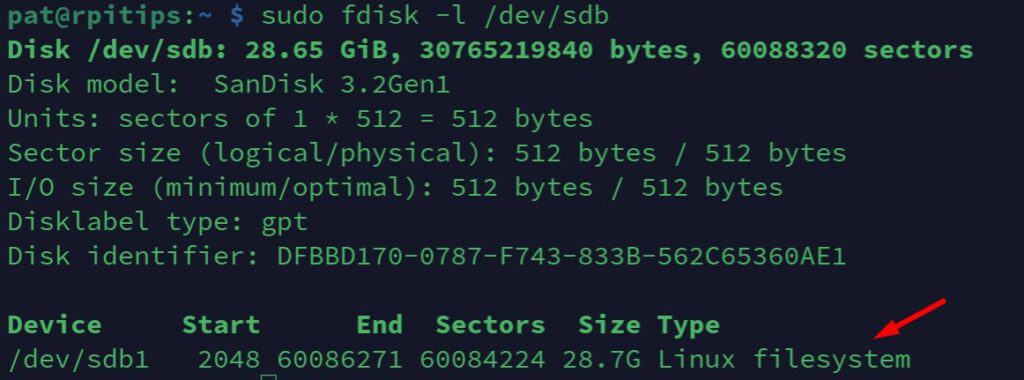
In my example, I have plugged in a USB drive, detected “/dev/sdb”, so I can see the partition table with:sudo fdisk -l /dev/sdb
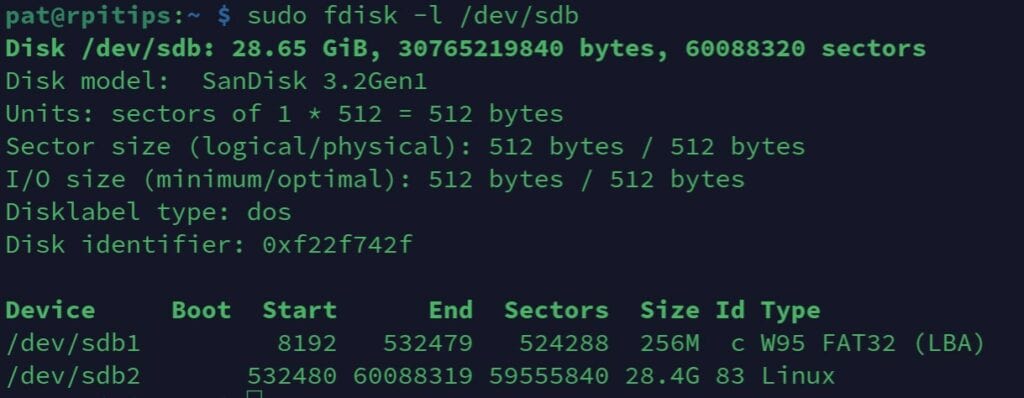
The output starts with information about the whole drive (SanDisk drive with 28.65 GiB, its identifier and format, etc.), then we have the current partition table (2 partitions, one of 256M formatted as FAT32, and another one, formatted for Linux, taking up the rest of the available space).
Yes, it’s the typical format of a drive for a Raspberry Pi installation, with a boot partition in FAT32, and the remaining space for the system files.

Join Our Community!
Connect, learn, and grow with other Raspberry Pi enthusiasts. Support RaspberryTips and enjoy an ad-free reading experience. Get exclusive monthly video tutorials and many other benefits.
Learn moreEdit partition table (interactive mode)
The next example will show you how to open ‘fdisk’ in interactive mode, to change the current partition table.
Warning: Editing partition tables can lead to loss of data when not done properly. If you’re doing this for the first time, or if you have important files on your system, make sure you have a full backup of all your drives somewhere.
First of all, make sure the disk is not currently in use. This means you can’t edit the system disk while it’s running, and you can’t edit a disk that’s automatically mounted by your operating system (most distributions do this when you plug a USB drive).
If it’s not the system disk, you can unmount it with:sudo umount <device>In my example:sudo umount /dev/sdb1
sudo umount /dev/sdb2
Once done, start ‘fdisk’ in interactive mode, with:sudo fdisk /dev/sdb
From there, you are inside the ‘fdisk’ tool with many commands available, most of them only requiring to type one character:
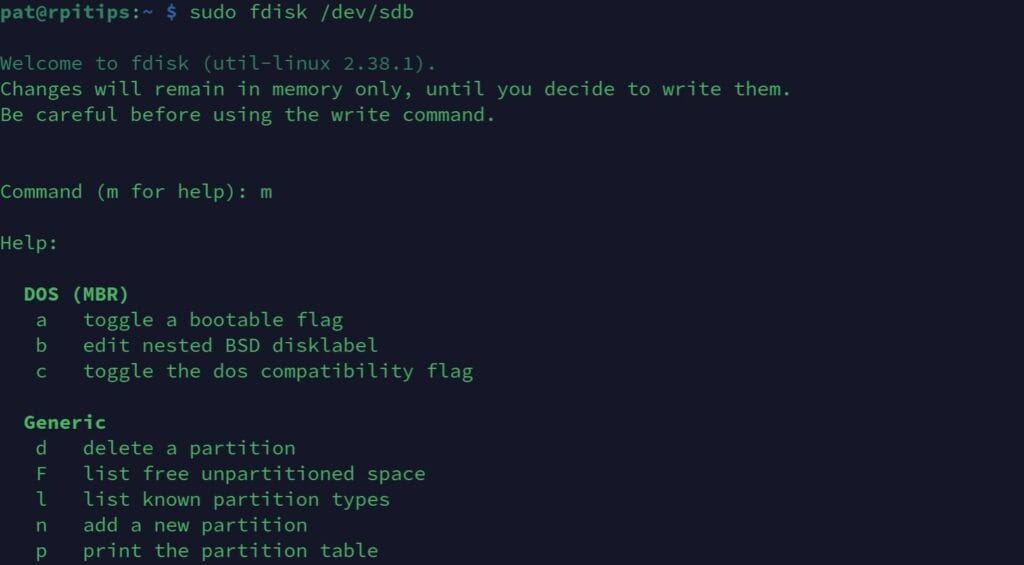
Type ‘m’ to see the list of options.
Download your exclusive free PDF containing the most useful Linux commands to elevate your skills!
Download now
From there, you can easily delete or create partitions.
A typical sequence with my device could be to delete all partitions and create a new one, taking all the device space. To do this, I’ll type:
- p: to show the current partition table.

It’s the same drive I used in the previous example, with a boot partition (256M in FAT32) and a big partition with the remaining space. - g: to create a new partition table from scratch (and remove everything).

- n: to create a new partition. It will ask a few questions (partition number, first and last sector to set the size of the partition).

Keeping the default value will generally use all the available space, but you can change that by specifying exactly what you want (like “+1G” for a 1GB partition). - You can use ‘p‘ again to make sure the changes correspond to what you want.
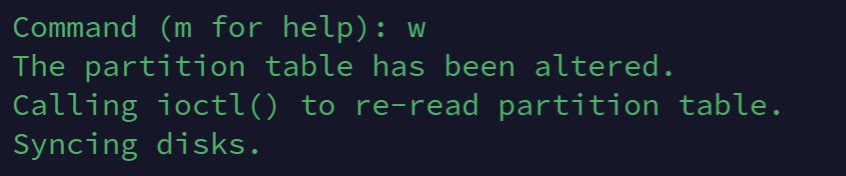
- w: to write the change on the drive.
Now, if I use “fdisk -l” again, I can see that I only have one big partition on the same disk:
Expand a partition
Fdisk is also often used to expand partitions. Most distributions now do this automatically during the system installation, but it used to be one of the first steps after installing a new operating system.
Let’s say, for example, that I have this drive:
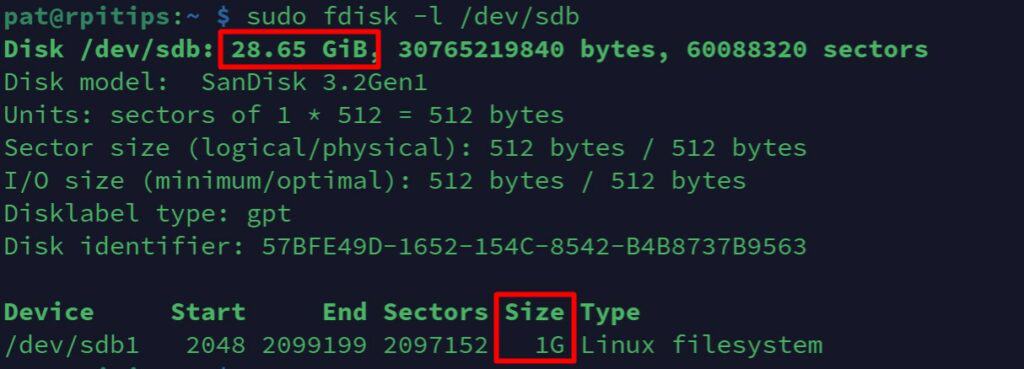
It’s a 32GB USB drive (/dev/sdb), with a partition on it (/dev/sdb1) that is only 1G. I would like to increase its size to use the maximum space available.
You can do it by entering the interactive mode:sudo fdisk /dev/sdbAnd then following this sequence:
- d: To delete the existing partition.
Yes, it’s scary if you have files on it, but don’t worry too much, you shouldn’t lose anything (and you have a backup, right?). - n: Create the new partition. You’ll now recreate it, using the default parameters if you want to use all the space available.
- w: Write the changes and exit.
You may need to use another command to make sure your system sees the full size after that:sudo resize2fs /dev/sdb1
Then mount it via the system interface or the mount command.
After doing this, my partition is now using the full disk.
You can use this command to see the mounted partitions:sudo df -h
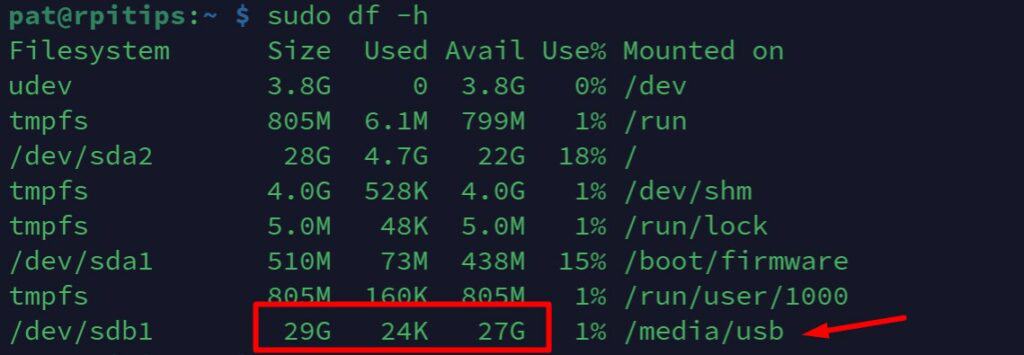
And I didn’t lose anything, after mounting my partition again. I can still access the files that were on it before :-).
Main options
Here is a summary of the main options available in command-line mode:
- -l: Lists the partition tables for the specified devices and then exits.
- -s: Prints the size of a partition (in blocks).
- -x: Lists extra details not included in the standard display.
- -v: Displays the version of fdisk.
- -u: Changes display/entry units (cylinders or sectors).
- -b: Sets the sector size (512, 1024, 2048, or 4096 bytes).
- -V: Prints the version and exits.
- -h: Displays help information.
Use man for command line list of options:man fdisk
If you enter the interactive mode, you can type ‘m’ to see all the options, but here are the most important ones to remember:
p: Prints the partition table. This command is essential for viewing the current layout of the disk, including the size and order of partitions.n: Adds a new partition. It’s one of the most commonly used commands, allowing you to create a new partition by specifying its type, start, and endpoints.d: Deletes a partition. This command is used to remove an existing partition from the disk.t: Changes a partition’s system ID. This command is useful for changing the type of a partition, such as from Linux to Windows or vice versa.w: Writes the changes to the disk and exits. This command saves all made changes and is crucial to finalize the partitioning process.q: Quits without saving changes. If you make a mistake or change your mind, this command exitsfdiskwithout applying any changes.m: Displays help. This command lists all available commands infdiskinteractive mode, useful for beginners or as a quick reference.
Tips
Here are a few tips to make sure you’re using ‘fdisk’ the right way and not lose your data when doing so:
- Make sure you have a backup: Whether you use ‘fdisk’ or any other tool to change the partition table on a disk, we can’t guarantee everything will go as expected.
This command changes the drive structure at a low level, and there is a chance that you could lose everything if there is an error, a power failure, or simply if you use the wrong parameter. A full backup of your hard drive is highly recommended (and make sure you know how to restore it from scratch). - Use ‘sudo’: As mentioned earlier, administrator privileges are required to see or edit the partition table. Make sure you prefix all your commands with ‘sudo’ or it won’t work.
- Unmount partitions: If the command doesn’t work, make sure the drive or partition has not been mounted automatically by your system. It’s often the case, especially if you have a desktop environment. Use the ‘umount’ command to unload the disk while keeping it accessible for ‘fdisk’:
sudo umount /dev/sdb1
You can also use the ‘Eject’ feature in your interface if you have a GUI.
Alternatives
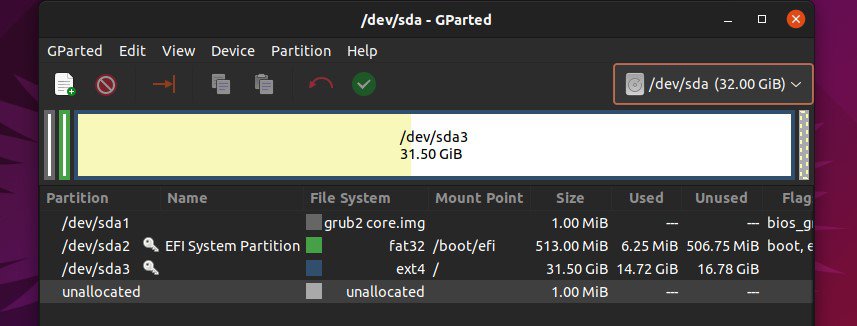
If using ‘fdisk’ as explained here feels a bit scary (it’s normal), there are great tools out there to do the same thing in a more user-friendly way. One of them is ‘Gparted’, available in most distributions via the package manager.
It allows you to do the same things, with a visual interface, looking like this:
Even I, after so many years of experience with Linux, will still boot to a live system like Ubuntu to change the partition table if it’s on a critical disk. Do it if you’re not comfortable with the command line, it’s fine.
It allows you to visually see your changes before applying them, reducing the chance of losing data or doing something completely wrong.
Related questions
How are storage devices and partitions named on Linux?
On Linux, storage devices are identified by specific names like /dev/sda or /dev/sdb. Each device name represents a physical disk, with /dev/sda being the first disk, /dev/sdb the second, and so on.
Partitions are numbered after each disk name, such as /dev/sda1 for the first partition on the first disk. It’s essential to correctly identify the disk you want to work on with fdisk to make sure you’re editing the right one.
Download your exclusive free PDF containing the most useful Linux commands to elevate your skills!
Download now
Going further
- How To Mount a USB Drive On The Raspberry Pi (3 ways)
- How To Install & Use Gparted On Raspberry Pi (Partition editor)
- How to Format a USB drive on Raspberry Pi
Download your exclusive free PDF containing the most useful Linux commands to elevate your skills!
Download now
If you are looking for exclusive tutorials, I post a new course each month, available for premium members only. Join the community to get access to all of them right now!
Additional Resources
Overwhelmed with Linux commands?
My e-book, “Master Linux Commands”, is your essential guide to mastering the terminal. Get practical tips, real-world examples, and a bonus cheat sheet to keep by your side.
Grab your copy now.
VIP Community
If you just want to hang out with me and other Linux fans, you can also join the community. I share exclusive tutorials and behind-the-scenes content there. Premium members can also visit the website without ads.
More details here.
Need help building something with Python?
Python is a great language to get started with programming on any Linux computer.
Learn the essentials, step-by-step, without losing time understanding useless concepts.
Get the e-book now.