Getting Started with Node-RED on Raspberry Pi
Node-RED is a powerful tool that is often used on Raspberry Pi, but weirdly is no longer available by default on Raspberry Pi OS. If you’re looking to install it on your Pi but are unsure where to start, this is the tutorial you are looking for. I’ll guide you through the entire process step-by-step.
Node-RED can be installed on Raspberry Pi with only one command typed in the terminal. There is an installation script available that does everything in the background (installing Node.js and Node-RED itself).
Let’s start with the prerequisites (there aren’t many), and we can then move on with the installation and the first steps to use the Node-RED editor safely and correctly.
If you’re looking to quickly progress on Raspberry Pi, you can check out my e-book here. It’s a 30-day challenge where you learn one new thing every day until you become a Raspberry Pi expert. The first third of the book teaches you the basics, but the following chapters include projects you can try on your own.
Prerequisites: Getting your Raspberry Pi ready
Node-RED is one of the most frequently used applications on the Raspberry Pi. It’s supported by most Raspberry Pi distributions and should work well on any model of Raspberry Pi.
I’m testing this for you on my Raspberry Pi 4 with Raspberry Pi OS 64-bit (Bullseye) but it should work the same way on any Raspberry Pi OS version.
You can follow the same steps on most Debian-based distributions (like Ubuntu or DietPi). The method we are using should automatically check and install the missing requirements.
Here are just a few steps I recommend doing before starting the installation:
If like me, you always mix the languages syntax, download my cheat sheet for Python here!
Download now
- (Optional) Enable SSH or VNC: If you have a better setup on your main computer than on the Raspberry Pi itself, using VNC or SSH allows you to follow this tutorial from your computer and just copy/paste the commands directly.
Check the links below if you don’t know how to do this:
⇒ Use SSH To Remote Control Your Raspberry Pi: A complete guide
⇒ Getting Started With VNC on Raspberry Pi: A Complete Guide - Update your system: To avoid any conflict or issue during the installation, make sure your system is up-to-date before going any further:
sudo apt update
sudo apt upgrade -y
Are you a bit lost in the Linux command line? Check this article first for the most important commands to remember and a free downloadable cheat sheet so you can have the commands at your fingertips.
It's a free PDF guide containing every Raspberry Pi Linux command you should know!
Download now
Installing Node-RED on Raspberry Pi
Even if Node-RED is no longer pre-installed on Raspberry Pi OS, installing it on your operating system is not complicated. You can use the package manager to do this, but it’s recommended to install it manually instead.
From the package manager (old version)
If you are using Raspberry Pi OS, you may have noticed that Node-RED is available as a package via the package manager (APT).
If you use “apt search” or the “Add/Remove Software” tool, you’ll find it listed:

Join Our Community!
Connect, learn, and grow with other Raspberry Pi enthusiasts. Support RaspberryTips and enjoy an ad-free reading experience. Get exclusive monthly video tutorials and many other benefits.
Learn more
The issue with this is that it’s generally not the latest version. In my screenshot, you can see that it’s only version 2.2.3 in the repository while version 3.0.2 is already available at the time of writing.
If you are lucky and get a recent version in the repository, or if you don’t care about the version, you can install it with apt:sudo apt install nodered
But I recommend following the next steps instead.
Get the latest version
To install the latest version of Node-RED on Raspberry Pi, including all the dependencies, it’s recommended to use their installation script available on GitHub.
Here are the steps to do this, the script will do all the background tasks for you:
- Open a terminal, or connect via SSH to your Raspberry Pi.
- In the terminal, type and run this command:
bash <(curl -sL https://raw.githubusercontent.com/node-red/linux-installers/master/deb/update-nodejs-and-nodered) - It will download the editor’s installation script from their GitHub repository.
You will get a warning message like this: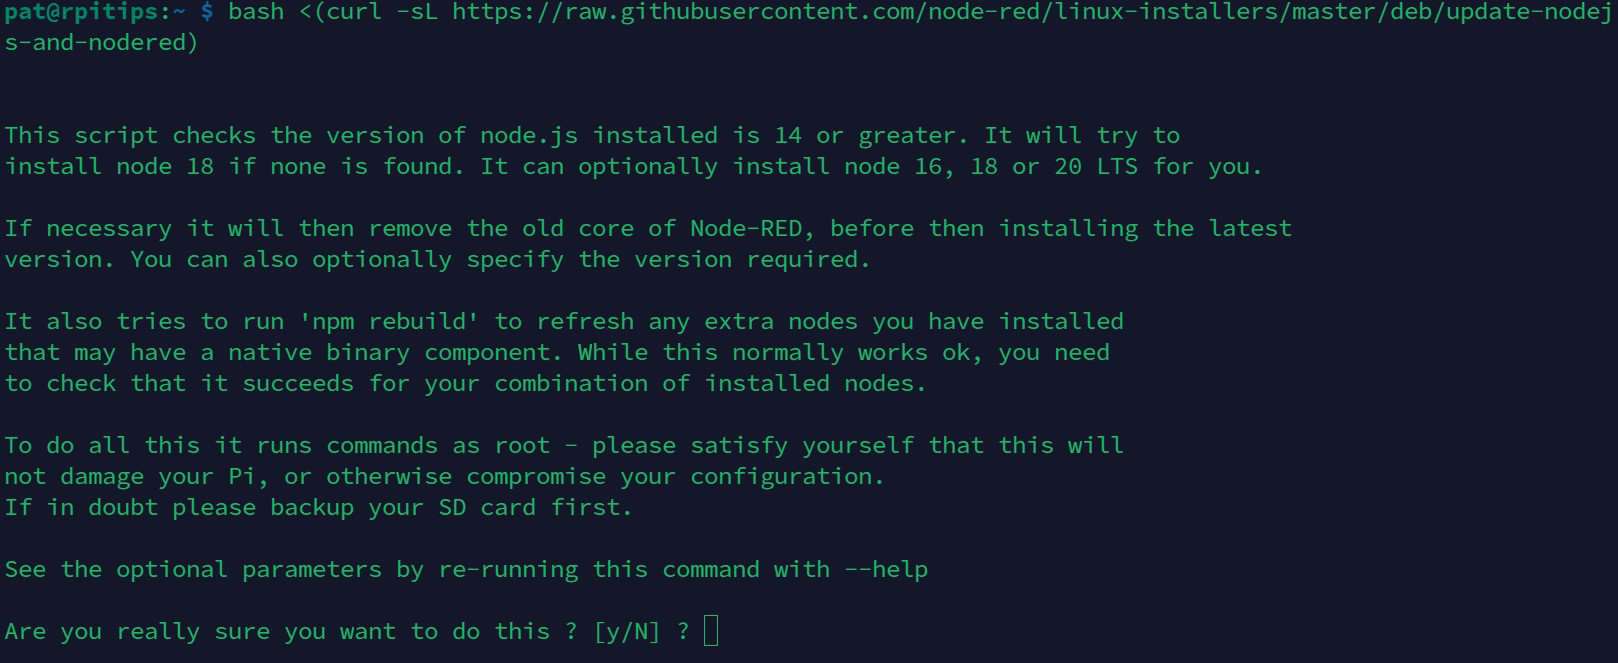
- Read it carefully, and press “y” to accept the conditions.
You should be particularly careful if you already have Node-RED installed or if you use Node.js for other projects. But if it’s your first time trying this, there is no risk. - It will ask if you want to install extra Pi nodes (optional) and start the installation.
It shows the progress with green ticks like this: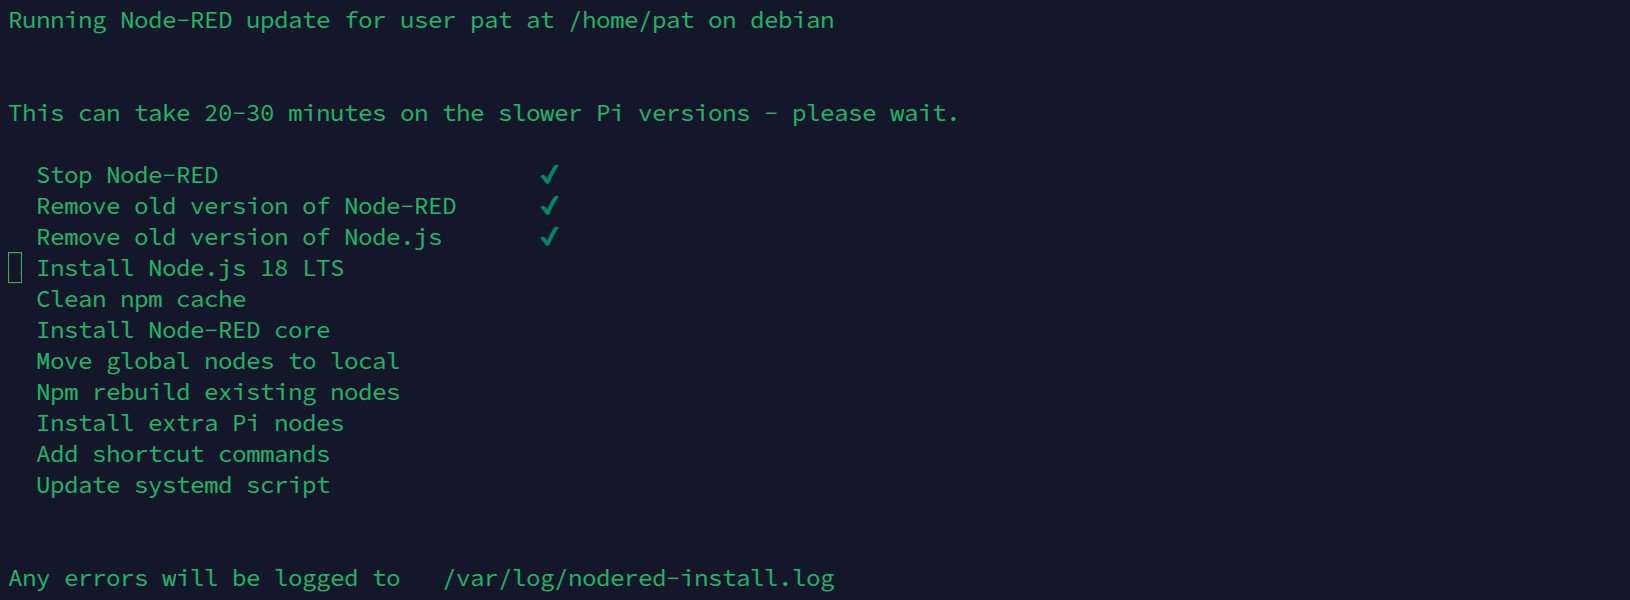
- After a few minutes, the installation will be completed and you’ll get a message it was successful:

You may get some security warnings after that but don’t worry for now, I’ll guide you with the additional steps.
It's a free PDF guide containing every Raspberry Pi Linux command you should know!
Download now
If you are looking for exclusive tutorials, I post a new course each month, available for premium members only. Join the community to get access to all of them right now!
Your First Steps with Node-RED on Raspberry Pi
Node-RED runs as a service with a web interface to do everything. Before going any further, it’s recommended to secure your installation, at least by adding a login and password. I’ll then show you how to access the interface.
If like me, you always mix the languages syntax, download my cheat sheet for Python here!
Download now
Securing your Node-Red setup
While you are in the terminal, I recommend adding some security measures to protect your installation:
- First, use this command to create your configuration file and set a user and password:
node-red admin init
The most important step is to create a username and password.
It will also ask questions about your preferences. It doesn’t matter what you decide, but make sure to set a username and password in the first steps.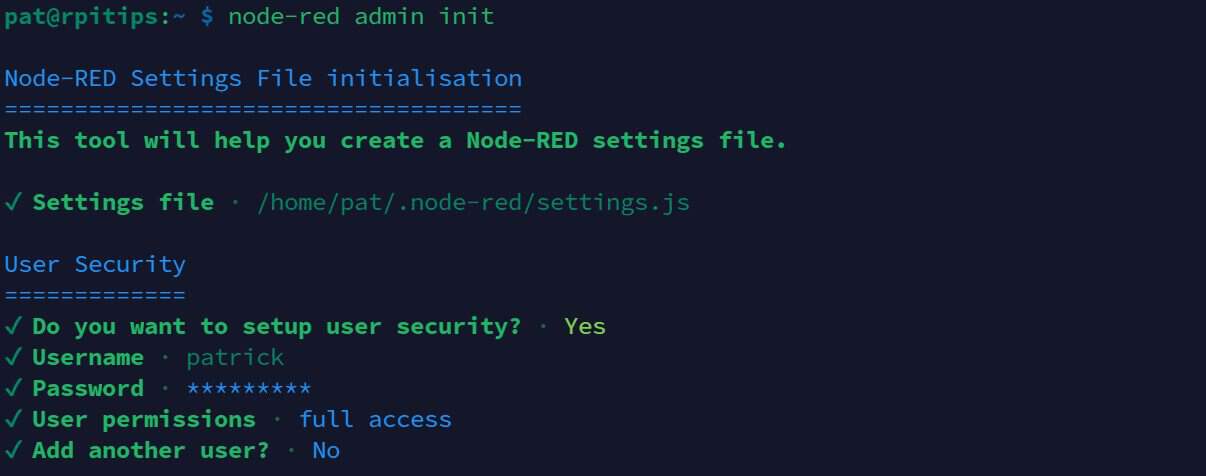
You can create different users with specific access levels if you want or need them. - If you are concerned about someone else using sudo to modify your Node-RED configuration, an extra step might be to make sure the password is always asked for when using sudo.
They recommend doing this by removing this file:sudo rm -f /etc/sudoers.d/010_pi-nopasswd
It’s particularly useful on older Raspberry Pi versions, or if physical access to the Raspberry Pi is possible. But it’s not mandatory (and will change the sudo behavior for everything, not just Node-RED).
You might also be interested: 17 Security Tips To Protect Your Raspberry Pi Like A Pro
Run Node-RED for the first time
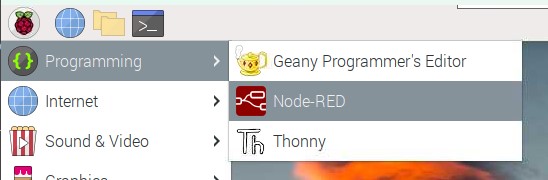
If you have a desktop environment installed, you can run the Node-RED interface directly from the main menu. The shortcut is available under the “Programming” category:
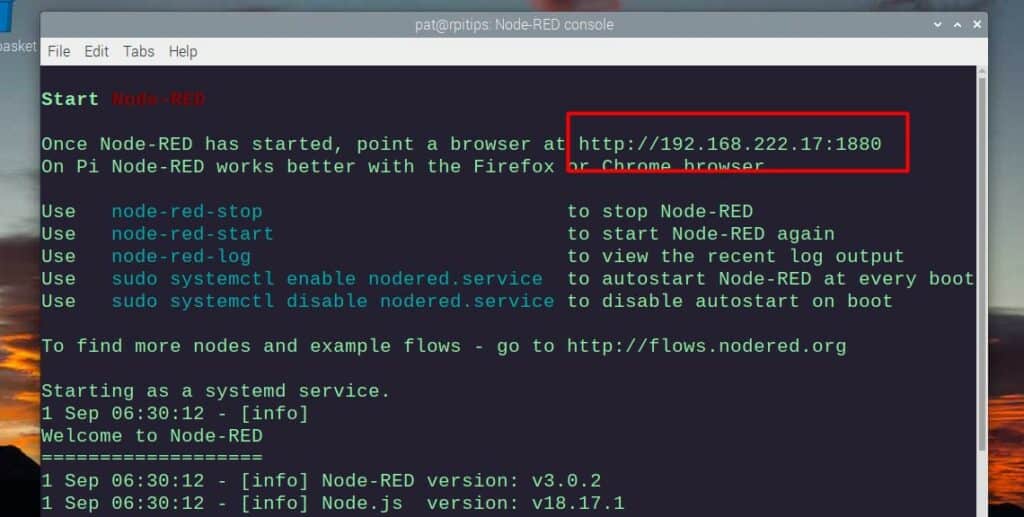
A terminal will show up with the web interface URL and the logs:
If you are running Raspberry Pi OS Lite or connected via SSH, you can get something similar by starting the service manually with:node-red-start
Accessing the Node-RED web interface
Once the service starts, you can access the web interface which is automatically on port 1880 (HTTP).
There is a link in the terminal where you just started Node-RED, or you can simply open a web browser and type the URL:
- From the Raspberry Pi:
http://localhost:1880 - From another computer on the network:
http://[IP-ADDRESS]:1880You can read this article to find the IP address of the Raspberry Pi if you don’t know how.
You’ll get a login form like this:
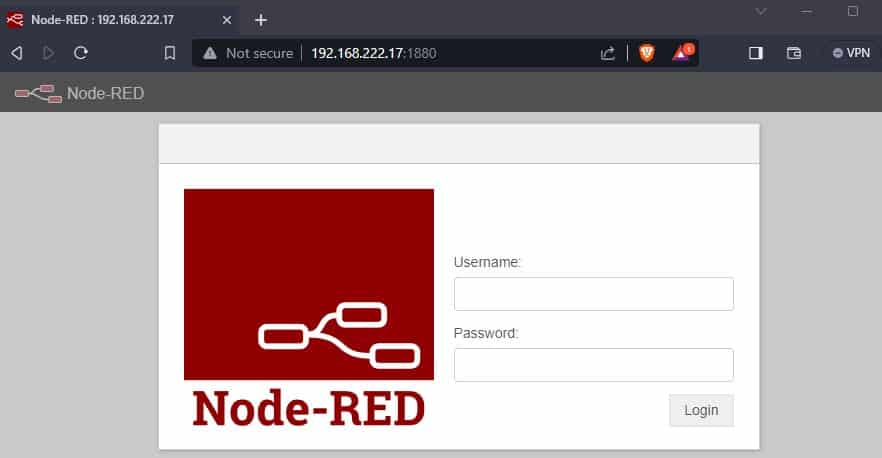
Type the username and password we just set for Node-RED.
Once connected, you’ll get a welcome message introducing you to the Node-RED interface.
You’ll then have access to the full editor to create your first flow:
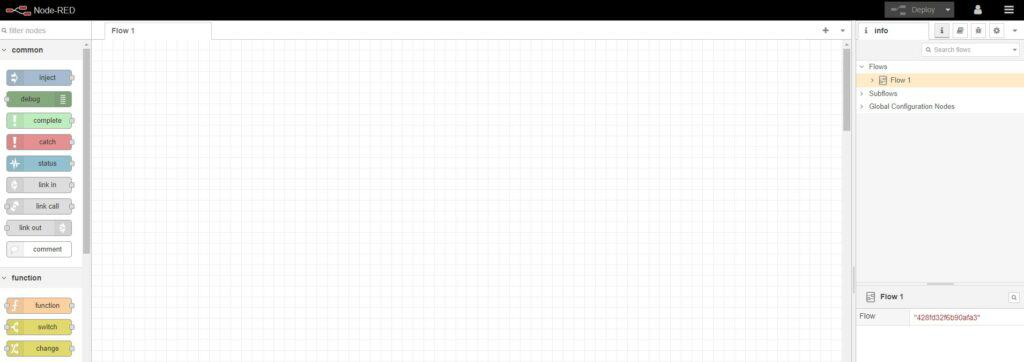
You can import examples from the main menu if it’s your first time there so you can better understand how it works.
And there is pretty good documentation available on the official website (here) if you need help to get started.
Node-RED essential commands
We have seen how to start the service, but there are a few other commands you should know about.
Firstly, if you want to stop the service, closing the terminal won’t do it. You have to run this command instead (in another terminal, or after doing CTRL+C in the current one):node-red-stop
If you are serious about it and use Node-RED regularly, a better option is to program it to start automatically on boot.
You can activate the Node-RED service to start on boot by using this command:sudo systemctl enable nodered.service
In this case, you don’t have to worry, it will run in the background all the time and can access the web interface directly.
If you want to get the same interface as previously to check the logs, you can use this command at any time:node-red-log
Whenever you’re ready, here are other ways I can help you:
The RaspberryTips Community: If you want to hang out with me and other Raspberry Pi fans, you can join the community. I share exclusive tutorials and behind-the-scenes content there. Premium members can also visit the website without ads.
Master your Raspberry Pi in 30 days: If you are looking for the best tips to become an expert on Raspberry Pi, this book is for you. Learn useful Linux skills and practice multiple projects with step-by-step guides.
The Raspberry Pi Bootcamp: Understand everything about the Raspberry Pi, stop searching for help all the time, and finally enjoy completing your projects.
Master Python on Raspberry Pi: Create, understand, and improve any Python script for your Raspberry Pi. Learn the essentials step-by-step without losing time understanding useless concepts.
You can also find all my recommendations for tools and hardware on this page.