The ‘screen’ Command on Linux: A Beginner’s Guide
Screen is one of the best commands I’ve learned as a developer. I can’t tell you the number of times I’ve run long PHP scripts on servers and never got the result because my computer went to sleep. Using ‘screen’ is a great way to avoid this.
Screen is a program that allows multiple sessions within a single terminal. Each session works independently and continues running even if the user is disconnected. It is useful for managing different tasks simultaneously in a terminal and maintaining long program operations on servers.
The problem is that it’s not necessarily intuitive to use, which is why I created this guide. I’ll introduce the command and give you some useful examples so you can start using it right away. I’ll also list the most useful options and shortcuts, so you don’t have to read the entirety of the guide.
Installation
While ‘screen’ is a very useful command, it isn’t necessarily pre-installed on all distributions. You might need to use the package manager to install it on your Linux computer or server.
For example, on Debian-based distributions:sudo apt install screen
If you’re new to the Linux command line, this article will give you the most important Linux commands to know, plus a free downloadable cheat sheet to keep handy.
Command syntax
The main syntax for the screen command looks like this:screen <options> <parameters>
It isn’t very useful without examples, so I’ll give you some in the next section. But in short, parameters often refer to the session or command you want to manage, and options to what you intend to do with that session (create a new one, access an existing one, etc.).
It's a free PDF guide containing every Raspberry Pi Linux command you should know!
Download now
Usage examples
Let’s take a few concrete examples of how to use “screen” in your day-to-day life to make things clearer.
Starting a new screen session
The idea with “screen” is to create a sub-session in your terminal that will continue to run in the background even when you’re disconnected. So one of the first commands you’ll need to know is how to create one.
To start a new session, you can simply use:screen -S <session_name>

Join Our Community!
Connect, learn, and grow with other Raspberry Pi enthusiasts. Support RaspberryTips and enjoy an ad-free reading experience. Get exclusive monthly video tutorials and many other benefits.
Learn moreFor example:screen -S mysession
After you type this command, you’ll be connected to the session (as if you were opening another terminal), and any commands or scripts you run after that will be executed within that session (“attached” to the session is the right term).
Detaching and reattaching a screen session
By default, you’re automatically “attached” to the session when you start one. But there are options and shortcuts to go back to your main session (“detach” from the newly created session) and then to go back to it (“reattach”).
The first thing you can do is to disconnect from the current screen session while it is still running in the background (especially if you are running a long script or command). To do this, press the keys “CTRL+A +D”. You’ll get a message like this:

It says “remote detached from mysession”. The session I named “mysession” is still running, but I’m no longer tracking it from this terminal, I’m back to the normal terminal session.
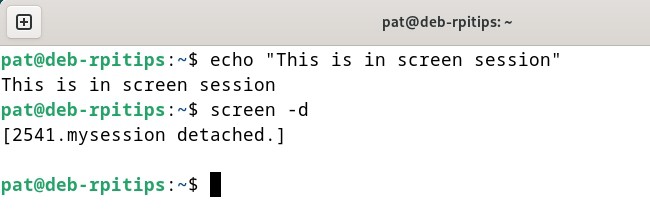
Another way to do something similar is to use the command:screen -dIf you’re in a screen session, you’ll be disconnected from it, just like with the keyboard shortcut. The problem is that this only works if you don’t have a command or script running.
Finally, the third way to disconnect from the newly created session is to simply close your terminal application or SSH client. The session will continue to run on the Linux system, but of course, you won’t be connected to it to see what’s going on.
It's a free PDF guide containing every Raspberry Pi Linux command you should know!
Download now
At any time, you can reattach your terminal to an existing session, by using its name and the “-r” option, like this:screen -r mysession
Once you understand these three key operations (“create”, “detach” and “reattach”), you can benefit from using the “screen” command in your everyday work. But let’s explore a few more interesting options now.
Running a command in a detached session
If your main use of the screen command is to run long scripts in the background, you can speed up things a bit by adding a few options to your command.
With this command, instead of creating a session, running your script and then exiting the screen session, you do everything at once:screen -dmS <session_name> <command>

You already know most of these options:
- -S: Create a new session, with the name in the parameter.
- -d: Detach the screen session from the terminal (in this case it does it right away, no need to use CTRL+A+D).
- -m: The only new one here. Force “screen” to create a new session (whether already in a screen or not), the new session will be in “detached” mode.
This command can also be useful for startup scripts, for example. This way, it starts automatically, runs in the background, and you can always access the corresponding terminal to see what’s going on.
Main options
Here is a summary of the main options you can use with the “screen” command:
- -S: Start a new session with a given session name.
- -d: Detach a screen session (disconnect from the terminal).
- -r: Reconnect a disconnected screen session.
- -ls: List all screen sessions.
- -x: Connect to an undetached screen session (without this, only one user can access one session, and you can’t access it if it’s already attached somewhere).
Main shortcuts
I also mention that there are some shortcuts you can use with “screen”.
Here are a few interesting ones to have in mind:
- Ctrl-A + d: Disconnect from the current session.
- Ctrl-A + c: Create a new window.
- Ctrl-A + n: Go to the next window.
- Ctrl-A + p: Go to the previous window.
- Ctrl-A + “: Present a list of all windows for selection.
- Ctrl-A + A: Rename the current window.
Warning: the uppercase A is important, CTRL-A + a will only switch to another window.
Note: I didn’t mention it, but windows within screens are like tabs you can create to do different things inside the same session. So creating a new window is like opening a new tab, and then you can switch from one to another with these shortcuts.
It's a free PDF guide containing every Raspberry Pi Linux command you should know!
Download now
Tips
Terminate a screen session
All screen sessions will be closed on system reboot, but it’s also possible to quit a “screen” session with:exit
It’s called “terminating” a session.
The shortcut equivalent to this is “CTRL + D”. So make sure to not forget the A when you do “CTRL + A +D” to detach from the current session, or you’ll terminate it :-).
Teamwork with screen sessions
If you are working in a team on the same server, it’s possible to share your screen sessions with the other members. If you are running an essential script in a screen session, anyone with the right access level can join it and see what’s going on.
But even better, we’ve seen that it’s possible to have the same session open in multiple terminals (with “-x”), so you can even use it for showing something to another member, pair programming, or similar teamwork tasks.
Run a Minecraft server in a screen session
This is more of an example than an additional tip, but to share my experience with this command.
I’ve been running a Minecraft server for years. And if you don’t know, a Minecraft server is basically a script that needs to be running all the time. If you close your session or get disconnected, the server crashes, all players are disconnected, some items and progress are usually lost, and no one can access it until you restart it.
If you’re hosting a public server, you can’t afford to have that kind of experience. So using a screen to run it helps a lot to make sure the server is available 24/7.
It's a free PDF guide containing every Raspberry Pi Linux command you should know!
Download now
Reminder: Remember that all the members of my community get access to this website without ads, exclusive courses and much more. You can become part of this community for as little as $5 per month & get all the benefits immediately.
Additional Resources
Overwhelmed with Linux commands?
My e-book, “Master Linux Commands”, is your essential guide to mastering the terminal. Get practical tips, real-world examples, and a bonus cheat sheet to keep by your side.
Grab your copy now.
VIP Community
If you just want to hang out with me and other Linux fans, you can also join the community. I share exclusive tutorials and behind-the-scenes content there. Premium members can also visit the website without ads.
More details here.
Need help building something with Python?
Python is a great language to get started with programming on any Linux computer.
Learn the essentials, step-by-step, without losing time understanding useless concepts.
Get the e-book now.