How To Connect Ubuntu To Your Wi-Fi (Desktop & Server)
Ubuntu is a great Linux distribution for beginners, with most things being intuitive enough to get started quickly. It doesn’t mean that everything is easy. One of the first steps will be to connect your computer or server to the Internet, and you may need some help, especially with a Wi-Fi connection. Well, you’re at the perfect place, as I’ll show you 5 ways to do it!
The easiest way to connect to a Wi-Fi network on Ubuntu is to do it during the installation. After that, you can always switch to another network from the system settings on by editing the netplan configuration file.
Don’t worry if this short answer doesn’t apply to you, I’ll give you the step-by-step process to do it in all situations. I’ll start with the Desktop version, and then show you how to do the same thing on a Server edition (or via SSH).
How to connect to Wi-Fi on Ubuntu Desktop
There are 3 ways to connect to a Wi-Fi network on Ubuntu Desktop:
– During the installation, if your card is detected.
– From the top-right corner shortcuts once on GNOME.
– Or from the system settings, under the network section.
Let’s learn how to use each one.
Connecting to Wi-Fi during the installation
The easiest method to connect to your Wi-Fi on Ubuntu Desktop is to do it during the installation.
Ubuntu comes with most drivers, and unlike my issues with Debian lately, my wireless card was detected properly with the latest Ubuntu version.
After asking for your language, and keyboard layout, the installation wizard should give you an option like this:

You can then check the box “Connect to this network” and pick your SSID in the list.
Download your exclusive free PDF containing the most useful Linux commands to elevate your skills!
Download now
You’ll then enter your Wi-Fi password and get connected to it immediately.
I don’t think you can use the WPS feature during the installation (or at least it’s not mentioned on this form).
It’s a good idea to do it during the installation, because you’ll get access to the system updates directly once connected, and Ubuntu will start downloading the updates during the installation process.
Note: If you have any issues at this point, and can’t connect to a Wi-Fi network during the installation, I recommend starting with an Ethernet cable. This will you’ll get the system updates, and should download the missing driver. You can then follow the next steps after that.
Connect to Wi-Fi from the top-right corner shortcut
If you didn’t connect your computer to your Wi-Fi during the installation or if you need to switch to another network, you can easily do it from the shortcuts on the Ubuntu Desktop interface. By default, they are located in the top-right corner, and look like this:

Join Our Community!
Connect, learn, and grow with other Raspberry Pi enthusiasts. Support RaspberryTips and enjoy an ad-free reading experience. Get exclusive monthly video tutorials and many other benefits.
Learn more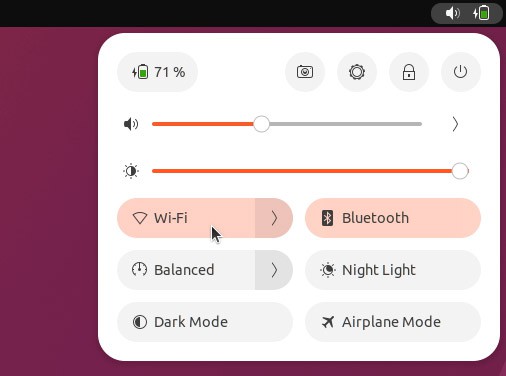
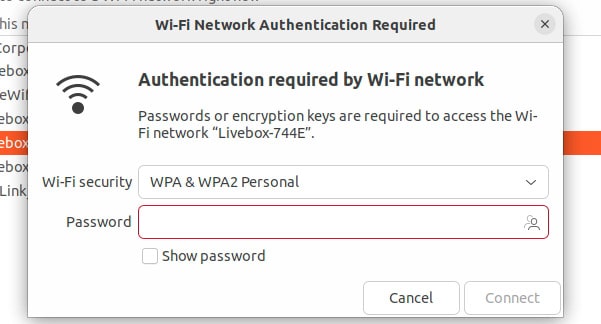
Click on “Wi-Fi” and pick your SSID in the list:
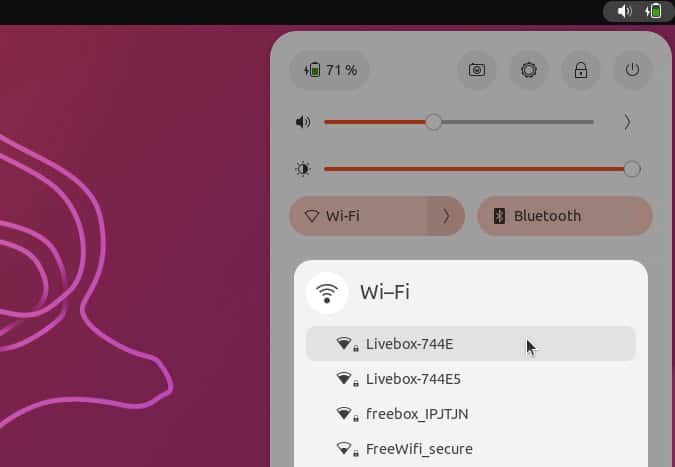
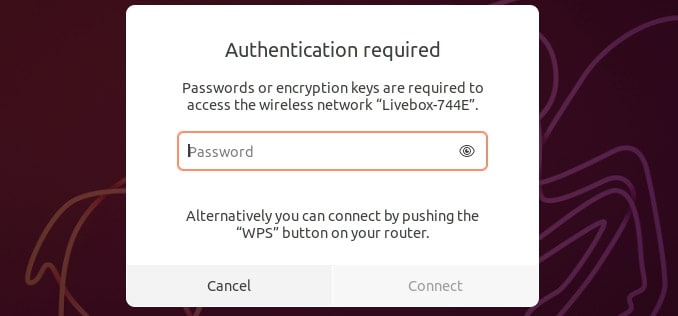
It’ll ask for your password, and with this method, you can use the WPS feature of your router if it’s supported (it’s a button you can press on the router instead of typing your password).
That’s it, you should be connected. It wasn’t that hard once you know where it is :-).
Connect to Wi-Fi from the system settings
The last method you can use to connect to a Wi-Fi network on Ubuntu is to open the system settings and find the Wi-Fi network configuration.
You can open “Settings” from the same shortcuts in the top-right corner (click on the wheel), or via the main menu (search for “Settings”). If you have a wireless card on your computer, the Wi-Fi section is probably the first one in the left menu:
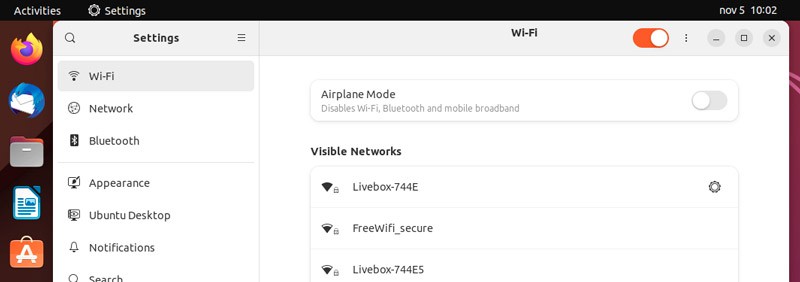
From there, make sure the Wi-Fi is enabled, and it should list all the visible networks.
Click on the Wi-Fi you want to use, and as with the previous methods, type your password (or use WPS) and connect to it.
Download your exclusive free PDF containing the most useful Linux commands to elevate your skills!
Download now
Once connected, you can click on the small wheel in front of the SSID to see the network configuration:

I got an IP address on my local network, confirming that I’m properly connected.
Download your exclusive free PDF containing the most useful Linux commands to elevate your skills!
Download now
How to connect to Wi-Fi on Ubuntu Server
On Ubuntu Server, you can connect to Wi-Fi during the server installation or in command lines, by editing the /etc/netplan/50-cloud-init.yaml configuration file.
It’s less intuitive than the desktop options, especially if you have to do it on a server that is already installed, but I’ll give you everything you need, so you just have to use copy & paste.
Connecting to Wi-Fi during the server installation
If you know that you’ll be using a Wi-Fi network, it’s a good idea to configure it during the installation. The installation wizard includes a step to configure it via a minimal interface, making it easier to configure than later when you only have the command line to do it.
On the latest Ubuntu version, it looks like this:
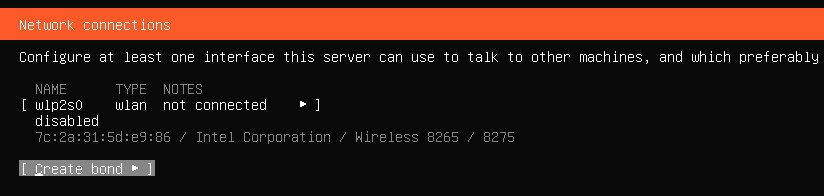
You can select your Wi-Fi interface with the arrows on your keyboard, and press enter to open the configuration.
Only the wireless interfaces are listed, so you probably only have one. It should be named something like “wlp2s0” or “wlan0”.
Once the interface is selected, you’ll have a form show up where you can type the network name (SSID) and password.
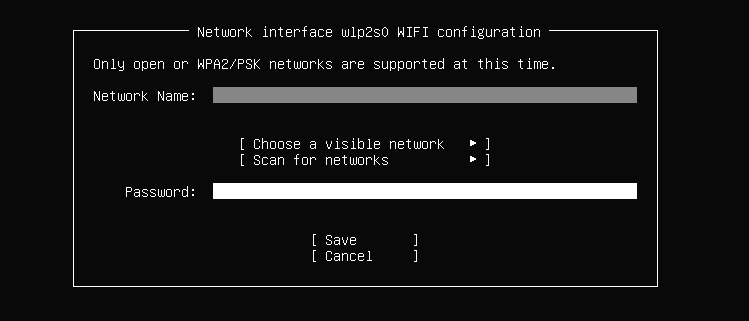
You have the option to choose from a visible network, or scan again if you don’t see your SSID in the list.
Click “Save” and your configuration should be updated immediately.
There are some limitations with the server edition, though. As you can see on the screenshot, only WPA2/PSK networks are supported. They are the most common ones, but if you have something more advanced, you can’t do it during the installation.
I guess most people that use a stronger security method for their Wi-Fi don’t use Wi-Fi on their servers, but anyway, it’s something to have in mind.
Connect to Wi-Fi in command lines
If you use Ubuntu Server or don’t have access to the desktop interface, you can configure the Wi-Fi in the command lines. There is a configuration file with everything in it, here is what you need to do:
- Before going further, you need to know the name of the wireless interface.
You can get it easily with:ip a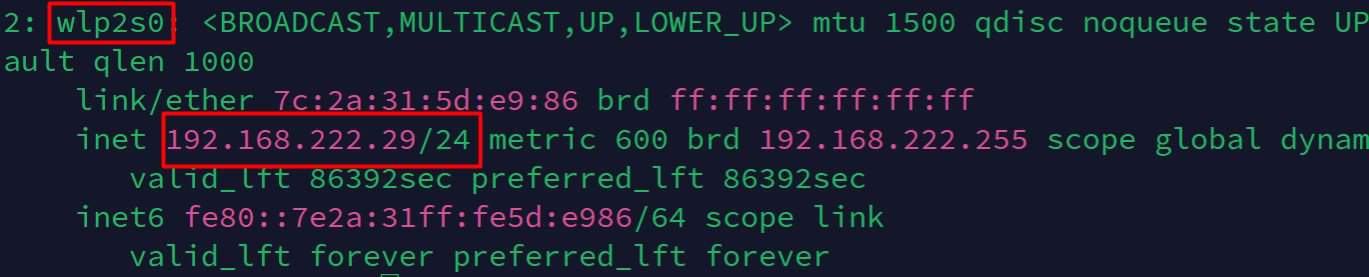
In my example, the name is “wlp2s0”.
It’ll probably be the same thing on your side or “wlan0” on older versions. - Then open the configuration with:
sudo nano /etc/netplan/50-cloud-init.yaml
Mine was empty. If you already have something in it, find the Wi-Fi section and edit it as explained in the next steps. - The file should include at least these lines:
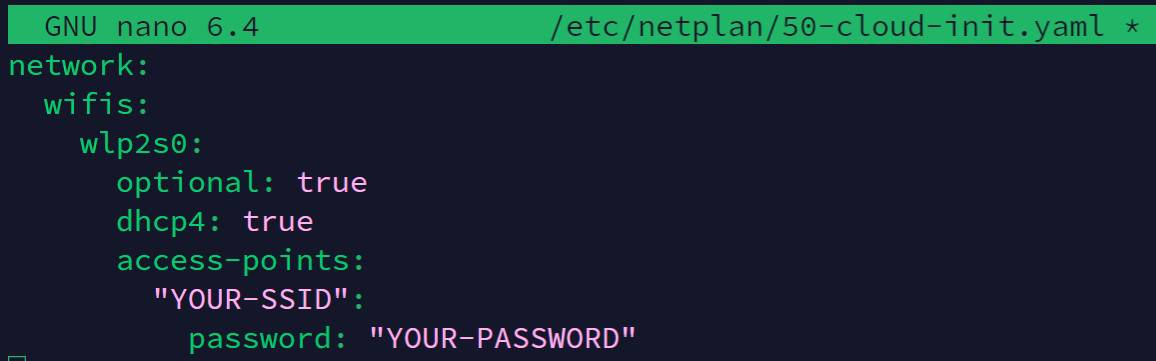
network:
   wifis:
      wlp2s0:
         optional: true
         dhcp4: true
         access-points:
            "YOUR-SSID":
password: "YOUR-PASSWORD" - Save and exit (CTRL+O, Enter, CTRL+X).
- Apply the changes with:
sudo netplan apply - Check if you got connected to your Wi-Fi network with:
ip a
You should have an IP address assigned on the new network if it’s working correctly.
If for any reason it doesn’t work, you can try to add the –debug option to the netplan command:sudo netplan --debug applyIt will give you more details about what’s wrong with your configuration (formatting issue, wrong password or bad interface name, for example).
I give more details about this configuration file in my article on how to set a static IP on Ubuntu Server. Check it out if you need more guidance.
If you’re new to the Linux command line, this article will give you the most important Linux commands to know, plus a free downloadable cheat sheet to keep handy.
There are probably tools you can install if you have to do this regularly, but it worked pretty well in my tests, so I’m happy with this method.
Whatever the solution you chose in this tutorial, you are now ready to move on and try one of my other tutorials on this website. Here are a few ideas to go further from there:
- How To Safely Install Bitwarden On Linux (Debian/Ubuntu)
- 5 Most Effective Ways to Free Disk Space on Ubuntu Server
- Do You Need an Antivirus on Ubuntu? (And how to install it)
Download your exclusive free PDF containing the most useful Linux commands to elevate your skills!
Download now
If you are looking for exclusive tutorials, I post a new course each month, available for premium members only. Join the community to get access to all of them right now!
Additional Resources
Overwhelmed with Linux commands?
My e-book, “Master Linux Commands”, is your essential guide to mastering the terminal. Get practical tips, real-world examples, and a bonus cheat sheet to keep by your side.
Grab your copy now.
VIP Community
If you just want to hang out with me and other Linux fans, you can also join the community. I share exclusive tutorials and behind-the-scenes content there. Premium members can also visit the website without ads.
More details here.
Need help building something with Python?
Python is a great language to get started with programming on any Linux computer.
Learn the essentials, step-by-step, without losing time understanding useless concepts.
Get the e-book now.