Nginx on Ubuntu: The Ultimate Setup Guide for Your Web Server
Setting up a fast and efficient Ubuntu web server can be a big challenge, and Nginx is often your best option. However, whether you’re an experienced user or not, setting it up can be overwhelming. That’s why I created this tutorial, to explain everything in one convenient location.
Nginx can be installed on Ubuntu Server using the package manager (apt). Once installed, the Nginx service is immediately available. Web pages can be created in /var/www/html and configuration can be done by editing files in /etc/nginx.
In this guide, I will show you how to install Nginx, do basic configurations, and host your website on a lightning-fast Ubuntu Nginx server. Let’s get started!
Prerequisites
Here’s a quick checklist of what you need before installing Nginx on Ubuntu:
Hardware & Software:
- Ubuntu Server: Ensure you have a running Ubuntu server, preferably a fresh installation. This can be a Raspberry Pi, Virtual Machine, VPS, or another computer. Use Ubuntu server 20.04 or a later version.
- Sudo Access: You’ll need a user account with sudo privileges to install and configure software. If you’re unsure about creating one, check out this article on sudo.
- Internet Connection: An active internet connection is needed during the installation for downloading packages.
- System Updates: Before you install new software on Ubuntu, always update your package lists. This is best practice. It ensures that you get the latest versions of the software you install. Packages can be updated by running the commands:
sudo apt update
sudo apt upgrade
Optional Skills:
- Basic Command Line Experience: Familiarity with navigating the command line and executing basic commands is recommended. This guide assumes minimal comfort with the terminal, but basic knowledge will make the process smoother. Going through our Linux command cheatsheet can be helpful.
Installing Nginx
If you’ve got everything you need, let’s go ahead and install Nginx on the Ubuntu server.
Installing the Nginx package
Log in to your Ubuntu server and run the following command to install Nginx:sudo apt install nginx
Verify that you installed Nginx correctly:sudo nginx -v
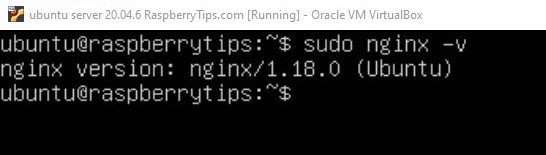
After running the command above, you should see the Nginx version number. This means that the installation was successful.
If you’re new to the Linux command line, this article will give you the most important Linux commands to know, plus a free downloadable cheat sheet to keep handy.
Managing the Nginx service
Next, let’s look at some basic commands you’ll need to know to control your new Nginx server.
- First, make sure that Nginx is running with:
sudo systemctl start nginxThis command starts up Nginx so that it’s ready to serve web pages. Note that there is no confirmation message given when the command is successful.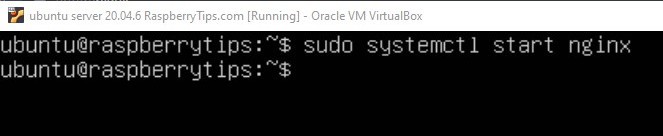
- Second, it’s useful to have Nginx run every time Ubuntu boots.
When you freshly install Nginx, it doesn’t launch on system startup by default. It’s a good idea to ensure that it starts automatically using this command:sudo systemctl enable nginx
- Finally, you can check the status of Nginx at any time.
The “status” command will give you useful information such as how long Nginx has been running, its process ID, the number of tasks it’s running and how much RAM Nginx is using up.sudo systemctl status nginx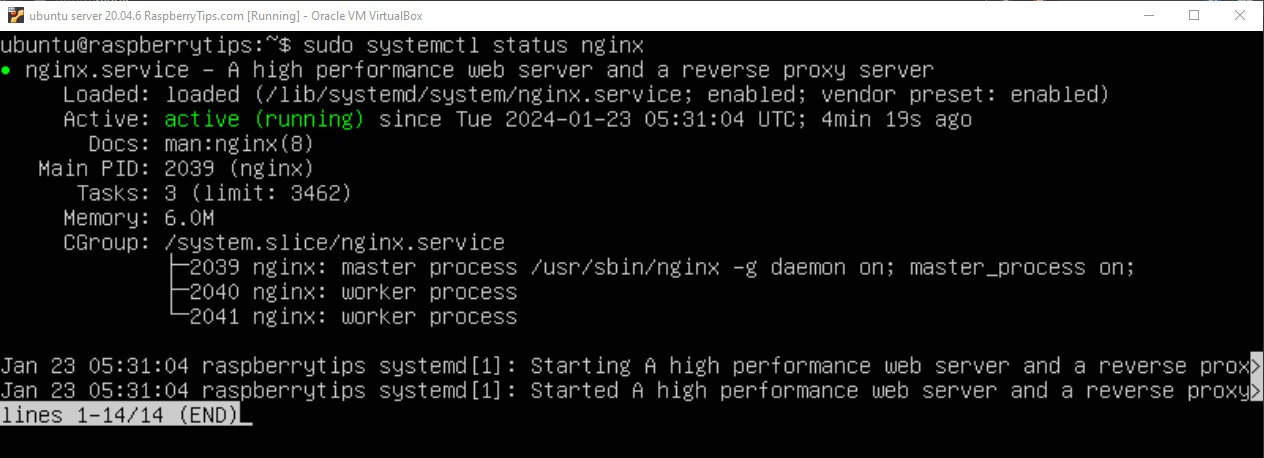
Adjusting Firewall Settings (optional)
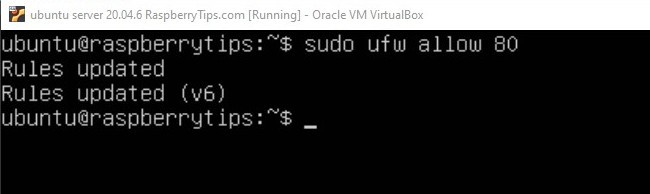
If you have a firewall enabled, you should allow traffic on port 80, the default port for HTTP traffic. This ensures that your firewall will not block Nginx. Use the following command to allow traffic on port 80:sudo ufw allow 80
Verifying that the Nginx server is working
Now that we have Nginx installed and running, let’s access the server webpage.
To do this, you need to know your Ubuntu server’s IP address. If your Ubuntu server is a VPS, look in your server provider’s dashboard or documentation for the IP address. If you are running your server, use this command:ip a
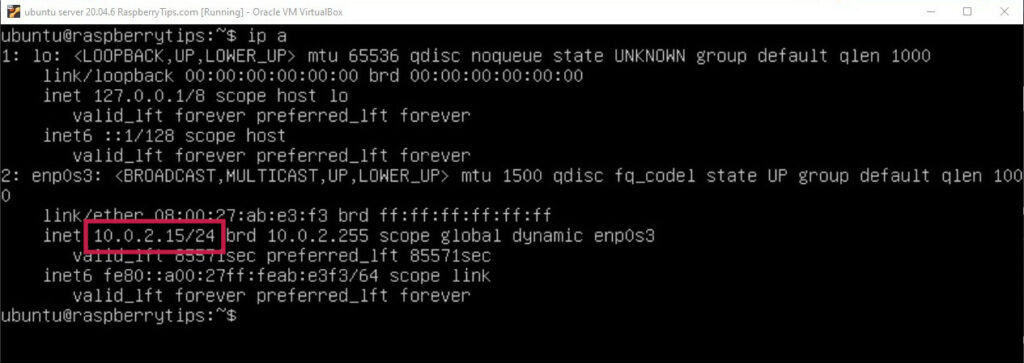
My Ubuntu server’s IP address is 10.0.2.15.
Type your server’s IP address in your web browser and hit enter. You should see the default web server page.
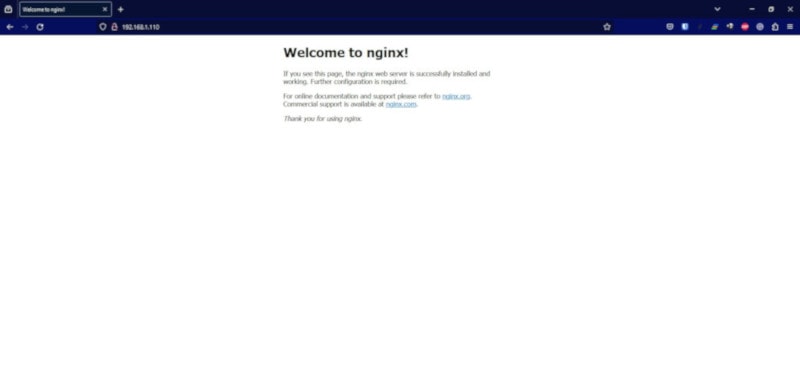
This confirms that the Nginx webserver is working. Now we can get to the really fun part which is hosting our website. 😁
Download your exclusive free PDF containing the most useful Linux commands to elevate your skills!
Download now
Hosting your first website with Nginx webserver
Once you have Nginx installed and running you can move on to hosting your website.
The default web root directory for Nginx on the Ubuntu server is /var/www/html. This is the location you need to place your website files. To do this, you must copy the website files from your computer to your Ubuntu server.
First, you need to ensure that the target directory has the correct permissions:
sudo chmod -R 755 /var/www/html
Next, let’s copy over the website files.
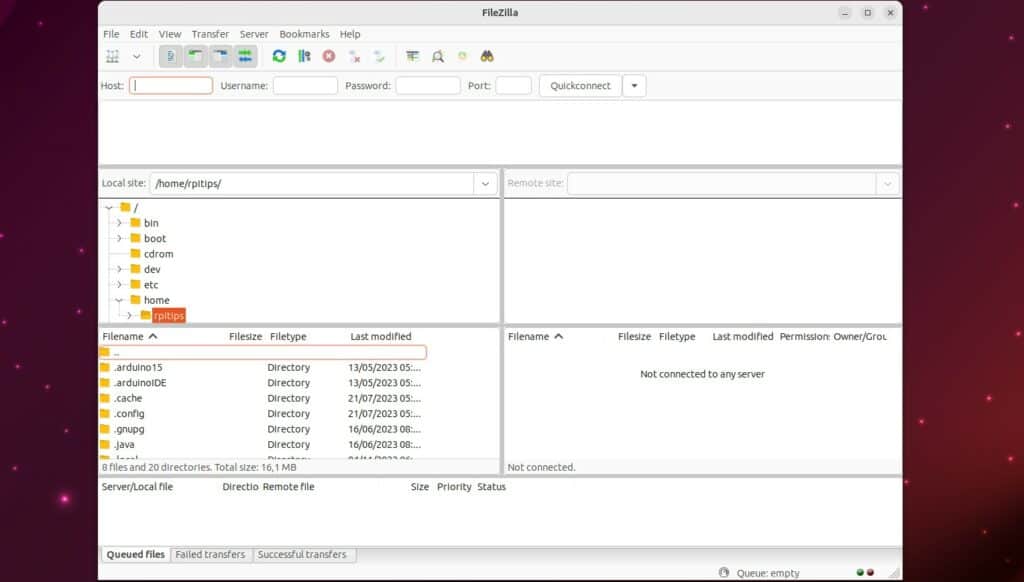
If you are on Windows or Linux with a desktop environment, you can use graphical tools (like FileZilla, WinSCP or Termius). These tools will generally allow SSH connections to a remote host, with a way to transfer files from one side to another. It should be pretty intuitive.
If you are using macOS or a Linux computer, you can also use the SCP command in a terminal, something like:scp -r /path/to/your/local/folder your_username@ubuntu_server_ip:/var/www/html
- Replace “/path/to/your/local/folder” with the path to your local website files on your computer.
- Replace “your_username” with your Ubuntu server username.
- Replace “ubuntu_server_ip” with the IP address of your Ubuntu server.
- You may be prompted for your Ubuntu user password. Note that the password field will remain blank as you type your password.
Once your website files are done copying, open a web browser and navigate to your server IP address, and you will see your website is running. Congratulations! 🥳
That’s all there is to get up and running with the basic installation of Nginx on the Ubuntu server.

Join Our Community!
Connect, learn, and grow with other Raspberry Pi enthusiasts. Support RaspberryTips and enjoy an ad-free reading experience. Get exclusive monthly video tutorials and many other benefits.
Learn moreBasic Configurations
Now that you have your website running on Nginx, you may be interested in various configuration options. Let’s explore some of these.
Changing Default Web Root Directory
You might want to store website files in a different location from the default. This is commonly done for organizational reasons or security practices. Here’s how to change the document root.
Open the Nginx configuration file and edit the server block. You can do this using a text editor, called Nano, available on the Ubuntu server.sudo nano /etc/nginx/sites-available/default
Locate the relevant server block in your configuration files. This is usually the default “server” block.
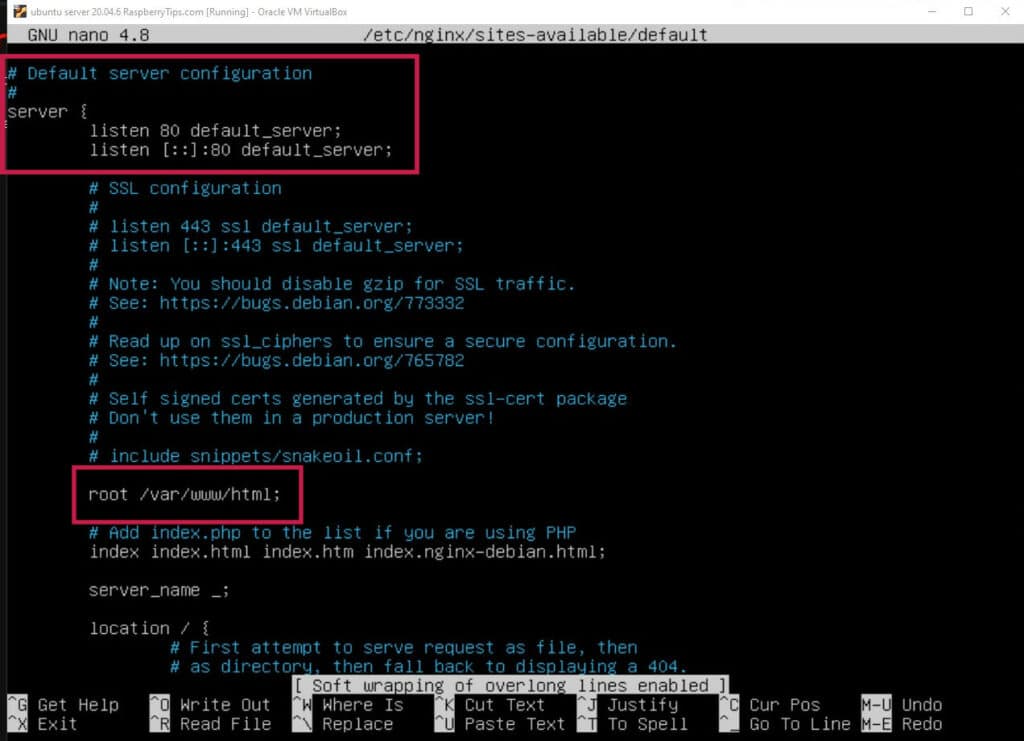
Within the server block, find the “root” directive. This line specifies the location where Nginx serves files from. Replace the default path with your chosen document root:
“root /your/new/document/root;“
You must ensure you have proper permissions to access and modify files in this directory. Then save the configuration file by pressing “ctrl+x” then type “y” to confirm you want to save before exiting.
Finally, restart Nginx:sudo systemctl reload nginx
Then navigate your web browser to your server IP address to confirm that it is working.
Enabling Gzip compression
Gzip compression speeds up your website by making your website files smaller.
Here’s how to enable Gzip compression on your Nginx server on Ubuntu:
Open the main Nginx configuration file:sudo nano /etc/nginx/nginx.conf
Find the “http” block within the configuration file. This block contains general settings for all your websites served by Nginx. Look for the “gzip on” directive. If it’s not already there, add it within the http block like this:
http {
  # ... other settings ...

  gzip on;
  gzip_types text/plain text/css application/json application/x-javascript text/xml application/xml+rss text/javascript image/svg+xml;

  # ... other settings ...
}
This example compresses:
- Text files
- CSS files
- JSON files
- JavaScript files
- XML files
- SVG images
Save the changes to the configuration file with “Ctrl+O” and exit the editor with “Ctrl+X“. Reload Nginx for the changes to take effect:sudo systemctl reload nginx
Finally, test if compression is working by opening your website in your browser and checking the network tab in the developer tools. To open developer tools, press “ctrl+shift+i” on your keyboard. Then click on the “network” tab.
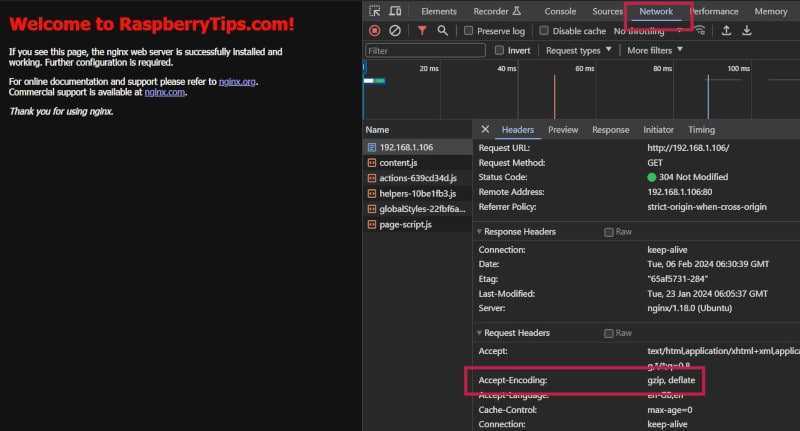
If everything is configured correctly, you should see “gzip“.
Download your exclusive free PDF containing the most useful Linux commands to elevate your skills!
Download now
(Optional) Advanced Configurations
Nginx is a very powerful web server. Its advanced configuration options allow you to make it work for your unique needs. Let’s look at some of these advanced use cases.
Hosting Multiple Websites on a Single Server using Server Blocks
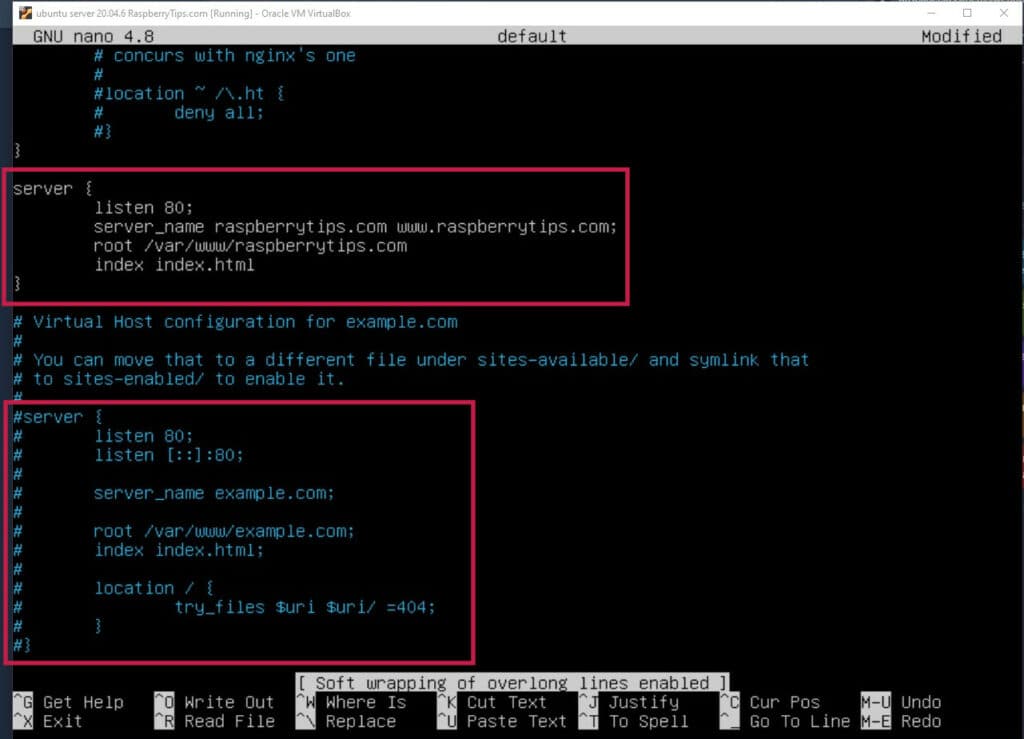
Server blocks, also known as virtual hosts, allow you to host many websites on a single server. Here’s how you can configure them:sudo nano /etc/nginx/sites-available/default
In the configuration file, find the server block. Define your server settings for each website you want to host. Below is an example:
server {
    listen 80;

    server_name raspberrytips.com www.raspberrytips.com;

    root /var/www/raspberrytips.com;

    index index.html;
}
Here’s a breakdown of what each setting does:
- listen 80: Tells Nginx to listen for web requests on port 80, the default port for HTTP.
- server_name raspberrytips.com www.raspberrytips.com: This defines the server names for this block.
- root /var/www/raspberrytips.com: This tells Nginx where to find the root folder for the website.
- index index.html: This indicates the name of the default index file.
The configuration file also provides you with an example in the comments.
Repeat this for each website you want to host on your Ubuntu server. Save your changes and restart Nginx. However, your websites won’t be accessible via the domain name just yet. To make them accessible, you need to configure your DNS records.
Configuring Logs
Monitoring your server logs is important for troubleshooting and optimizing performance. Before we dive into configuring logging for Nginx, I’ll explain the different kinds of log files and levels.
access_log
The access log records information about each incoming request to the Nginx server. This includes information like the IP address of the client making the request, the authenticated user, the HTTP request method, and more.
Access logs help you understand your website traffic patterns. They are also useful for identifying suspicious or malicious activity on the server, such as multiple failed login attempts, patterns of unusual requests, or potential security threats.
The default location of the access logs is /var/log/nginx/access.log.
error_log
Error logs provide a detailed record of errors, warnings, and other critical events that occur during the server’s operation. Analyzing error logs helps you identify and troubleshoot issues quickly. These issues can be related to misconfigurations, software bugs, or security vulnerabilities.
The default location of error logs is /var/log/nginx/error.log.
Log Levels
Nginx has different log levels that help you manage how much information is recorded. Here’s an explanation of each log level:
- Debug (debug): Lots of details for finding and fixing problems. Useful during development or when something is not working right.
- Informational (info): General info about what the server is doing. Regular updates.
- Notice (notice): Normal, but important information about how the system is doing.
- Warning (warn or warning): Not as serious as an error, but still something to keep an eye on.
- Error (error): Something went wrong, but it’s not the end of the world. It needs fixing, though.
- Critical (crit): A serious problem that should be fixed quickly to avoid more issues.
- Alert (alert): Urgent issue that needs immediate attention.
- Emergency (emerg): The worst situation. The system is broken and needs fixing right away.
Logging Configuration Steps
Now that we know some background info about logging, let’s configure it for our server.
First, open your Nginx configuration file:sudo nano /etc/nginx/sites-available/default
Find the http block. Within it, add an access_log and error_log directive, together with the path pointing to where you want each log file to be saved. Here’s a snippet of the code to add:
http {

    access_log /var/log/nginx/access.log debug;

    error_log /var/log/nginx/error.log info;

    server {
        ...
    }

}
Explanation of the log settings:
- access_log: Specifies the path where Nginx will save the access log file. The debug after the path is the log level.
- error_log: This specifies the path for the error log file. The info after the path is the log level.
Using server-side programming languages – Python, PHP, Node.js
Finally, in most web programming scenarios, you will need to use a server-side programming language like Python, PHP, and node.js. Here’s how you can install and integrate them with Nginx.
PHP
Install PHP and FastCGI Process Manager (FPM)
Update your packages and install PHP and FPM by running these commands:sudo apt update
sudo apt install php7.4-fpm php7.4-common
Start the PHP FPM service:sudo systemctl start php7.4-fpm
This is an example. Update these commands with the PHP version you want to use.
Configure Nginx for PHP
Edit your Nginx configuration file:sudo nano /etc/nginx/sites-available/default
Modify the location and index directives with the following code:
location ~ \.php$ {
    include snippets/fastcgi-php.conf;
    fastcgi_pass unix:/var/run/php/php7.4-fpm.sock; # Adjust version if needed
    fastcgi_param SCRIPT_FILENAME $document_root$fastcgi_script_name;
    include fastcgi_params;
}

index index.php index.html
Restart Nginx for changes to take effect:sudo systemctl restart nginx
Great job! You now have PHP configured with your Nginx server.
Python (uWSGI)
Install uWSGI
sudo apt install uwsgi uwsgi-plugin-python3
Create a Simple Python App
Create a Python file (e.g., app.py) with a simple application:
def application(env, start_response):
    start_response('200 OK', [('Content-Type', 'text/html')])
    return [b'Hello from Python!']
Configure Nginx for uWSGI
Edit your Nginx configuration file and add the following lines within the server block:
location / {
    include uwsgi_params;
    uwsgi_pass unix:/tmp/uwsgi.sock;
    uwsgi_param UWSGI_PYHOME /path/to/your/python/virtualenv; # Optional
    uwsgi_param UWSGI_CHDIR /path/to/your/python/app;
    uwsgi_param UWSGI_SCRIPT app:application;
}
Restart Nginx:sudo systemctl restart nginx
Awesome! Your Python and Nginx setup is ready to roll. 🛼
Node.js (with Nginx as a Reverse Proxy)
Install Node.js
Node.js is not in your sources by default. So we need to add the NodeSource APT repository first. Do this by running these 3 commands one after another:sudo apt update
sudo apt install curl
curl -fsSL https://deb.nodesource.com/setup_20.11.0 | sudo -E bash -
Now we are ready to install node.js:sudo apt install nodejs
Create a Simple Node.js App
Create a Node.js file (e.g., app.js) with a simple application:
// app.js
const http = require('http');

const server = http.createServer((req, res) => {
    res.writeHead(200, {'Content-Type': 'text/plain'});
    res.end('Hello from Node.js!\n');
});

const port = 3000;
server.listen(port, () => {
    console.log(`Server running at http://localhost:${port}/`);
});
Configure Nginx for Node.js
Edit your Nginx configuration file and add the following lines within the server block:
location / {
    proxy_pass http://localhost:3000;
    proxy_http_version 1.1;
    proxy_set_header Upgrade $http_upgrade;
    proxy_set_header Connection 'upgrade';
    proxy_set_header Host $host;
    proxy_cache_bypass $http_upgrade;
}
Save the configuration file and restart Nginx:sudo systemctl restart nginx
Woo hoo! You did it! You now have node.js and Nginx configured. Now go ahead and create a great web app!
Download your exclusive free PDF containing the most useful Linux commands to elevate your skills!
Download now
Conclusion
Congratulations! You’ve successfully installed and configured Nginx on your Ubuntu Server. You have logging enabled and a working configuration with your favorite server-side programming language. If you’d like to learn more advanced configurations for Nginx, visit the official documentation. Happy coding!
Download your exclusive free PDF containing the most useful Linux commands to elevate your skills!
Download now
Reminder: Remember that all the members of my community get access to this website without ads, exclusive courses and much more. You can become part of this community for as little as $5 per month & get all the benefits immediately.
Additional Resources
Overwhelmed with Linux commands?
My e-book, “Master Linux Commands”, is your essential guide to mastering the terminal. Get practical tips, real-world examples, and a bonus cheat sheet to keep by your side.
Grab your copy now.
VIP Community
If you just want to hang out with me and other Linux fans, you can also join the community. I share exclusive tutorials and behind-the-scenes content there. Premium members can also visit the website without ads.
More details here.
Need help building something with Python?
Python is a great language to get started with programming on any Linux computer.
Learn the essentials, step-by-step, without losing time understanding useless concepts.
Get the e-book now.