3 Best Ways to Make Money with a Raspberry Pi (Beginner-friendly)
Even if Raspberry Pi devices are not that expensive, it might be an important budget for some of us. Finding ways to reduce the initial cost, or at least make a bit of money with it in the first month, can make your decision to buy one easier. And if like me, you have them running all the time, there is no reason not to put them to work for you. How to do this? This article will explain a few ways you can make money with your Raspberry Pi.
A Raspberry Pi is a tiny computer, and its resources can be used to make a bit of money. The most popular method is to share its CPU power (for crypto-mining), the unused storage, or even better, the unused bandwidth.
In this article, I will introduce the theory on how each method works, and give you a concrete example of how to set this up on your Raspberry Pi at home. Keep reading if you want to make a few dollars every month, by just keeping your Raspberry Pi running.
If you’re looking to quickly progress on Raspberry Pi, you can check out my e-book here. It’s a 30-day challenge where you learn one new thing every day until you become a Raspberry Pi expert. The first third of the book teaches you the basics, but the following chapters include projects you can try on your own.
3 – Crypto-mining: use the Raspberry Pi CPU to make money
One of the most popular ways to try to make money passively on your Rasberry Pi is to set up crypto mining on it. It’s not the best option, but let’s talk a bit about this first.
Theory
Most cryptocurrencies work the same way. A network is used to support the transactions, and anyone can host a node on a computer to help the organization. In return, the node’s owners are generally rewarded with some cryptocurrency coins. That’s what we call crypto-mining.
In short, the more powerful your node is, the higher chance you have to receive a reward. So, you are in competition with traditional computers using high-end CPU and/or GPU to beat the competition and receive more coins. Watch this short video to better understand how it works:
As you may already know, this is no longer something used by a few nerds at home to make a bit of money. The worldwide GPU shortage we currently have is in part related to this usage. The most expensive graphic cards are used to build powerful nodes.
If you are lost in all these new words and abbreviations, request my free Raspberry Pi glossary here (PDF format)!
Download now
With this competition, a Raspberry Pi has almost no chance to compete. But you can still try some less-popular cryptos in order to try earning something. At least, you’ll get some experience to better understand how all of this works. This is why I decided to still include it in this article.
Testing this method
Setting up a Raspberry Pi to mine cryptocurrencies is no longer very complicated. But there are still a few steps that may be entirely new for you, so keep reading to learn more.
In short, you’ll need:
- A Raspberry Pi: the better model, the better results you’ll receive. So, try to use a Raspberry Pi 5 or 4 if possible (or at least one supporting 64-bit).
- A 64-bit operating system: mandatory for the app to run correctly.
- An address: to receive and store your coins (depends on the cryptocurrency you try).
- A miner: the software that will do the work for you.
- A mining pool: the network your miner will be connected to.
One solution I recently tested was mining Dogecoin. You can create a Dogecoin address here, and find a pool on UnMineable. Then, you’ll install a free miner named XMRig and set it up to connect to this pool.
Join Our Community!
Connect, learn, and grow with other Raspberry Pi enthusiasts. Support RaspberryTips and enjoy an ad-free reading experience. Get exclusive monthly video tutorials and many other benefits.
Learn more
I understand that it may seem complicated at first, which is why I wrote an entire tutorial on how to mine Dogecoins with a Raspberry Pi. I explain all the steps in detail (including the system setup), so I recommend reading it if you want to give it a try. There is also a video at the end where you can follow me doing it on my Raspberry Pi.
As I told you, it’s not the most rewarding method. You’ll need a few months to get anything, but it’s very interesting to try it at least once in order to better understand this industry.
I also have an article on how to mine Monero on Raspberry Pi, which is often the cryptocurrency of choice if you don’t have a powerful computer.
It's a free PDF guide containing every Raspberry Pi Linux command you should know!
Download now
2 – Rent your unused storage from your Raspberry Pi
If sharing the CPU power doesn’t seem well-fitted for a limited Raspberry Pi, sharing the unused disk storage seems more adapted. There is no difference between 1 TB on a PC and 1 TB on a Raspberry Pi.
Theory
Some companies are building decentralized cloud storage for their customers. Cloud has become a buzzword and lost a bit of its meaning. If your files are hosted “in the cloud”, with everything on the same server or in the same data center, there are still some risks involved (believe me, I lost my Nextcloud server in a data center fire last year).
The idea of decentralized cloud storage is to use random computers over the world, to safely store your files – encrypted, and with redundancy. Here is a short video from STORJ explaining the whole concept:
Testing this method
STORJ offers a solution, to easily create a node on your computer or Raspberry Pi. This way, it will use your available disk space and bandwidth, and you’ll get paid for this.
If you are lost in all these new words and abbreviations, request my free Raspberry Pi glossary here (PDF format)!
Download now
Payouts will vary a lot depending on your internet connection, storage, and their needs. However, you can still expect to get a few dollars every month with this method, so it’s way better than crypto-mining.
Hosting a node with STORJ can be done in four steps:
- Generate your auth token: based on your email address, it will be your identifier to get paid.
- Generate your node identity: same thing to identify each Raspberry Pi you use.
- Configure port forwarding: STORJ requires access to your node from the Internet, so port forwarding needs to be configured before doing anything else.
- Set up your node: Finally, you can install the software on your device to start making money by hosting files on it.
Before all of this, I highly recommend setting up your Raspberry Pi with some kind of external storage. The more disk space you have, the more you’ll get paid, so using some kind of SATA expansion board (like this one on Amazon) is probably a good idea. Another option is to plug this kind of external drive via USB, it will be easier.
Anyway, once the Raspberry Pi is set up, you can visit the STORJ website for more details on how to host a node with them. The node runs with docker, so it’s not that complicated. All you have to do is follow each step carefully to ensure you do not miss anything.
It's a free PDF guide containing every Raspberry Pi Linux command you should know!
Download now
Reminder: Remember that all the members of my community get access to this website without ads, exclusive courses and much more. You can become part of this community for as little as $5 per month & get all the benefits immediately.
1 – Best method: sell your unused bandwidth to make money
The best and easiest way I found to make money with a Raspberry Pi until now is to sell your bandwidth. It works with any Raspberry Pi model and doesn’t require any changes to your current setup. I love it, especially for my Raspberry Pi Zero that runs 24/7 anyway.
Theory
Some companies are looking to get data on the web from different locations over the world. Here are a few examples given by the solution I’ll introduce just after:
- What’s the price of a London to New York flight booked from a French user?
- What are the results for the query “best bizza in town” from a guy in Rome, Italy?
- What’s the text on specific Facebook ads when visiting the page from India?
Many companies are interested in that kind of result, but they can’t host a server in each city to get the result themselves. That’s why BrightData (and maybe others) offers a solution: using their network that is made of random users over the world.
For us, the idea is to set up a Raspberry Pi with the app from BrightData, to be registered as a node on their network. After that, the Raspberry Pi will be used to make queries on the web, and you get paid depending on how much bandwidth they use.
It’s that simple, and it’s the solution that made me earn the most money.
Testing this method
The only thing you need is a Raspberry Pi connected to the Internet. I tested this on a Raspberry Pi Zero running Raspberry Pi OS, but it should work on any model and Linux distribution. Here are the steps to test this on your side:
- Create an account on their website: Go to EarnApp.com and create your account.
You can quickly register with your Google account. - Once connected, you’ll get access to your dashboard, where you can view your current balance, devices and usage history.
Everything is empty for now, so you need to set up your Raspberry Pi first. - On your Raspberry Pi, run the following command lines:
wget -qO- https://brightdata.com/static/earnapp/install.sh > /tmp/earnapp.shsudo bash /tmp/earnapp.sh
A script will run and do everything for you. At the end, you should get something like the following: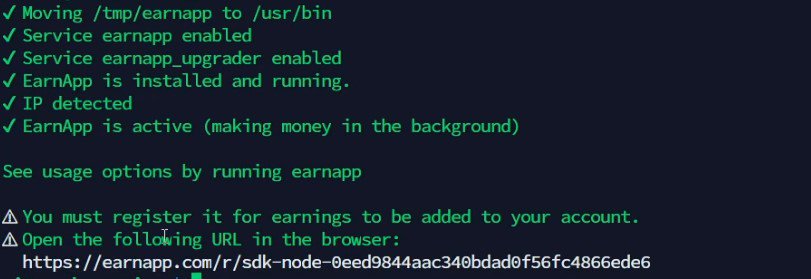
- Click on the link to register the new node.
It will then appear on your dashboard, like this:
You can rename it if you want (recommended if you set up several devices).
That’s it! That’s all you need to do. The EarnApp service is now registered on your Raspberry Pi and will start automatically on boot. If you keep your Raspberry Pi powered on, you’ll earn money each time the network needs Internet access from your location.
After a few hours, you’ll start to see the results on your dashboard:
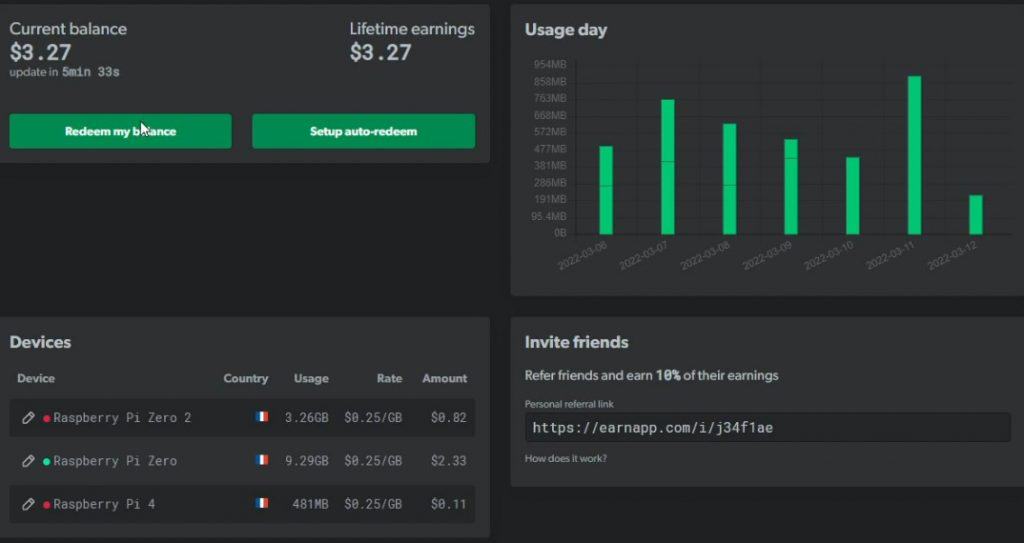
Your total earnings are in the top-left corner, and you will see the usage history day-by-day on the right, and which node contributed to the results in the devices section.
These are my results after a few weeks, running mostly on my Raspberry Pi Zero. I tried to use several devices, but it’s not worth it to have them on the same network. If you can have another Raspberry Pi running in a different location, you’ll get better results (mobile network, maybe at work or using the neighbor Wi-Fi ^^). The earnings also vary depending on your country, as you can see on their home page.
Getting $5 to $15 a month from a Raspberry Pi Zero that costs $15 and a few minutes to set up is pretty interesting :-).
If you want to give it a try, go to EarnApp.com now and follow the instructions to start making money immediately with their service.
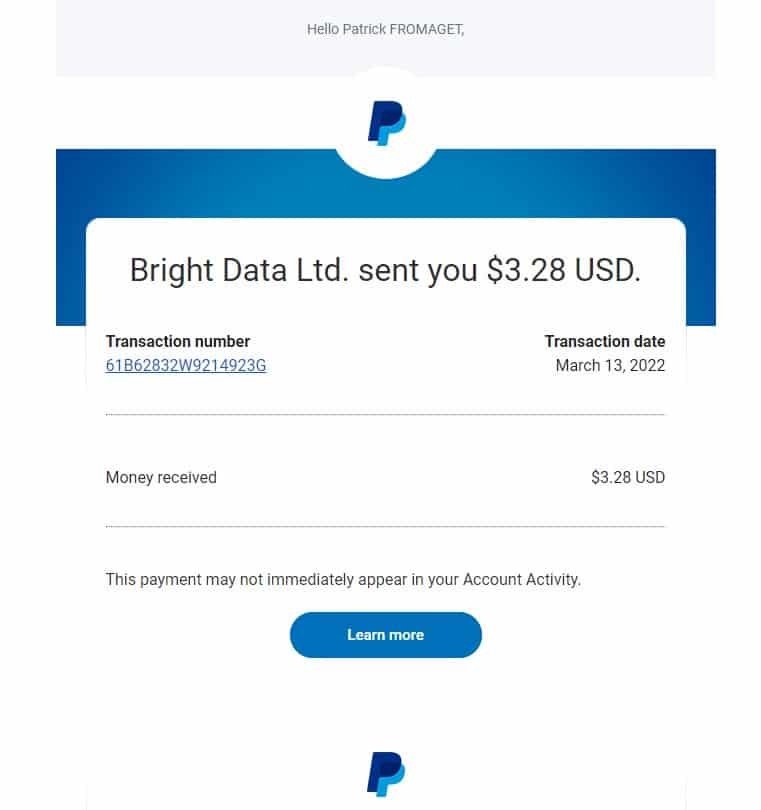
You can redeem the balance from $2.5, so unlike crypto mining, it pays off really fast, and it’s real money:
Feel free to set up the app on your other computers, tablets and smartphones to earn even more (especially if you are not using them from the same network).
Whenever you’re ready, here are other ways I can help you:
The RaspberryTips Community: If you want to hang out with me and other Raspberry Pi fans, you can join the community. I share exclusive tutorials and behind-the-scenes content there. Premium members can also visit the website without ads.
Master your Raspberry Pi in 30 days: If you are looking for the best tips to become an expert on Raspberry Pi, this book is for you. Learn useful Linux skills and practice multiple projects with step-by-step guides.
The Raspberry Pi Bootcamp: Understand everything about the Raspberry Pi, stop searching for help all the time, and finally enjoy completing your projects.
Master Python on Raspberry Pi: Create, understand, and improve any Python script for your Raspberry Pi. Learn the essentials step-by-step without losing time understanding useless concepts.
You can also find all my recommendations for tools and hardware on this page.


