
How To Mount a USB Drive On The Raspberry Pi (3 ways)
Mounting a USB drive can become a real headache and maybe a waste of time, especially if you are new to Raspberry Pi and Linux commands.
Today, I’ll give you all the exact information you need to mount a USB drive quickly and easily.
In most cases, the USB drive is mounted automatically on Raspberry Pi OS.
If needed, the USB drive can be mounted manually by using the following command: sudo mount /dev/sda1 /mnt/usb. The /etc/fstab file can also be edited for an automatic mount on startup.
Don’t worry, I’ll explain how to connect your USB key or drive without having to remember 50 parameters. We’ll learn the manual way (for temporary devices) and the automatic way for devices you want to use often on your Raspberry Pi (like your RetroPie ROMs, movies, or a backup storage drive).
If you’re looking to quickly progress on Raspberry Pi, you can check out my e-book here. It’s a 30-day challenge where you learn one new thing every day until you become a Raspberry Pi expert. The first third of the book teaches you the basics, but the following chapters include projects you can try on your own.
Hardware requirements
Here is the recommended hardware to follow this tutorial:
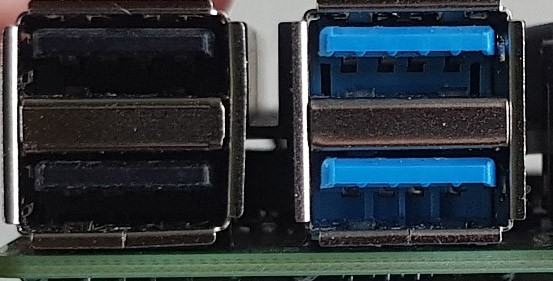
- A Raspberry Pi 4: Or at least, try to pick a model with blue USB ports, it will be way faster than with older models.
- A fast USB drive: This is my favorite. You can now get SSD in external drives as well, making everything faster. And it’s not even more expensive than traditional slow drives.
And as for most projects, adding these optional accessories can make your life easier:
- A good keyboard and mouse: I use this one, but other options are available (I tested most of them in this comparison).
- A decent monitor: always easier to follow the instructions when you can see what’s going on with the Raspberry Pi, not switching from your computer to the Pi all the time.
- The best Raspberry Pi case: it’s the one I use all the time. It keeps my Pi protected and cool, a must-have (tested here).
Get information about the USB drive
Before going further, we need to collect information about your hard drive, such as the identifier and the file system type used on it.
We’ll also create a new folder to mount the drive in.
Prepare your Raspberry Pi
You can follow this tutorial with any Raspberry Pi OS version, and nearly any Linux distribution. No prerequisites, just adjust the commands if you are not using a Debian-based distribution.
I’ll assume you’re on Raspberry Pi OS Lite. If you have a Desktop, maybe you’ll get the help of the interface for some steps, but it shouldn’t be that different.
Before doing anything on your system, start by updating it with:sudo apt update
sudo apt upgrade
And if you plan to use NTFS drives (Windows file system), check that you have the required package installed (NTFS is mainly for Windows devices and may not be required in your case).
You can install the package with:sudo apt install ntfs-3g
It's a free PDF guide containing every Raspberry Pi Linux command you should know!
Download now

It will tell you if you already have it installed.
Are you a bit lost in the Linux command line? Check this article first for the most important commands to remember and a free downloadable cheat sheet so you can have the commands at your fingertips.
Plug your device
You can then plug your device into a free USB port.
If you have a recent model, it’s better to plug the USB device into a blue port. USB 3 ports are faster overall.
For big external drives, you will need extra power to run the drive correctly (or the message “Under-voltage detected!” may appear).
Try to add a powered USB hub to the Raspberry Pi (check this one on Amazon for example, if you don’t already have one). Your hard drive will not work without that (unless it has its own power supply).

Join Our Community!
Connect, learn, and grow with other Raspberry Pi enthusiasts. Support RaspberryTips and enjoy an ad-free reading experience. Get exclusive monthly video tutorials and many other benefits.
Learn moreIf you are using one, plug the hub into the Raspberry Pi and your hard drive directly on the hub.
And if you don’t have a USB drive yet, here are my two recommendations currently:
- This USB flash drive from SanDisk: I use it all the time. I rarely use SD cards now and install my new distributions on this instead. I’m pleased with it, as it’s fast and robust.
- This USB portable SSD: It’s perfect for the Raspberry Pi (almost the same size), it’s one of the fastest options, and I love SanDisk.
Collect more information
Once the disk is plugged in, we need to know more about it before going further.
Fdisk
Fdisk is a tool to manage disks on Linux.
We’ll use it to display all disks and find your USB drive (full tutorial here).
Start with this command:sudo fdisk -l
At the end of the command output, you should get something like this: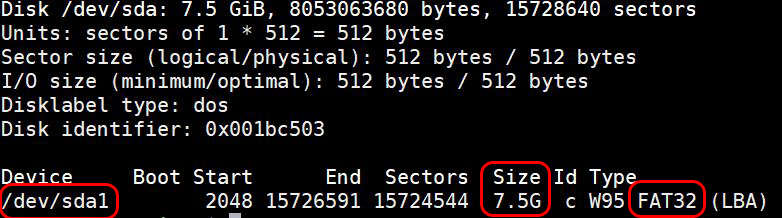
- First, be sure you’re checking the disk you want to mount
Mainly check the size of the drive, to know if this is the good one (in this case I plugged an 8Go USB key, so I’m sure it is this one).
If not sure, unplug it and run the command again to see which one disappears. - Then remember two things:
- The file system format type: here it’s FAT32, it could be NTFS or EXT4 for example.
- The device name: here it’s /dev/sda1, we’ll need this later.
If your USB drive is not formatted, or if you want to use another file system, you should check my other tutorial on this website: How to format and mount a USB drive on Raspberry Pi?.
UUID
Another piece of information that could help us later is the UUID.
When you format a disk, the system assigns an ID to the disk.
We call this the UUID. This allows us to know it is a known drive and to do something specific when you plug it into your Raspberry Pi.
To get this UUID, run this command:sudo ls -l /dev/disk/by-uuid/
It's a free PDF guide containing every Raspberry Pi Linux command you should know!
Download now
You’ll get something like this:
Find the line corresponding to your drive name (sda1 for example).
Note the UUID just before the drive name (it could be longer depending on your disk).
Create the mount point
We are almost ready.
On Linux systems, you need to create a new folder to mount the drive in later.
Generally, we create it in /mnt or /media (you can read my article to learn more about the Linux file system overall).
Create the directory:sudo mkdir /mnt/usb
We are ready with prerequisites.
Now, there are two ways to mount your USB drive:
- Manually: type a command line and get access to it quickly (perfect for temporary devices).
- Automatically: this needs more configuration to start, but this will be accessible automatically after a reboot.
I’m explaining the two methods in the next parts, so you can pick the one you prefer.
Manually mount the USB drive
In this part, we’ll learn how to mount a USB drive quickly on the Raspberry Pi.
The mount command
The mount command allows us to mount a device to a specific folder.
In my case, I want to mount /dev/sda1 to /mnt/usb.
The command syntax is this:sudo mount <DEVICE> <FOLDER> -o <OPTIONS>
So in my case:sudo mount /dev/sda1 /mnt/usb -o uid=pi,gid=pi
Adapt this value to your system.
The uid and gid options allow pi to read and write files on the USB key.
And then check you can see your files and create a new one:ls -latr /mnt/usb
touch /mnt/usb/test
You’re ready to use it.
If you want to remove the USB key, you can dismount it with:sudo umount /mnt/usb
Create a small script to save your preferences
Even if this was the manual way to mount a USB drive, I recommend saving it in a script if you are not familiar with this kind of command.
This will save you searching this page next time.
Create a small script
- Create a new file:
sudo nano /usr/local/bin/usb-connect.sh - Paste these lines:
#!/bin/bash
sudo mount /dev/sda1 /mnt/usb -o uid=pi,gid=pi
echo "USB drive mounted successfully"
This is a basic script, adapt the values and add what you want. - Save and exit (CTRL+O, CTRL+X).
- Add execution permission:
sudo chmod +x /usr/local/bin/usb-connect.sh
Create an alias
Creating an alias allows you to use a short command to run the script, instead of using the complete command we saw earlier, or the full path to the script.
- Edit your .bashrc file:
nano ~/.bashrc - Add this line at the end of the file:
alias usbmount='/usr/local/bin/usb-connect.sh' - Save and exit.
- Close the terminal or end your SSH connection.
Easy mount
Next time you come into the terminal and plug your USB key, just use:usbmount
And then it’s done.
No more mount command to remember.
Automatically mount the USB drive
You already know how to manually mount your drive each time you plug it in, or boot your Raspberry Pi.
But if you use it a lot, or even leave the drive plugged all the time, it’s not the best way to do it.
You can configure your Raspberry Pi to auto-mount it on boot.
The /etc/fstab file
/etc/fstab is a configuration file to configure a mount point for each device.
We’ll save in this file all information needed to mount our USB drive to /mnt/usb.
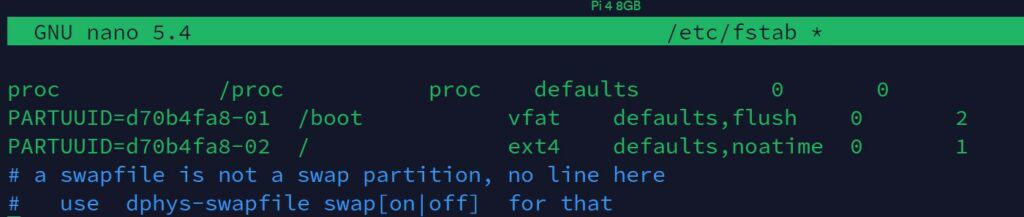
Follow this procedure to add your USB drive to this file:
- Open /etc/fstab:
sudo nano /etc/fstab - Add this line at the end:
UUID=2014-3D52 /mnt/usb vfat uid=pi,gid=pi 0 0
Replace the UUID with your own UUID you get in the prerequisites.
Replace vfat with your file system if needed (ntfs or ext4 for example).
As you may notice, the options column with uid and gid plays the same role as for the manual mount, we give access to the pi user with this. - Save and exit.
- Reboot or try it directly with:
sudo mount -a
Your USB drive should now be available in the /mnt/usb folder.
And Raspberry Pi OS will mount it automatically at each boot.
If you want to add it after the boot, just run mount -a again, or mount /mnt/usb.
Using the UUID rather than the device name (/dev/sda1) allows us to be sure it is the correct device.
When you use multiple USB keys, for example, the first connection will be sda1 but you can’t know which one it is physically.
With the UUID, you’re sure this is the good one.
You can create a mount point for each device if you want (/mnt/big_drive, /mnt/kingston_key, …).
Video
It's a free PDF guide containing every Raspberry Pi Linux command you should know!
Download now
Related questions
There is no partition on my USB key, so I’m not able to mount it, what should I do? The easiest way to create the first partition is to insert this key in a desktop OS (Windows or a Pi Desktop with Gparted for example). If you want to do this on a Raspberry Pi OS Lite, use the mkfs command: sudo mkfs -t fat32 /dev/sda1. More information here.
It's a free PDF guide containing every Raspberry Pi Linux command you should know!
Download now
Want to chat with other Raspberry Pi enthusiasts? Join the community, share your current projects and ask for help directly in the forums.
Conclusion
You can now use USB drives on your Raspberry Pi, either manually (with mount) or automatically on the boot (with fstab).
USB drives can then be used for multiple things, including:
- Backup and Restore your Raspberry Pi
- Installing Windows 11 on Raspberry Pi (An Illustrated Guide)
- Getting Started with OpenMediaVault on Raspberry Pi (NAS interface)
Whenever you’re ready, here are other ways I can help you:
The RaspberryTips Community: If you want to hang out with me and other Raspberry Pi fans, you can join the community. I share exclusive tutorials and behind-the-scenes content there. Premium members can also visit the website without ads.
Master your Raspberry Pi in 30 days: If you are looking for the best tips to become an expert on Raspberry Pi, this book is for you. Learn useful Linux skills and practice multiple projects with step-by-step guides.
The Raspberry Pi Bootcamp: Understand everything about the Raspberry Pi, stop searching for help all the time, and finally enjoy completing your projects.
Master Python on Raspberry Pi: Create, understand, and improve any Python script for your Raspberry Pi. Learn the essentials step-by-step without losing time understanding useless concepts.
You can also find all my recommendations for tools and hardware on this page.


Thank you, You Rock Patrick. I’m starting to learn. It is never to late.
Thanks 🙂
Thanks Patrick. Just added the automount mod to my Diet Pi’s /etc/fstab. Works quite well!
Thank you Mr. Fromaget for sharing this great post! Do you know how I could automatically mount a camera device using this method or something similar? because Raspberry recognizes it as / run / user / 1000 / gvfs / gphoto2 and can only get its ID using ‘lsusb’ and other commands with ‘usb-devices’ in terminal, I even tried it with an android device, but it was recognized as / run / user / 1000 / gvfs / mtp .. any ideas? I need to use these devices when starting startup with automatic console login, because those devices are only recognized on desktop after using startx.
Does this method allow you to add files to the USB drive?
Yes. If your disk is formatted correctly with enough permissions for your user, it should work.
Thanks, I was able to get this working with 2 external drives & a headless pi.
I found a problem in my situation : if either one of the USB drives is not connected at boot time, then the pi has some kind of error that stops it from joining the network (wifi)
So I had to remove the SD card, edit the fstab & comment out the absent drive.
I wonder if you have any ideas why this would be?
minor mistake in “Create a small script”
after hours for searching for the bug, i have realised that instead of:
Paste these lines:
#!/bin/bashsudo mount /dev/sda1 /mnt/usb -o uid=pi,gid=pi echo "USB drive mounted successfully"
it should have been;
Paste these lines:
#!/bin/bashsudo mount /dev/sda1 /mnt/usb -o uid=pi,gid=pi
echo "USB drive mounted successfully"
please correct this, so that others wont run into the same mistake
it was still a good way to learn bash scripting, maybe keep it
Fixed, thanks!
I changed from defaults to uid=pi,gid=pi in order to make the mounted drive writable for the pi user and now my pi doesn’t start…