How to Install DietPi on a Raspberry Pi (Complete Guide)
DietPi is the perfect distribution for an old Raspberry Pi model or a home server that doesn’t need much, but it’s also great for building your own custom system from scratch. It comes with almost nothing preinstalled and gives you the tools to set it up the way you want. Let’s see how to do that.
DietPi has a version for most Raspberry Pi models. After downloading the image, it can be flashed to a new SD card using Raspberry Pi Imager or Etcher. A full wizard will run on first boot to complete the installation.
Let’s start with a short introduction about DietPi and the differences with Raspberry Pi OS, and I’ll then guide you for the installation process.
If you’re looking to quickly progress on Raspberry Pi, you can check out my e-book here. It’s a 30-day challenge where you learn one new thing every day until you become a Raspberry Pi expert. The first third of the book teaches you the basics, but the following chapters include projects you can try on your own.
What is DietPi?
DietPi introduction
As its name suggests, DietPi is a lightweight distribution for your Pi. It’s based on Debian and you can configure it to start with a minimal operating system (less than 200M once installed).

It’s highly optimized for minimal CPU and RAM hardware, so it’s perfect for a Raspberry Pi Zero, but you can use it on any operating system.
You start with a minimal system and can choose to install additional software or not (even a desktop environment if you want).
If you want to give it a try, it’s even possible to use it on a standard PC or a VM (images available on the official website).
The DietPi Story
It seems that DietPi has been around since 2015 (I couldn’t find clear information, but this is the forum creation date). As you may not yet know what DietPi is, here are the main links you can browse to learn more about this distribution:
- The DietPi official website.
- The DietPi community forums.
- Their Twitter account to follow news and updates.
If you still think that DietPi is an interesting distribution to try, let’s move further to learn more :).
Why DietPi rather than Raspberry Pi OS Lite?
As it’s based on Debian, DietPi is close to Raspberry Pi OS Lite, so you might ask yourself why you’d need to choose one or the other.
It's a free PDF guide containing every Raspberry Pi Linux command you should know!
Download now
The first thing to note is that DietPi is updated often. For example, it’s upgraded to the latest version of Debian way faster than Raspberry Pi OS.
To give you a quick overview of the optimizations you can get, here is a short performance comparison I made between DietPi and Raspberry Pi OS Lite:
| DietPi | Raspberry Pi OS Lite | |
| Image Size | 889 MB | 1780 MB |
| SD Card usage | 0.7 GB | 1.2 GB |
| Minimal memory usage | 53 MB | 110 MB |
| Bootup Time | 14 s | 15 s |
| Packages installed by default | 238 | 463 |
These values are for a fresh new install, with nothing more than the default packages, so you might need to compare them in your specific environment. And, it’s the same result for most of the indicators (processes, swap usage, etc.).
So for a basic installation, DietPi is really a good choice. It’s up-to-date and easy to use (same commands as Raspberry Pi OS most of the time).
How to install DietPi on a Raspberry Pi
Here are the required steps to install DietPi on your Raspberry Pi:
Join Our Community!
Connect, learn, and grow with other Raspberry Pi enthusiasts. Support RaspberryTips and enjoy an ad-free reading experience. Get exclusive monthly video tutorials and many other benefits.
Learn more- Download the image from the official website.
- Extract the file from the archive and flash it to your SD card.
- Insert it into your Raspberry Pi and follow the instructions.
Let’s see how to do each step in detail.
Download the DietPi Image
Like for any OS, you need a few prerequisites to follow this tutorial.
Here is a list of hardware you need to prepare:
- A Raspberry Pi (the Zero seems perfect for DietPi, but any model is fine).
You can find my latest recommendations here if needed. - A minimal SD card, let’s say at least 4G (so any new one is OK), and a way to read it on your computer (integrated slot or external SD card reader).
That’s all you need.
A screen, mouse or keyboard is not mandatory if you have a computer and follow all the steps I’ll give you (we’ll connect remotely).
For the software, just two things are needed:
- The latest DietPi image that is available on the official website.
Select “Download” in the main menu, choose Raspberry Pi and click on the download button (sorry, no direct link is available).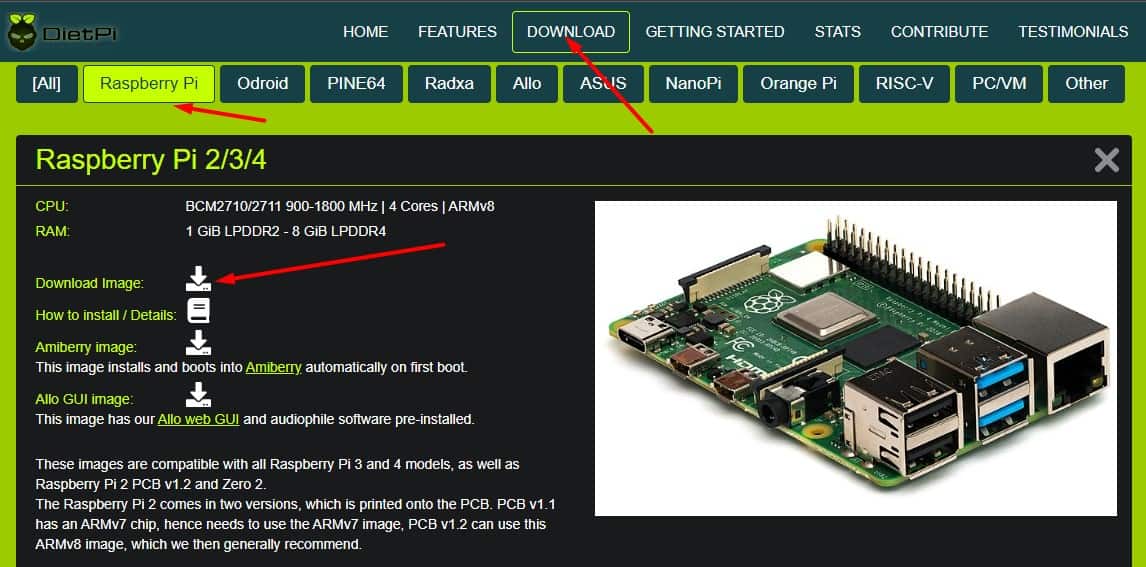
Make sure to pick the one corresponding to your Raspberry Pi model. If you have a recent model, you can download the 64-bit image for increased performance. - I guess you already have it, but you’ll need Raspberry Pi Imager (or any other similar tool) to flash the DietPi image to your SD card. Click here to download it (it’s free), and you can find more details about it in my complete Raspberry Pi Imager tutorial.
That’s it, you are ready to start!
Flash the DietPi Image to an SD Card
The first step is to prepare the SD card with DietPi.
Here are the steps to do this with Raspberry Pi Imager (it works on any system, including a Raspberry Pi):
- Start Raspberry Pi Imager.
- A window like this shows up:
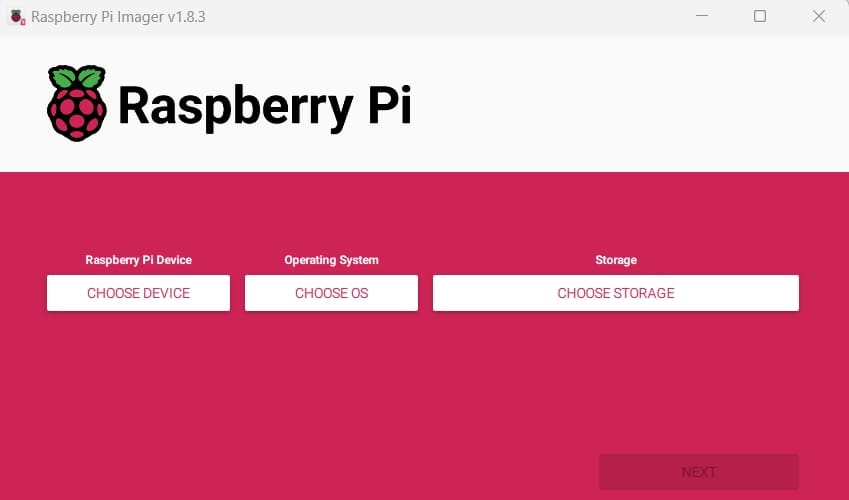
- Click on “Choose OS”, and browse to DietPi image location.
Select it and continue. We don’t need to choose a device. - Insert your SD card into your computer, and click on “Choose Storage” to select it in the list.
It also works fine with a USB drive if you prefer. - Click on “Next” to start the copy.
You can ignore the “OS customisation” popup, as it’s not supported anyway.
Raspberry Pi Imager will start copying the files, which should be pretty fast as the DietPi image is so tiny. When it’s done, eject it.
It's a free PDF guide containing every Raspberry Pi Linux command you should know!
Download now
Optional: Configure the Wi-Fi Before the First Boot
The easiest way to configure DietPi is to plug it to an Ethernet cable, with DHCP enabled, so it can get connected automatically.
But if your only option is Wi-Fi, and you don’t have a monitor for the initial setup, you can follow these steps for a headless installation:
- Insert the SD card back into your computer.
- Go to the boot partition in your file explorer.
- Find the dietpi.txt file, you’ll need to change one thing in order to enable auto Wi-Fi connection:
- Open the file with your favorite editor.
- Find the line starting with “AUTO_SETUP_NET_WIFI_ENABLED”
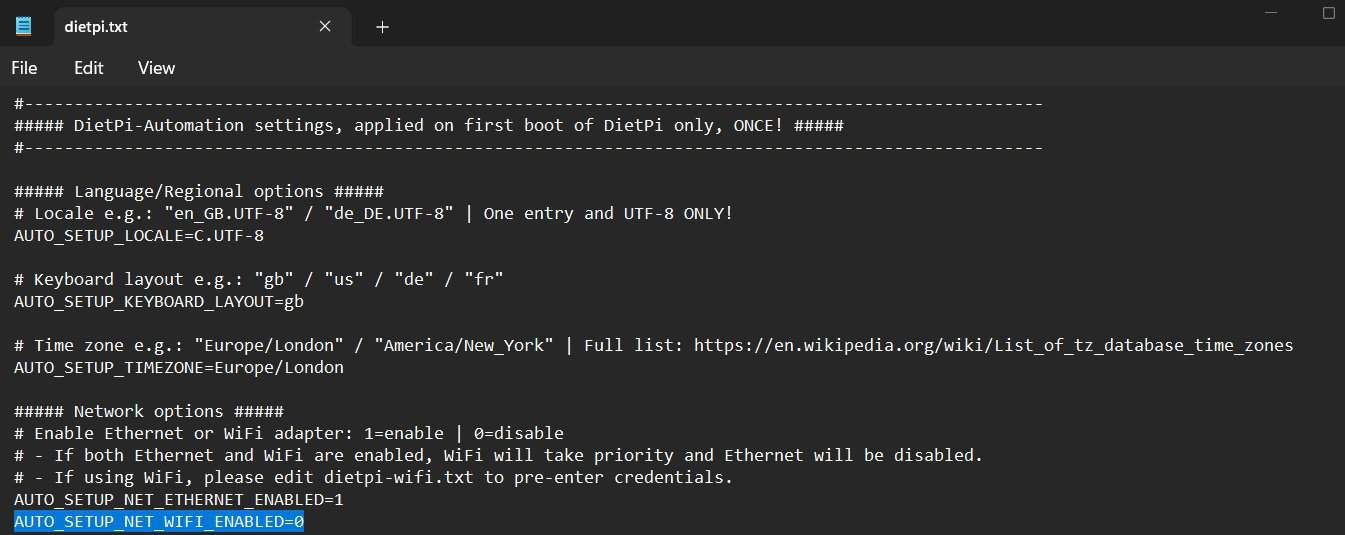
Set it to:AUTO_SETUP_NET_WIFI_ENABLED=1This will enable the wireless connection on boot. The SSID and password are in another file. - You can also quickly check this file to change any settings you want directly here (keyboard layout, time zone, network configuration, hostname, etc.).
- Save and exit.
- Now, find the dietpi-wifi.txt file and open it.
- Here is what you’re looking for:
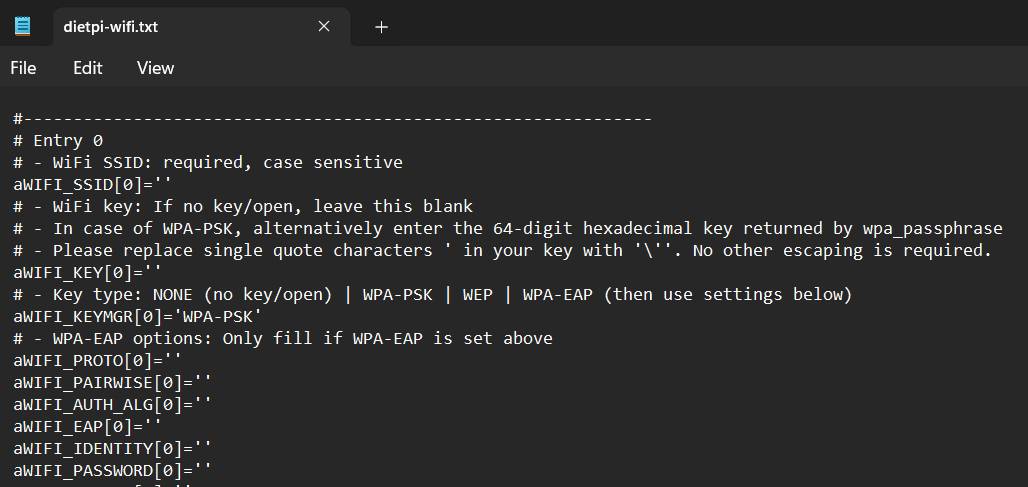
It’s at the beginning of the file, with all the fields you need to configure your wireless connection. - Fill in at least the SSID and KEY variables, if you have a basic network with WPA-PSK.
The other fields are for highly secured networks, such as in companies. - Save and exit.
- Here is what you’re looking for:
- Make sure you close all the files and eject the SD card again.
Once done, we are ready to start the Raspberry Pi.
Start DietPi for the First Time
Insert the SD card or plug the USB drive into your Raspberry Pi and start it.
A few seconds later, you will be able to connect through SSH or follow the instructions on the screen.
Connect to DietPi via SSH
Unless you have the perfect setup for your Raspberry Pi (monitor, keyboard, etc.), I recommend using SSH for the initial configuration. DietPi enables SSH by default on first boot, so it would be a shame to not use it.
By the way, SSH is a secure remote access protocol, you can find out more about it in my SSH guide for Raspberry Pi users.
Here is how to connect to DietPi via SSH:
- Find the IP address of the Raspberry Pi.
If you have a monitor, the IP address is mentioned just before the login prompt. Another option is to scan your network or check the computer list on your router (probably your Internet box).
Check this tutorial on how to find your Pi IP address for more guidance. - Once you know the IP address, you can connect with any SSH client.
From any operating system, you can open a terminal and type this command:ssh root@IP
I generally use a client like Termius for this, for more comfort, but it’s basically the same thing once connected.
The default login on DietPi is “root”, and the default password is “dietpi”.
I have a full guide about SSH with a Raspberry Pi. I recommend checking it if you are a bit lost with this step.
DietPi configuration wizard
Once connected (directly or via SSH), DietPi will start a few preparation steps for you and a wizard shows up to help you with the configuration process.
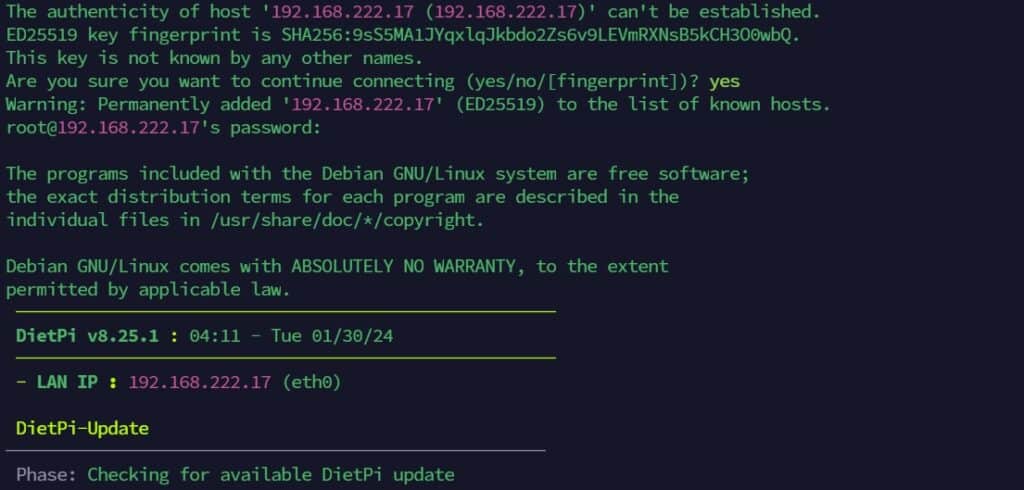
For example, the system updates are done automatically on first login and then the system reboots to apply changes (would be nice to have this on Raspberry Pi OS Lite too!).
A wizard will then guide you to complete the installation:
- It will ask you a few questions for the basic steps:
- If you agree to join DietPi-Survey or not.
- Changing the global software password if you like (recommended)
- Set the passwords for DietPi users: “root” and “dietpi” (strongly recommended).
- Disable the serial console if not needed (probably yes).
- Then you get a complete wizard to configure the system and install new software directly from here:
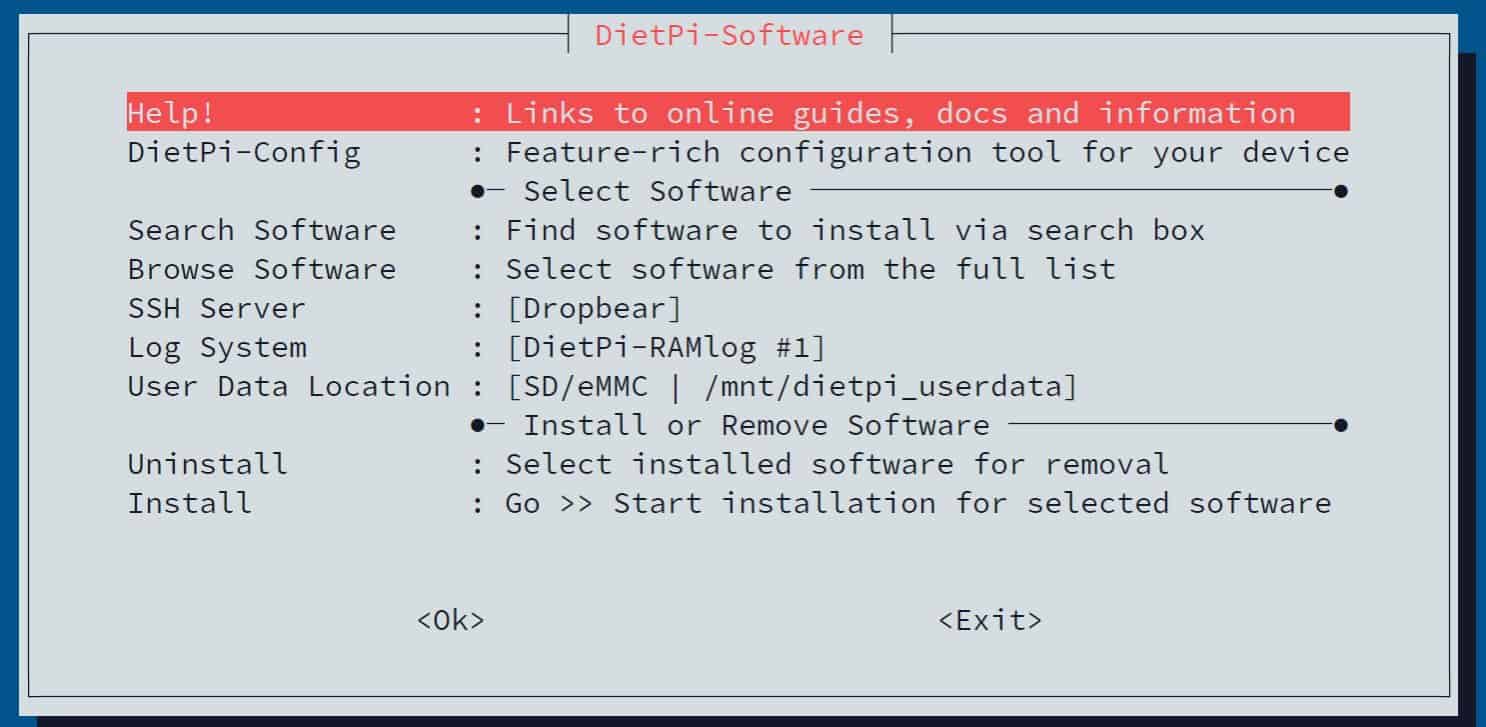
- A list of useful links to start with DietPi.
- Everything you need for the basic configuration (DietPi-Config): Display, audio, performances, advanced options, language, security, network, auto-start and other tools!
- A few lines to search and install new services and applications.
You can also browse a list of recommended packages to install: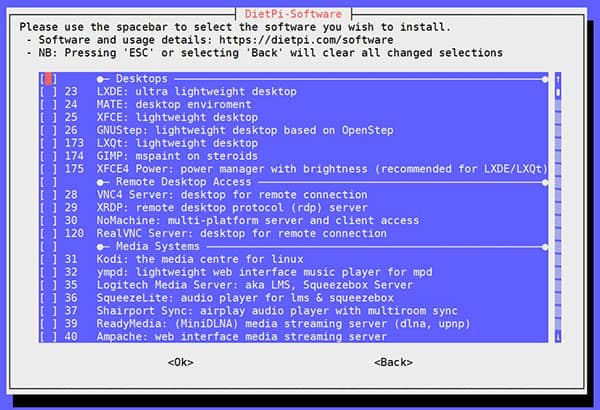
You can even install your favorite desktop environment from here, with an easy-to-use checklist.
Use the arrows to highlight one line, and space to check/uncheck one application. - Configure your favorite services for the main servers you want to use (SSH, File server, Web server, etc.).
- Location of the home folder.
- Once you’ve completed any changes you want, click on “Install” to install everything you selected.
You can always do this later with the dietpi-software command.
- You can also make no changes for now, and click “Ok” to close this wizard and keep a minimal image (or apply the changes you made). You can do everything later, including installing a desktop environment on a lite version.

You can always use APT later to install any package manually, as on Raspberry Pi OS.
Once your choices confirmed, the setup continues with at least the apt updates available.
It can take some time depending on the model you use and the apps you choose. But after that, you are ready to use your new DietPi system, congrats!

Are you a bit lost in the Linux command line? Check this article first for the most important commands to remember and a free downloadable cheat sheet so you can have the commands at your fingertips.
Tips to get started with DietPi
DietPi basics
Most of the commands are the same as on Raspberry Pi OS or Debian.
If you need help with basic commands on Raspberry Pi OS/Debian, check this guide on the topic. You can even download my cheat sheet in PDF format to keep them with you all the time.
Once done, I’ll give you a few extra tips for DietPi specifically in the next paragraph.
DietPi specific commands
Here are the few commands added by DietPi to manage your system:
- To go back to the installation wizard at any time, you can use:
dietpi-software - To only see and edit the configuration part (raspi-config equivalent), use:
dietpi-config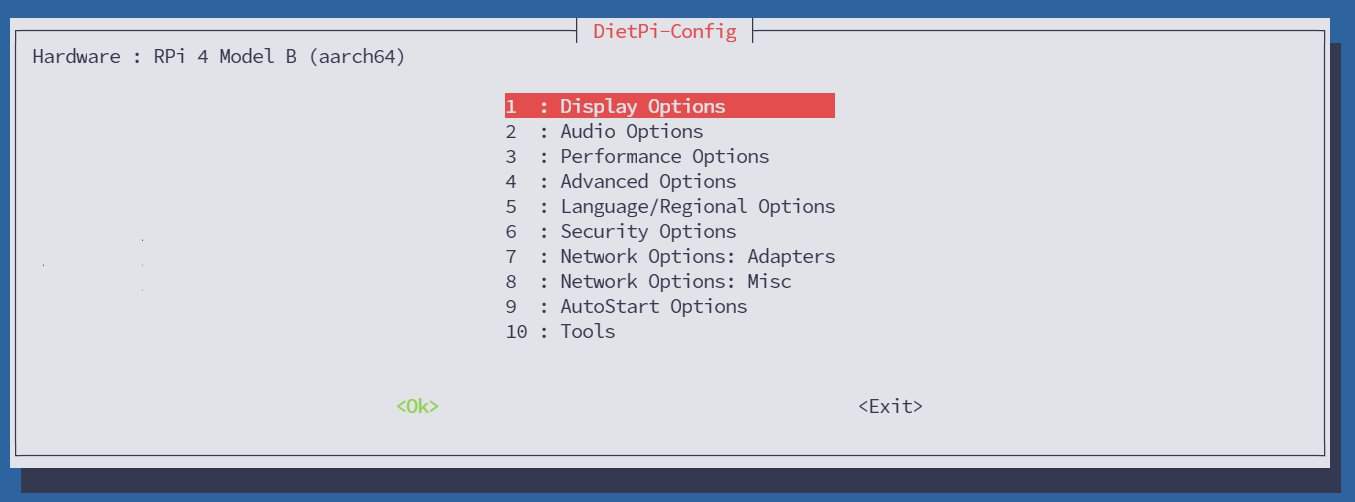
Here you’ll find all the basic things you saw during the installation wizard: network, display, audio, etc. - To check if a new DietPi version is available for your Raspberry Pi, use:
dietpi-update - Another great tool I like is to back up your DietPi system before moving to another device:
dietpi-backup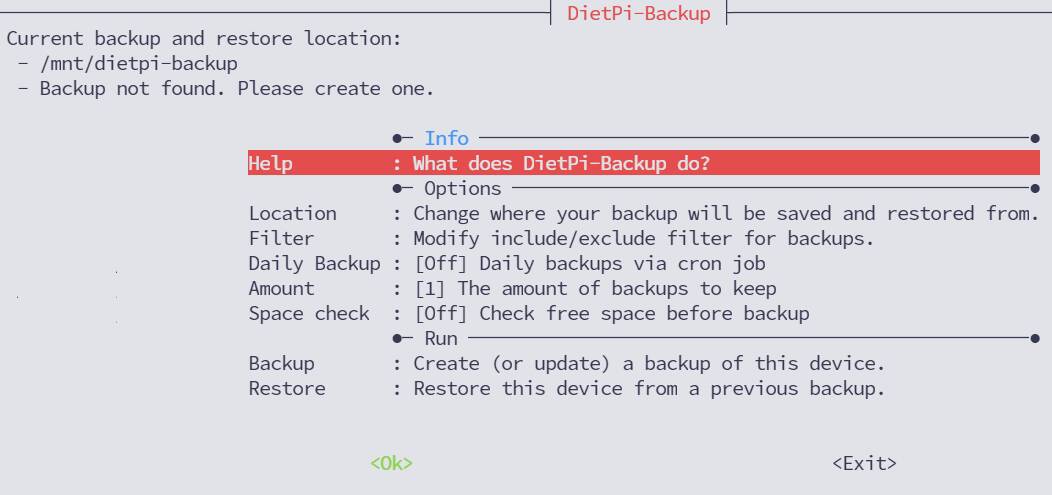
It allows you to save your files to a specific location, and you can choose what to include or exclude.
And obviously, you can restore a previous backup from here :). - Here are the other dietpi commands you can check, if interested.
I use them less, so I will let you try them yourself:dietpi-autostartdietpi-bannerdietpi-bugreportdietpit-cleanerdietpi-crondietpi-drive_managerdietpi-explorerdietpi-justboomdietpi-launcherdietpi-letsencryptdietpi-logcleardietpi-morsecodedietpi-process_tooldietpi-servicesdietpi-surveydietpi-sync
- I didn’t find full up-to-date documentation, so you will have to try them and see what happens :).
Most of the time, a wizard opens to ask what you want to do if you just type the command.
It's a free PDF guide containing every Raspberry Pi Linux command you should know!
Download now
Video
It's a free PDF guide containing every Raspberry Pi Linux command you should know!
Download now
Want to chat with other Raspberry Pi enthusiasts? Join the community, share your current projects and ask for help directly in the forums.
Conclusion
That’s it, you know what DietPi is and how to install it on your Raspberry Pi (Zero or other models).
I really like this distribution, so I think I’ll use it more in my projects.
If you have good skills on Raspberry Pi OS Lite, it won’t change many things, except the easier installation process, who is great. And then you have a lightweight distribution to do the same thing as on Raspberry Pi OS.
What do you think? If you are looking for something else, please check my top distributions for the Raspberry Pi here.
Whenever you’re ready, here are other ways I can help you:
The RaspberryTips Community: If you want to hang out with me and other Raspberry Pi fans, you can join the community. I share exclusive tutorials and behind-the-scenes content there. Premium members can also visit the website without ads.
Master your Raspberry Pi in 30 days: If you are looking for the best tips to become an expert on Raspberry Pi, this book is for you. Learn useful Linux skills and practice multiple projects with step-by-step guides.
The Raspberry Pi Bootcamp: Understand everything about the Raspberry Pi, stop searching for help all the time, and finally enjoy completing your projects.
Master Python on Raspberry Pi: Create, understand, and improve any Python script for your Raspberry Pi. Learn the essentials step-by-step without losing time understanding useless concepts.
You can also find all my recommendations for tools and hardware on this page.



What does this paragraph mean pls, I’ve read it a couple of times and get lost….
“First thing to know is that DietPi is often updated
For example, it’s already available in Debian 10.0 (Buster) whereas it’s available since less than a month at the time of writing”
The time required to implement the changes from Debian is shorter on DietPi than on Raspberry Pi OS.
But now that RPI OS is on Buster this paragraph is not clear 🙂