
The Easiest Way to Install OpenVPN Server on Raspberry Pi
OpenVPN is a service to host your own VPN server, without using third-party servers.
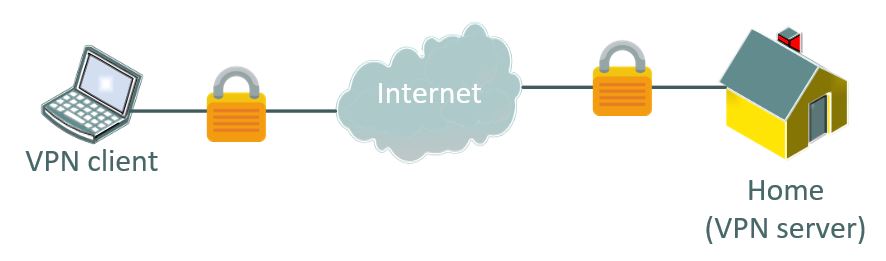
A VPN is a secured connection between two networks, for example between your phone and your home.
In this tutorial, I’ll give you a step-by-step method to install it quickly on Raspberry Pi.
OpenVPN is available in the official repository, so it can be installed with apt as for any other package.
Then, security must be configured to ensure the data is encrypted correctly between both networks.
In fact, I already did a tutorial on how to install OpenVPN a few years ago, but many of you were lost in the process.
The configuration part is so long and complex, that it was too complicated to follow, especially for a personal usage.
That’s why I looked for an easier method to install and configure OpenVPN, and I found it!
I will share it with you now.
Note: If you want to see all these steps in action, I have a video lesson available for the community members. You can join here and watch it directly if you are interested (with 10+ other lessons for Raspberry Pi and many other benefits).
Prerequisites
Just before the installation part, make sure you have everything ready.
For advanced users, you can probably skip this part, I just want to answer all the questions before going further.
What is a VPN?
VPN stands for “Virtual Private Network”, and basically the idea is to merge two networks.
For example, companies can use this to have employees in two different sites, but using the same resources from the main building (like a file share for example).
With a Raspberry Pi, we’ll generally use it to access a remote network from anywhere in the world.
For example, you can access your security camera or home automation web page from your smartphone while traveling.
The smartphone will connect to the Raspberry Pi through the Internet, and create a secured tunnel between the two devices, so that you can access any service on your home network.
OpenVPN is the software that will make this work on both sides.
It's a free PDF guide containing every Raspberry Pi Linux command you should know!
Download now
Find your IP address
To build this, you need to know your home public IP address and configure it on the client side.
If you don’t know, I’ll show you how to get your IP address, and also how to avoid issues if your IP is changing from time to time.
What is my IP?
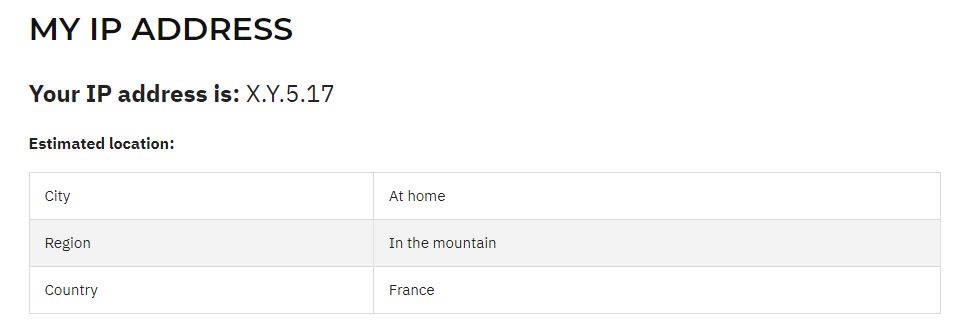
Finding your current IP address is pretty easy, as there are many websites that will give it to you.
For example, go to WebInpact.com and note your IP address.
You’ll only need this at the end of the tutorial, when configuring the OpenVPN client, but it’s an important prerequisite, especially if you have a dynamic IP address.

Join Our Community!
Connect, learn, and grow with other Raspberry Pi enthusiasts. Support RaspberryTips and enjoy an ad-free reading experience. Get exclusive monthly video tutorials and many other benefits.
Learn moreStatic or Dynamic?
Depending on your Internet provider you may have a static IP address or not.
In my case, I’m not so lucky, so my IP address is replaced with a new one every day or so.
If you are in this case, your VPN client will no longer work after the first change (or you will need to update the IP address each time).
To avoid this, you can use a free service named NoIP, which provides a free hostname (like myname.ddns.net) that redirects to your IP address, even after a change. This way, you can configure your VPN client with myname.ddns.net instead of your IP address.

You just need to have something on your network, that will update the IP address on NoIP regularly.
I have this feature in my Internet router, so I just need to put my credentials in the interface and it’s done.
But even if you don’t have it in your router, you can install a script on your Raspberry Pi (or any other device) to do the same thing. The Raspberry Pi tutorial is available here if you are interested.
Install Raspberry Pi OS
The last step is to make sure Raspberry Pi OS is installed and configured correctly.
If you need help about this, you can check my step-by-step tutorial here.
Before going further, I would recommend checking that:
- Raspberry Pi OS is installed (the Lite version is enough for a VPN server).
- You have access to your network and Internet on it (Ethernet connection if possible).
- Your system is up-to-date
- And a few security steps have been made, especially if you want to keep it powered 24/24 with the VPN service running.
OpenVPN server setup
Once ready, we can start the server installation on the Raspberry Pi.
They are many things involved like network, security settings, users and certificates. But the installation script will take care of everything.
The OVPN script
Connect to your Raspberry Pi by using SSH, and follow this procedure:
It's a free PDF guide containing every Raspberry Pi Linux command you should know!
Download now
- We’ll use the installation script from angristan on GitHub.
You can check the code on this link before installing it if you want. - Copy and paste this command in your terminal to download it:
wget https://raw.githubusercontent.com/angristan/openvpn-install/master/openvpn-install.sh -O openvpn-install.sh - Then run the script with:
sudo bash openvpn-install.sh - The script will show you your local IP address (you’ll need it in the next step), your public IP address and ask you a few questions.
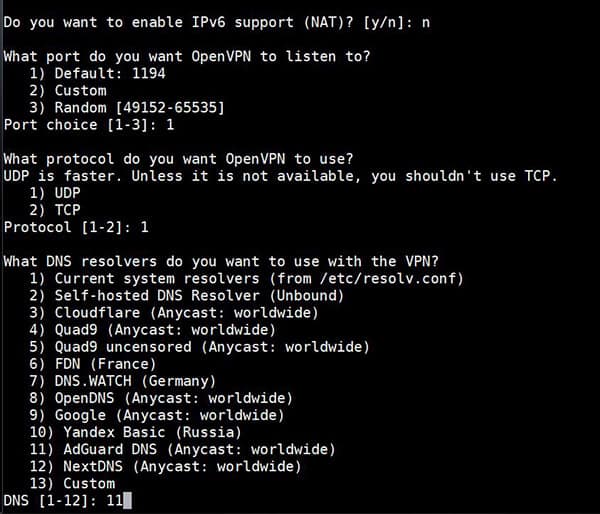
- Most of the time, you’ll keep the default values, so just press “Enter” for each question if you don’t know.
The OpenVPN installation starts. - A few seconds later, you will be asked some information about the first user to create.
Give it a name (your name or the device you’ll connect with for example), and set a password if needed (not mandatory).
Once done, the scripts ends and give you the path to the first configuration file:![]()
That’s it, the VPN server is running and your first client is ready to use 🙂
Note: I recommend restarting the Raspberry Pi after the installation. I don’t know why, but for me, it was not working before the reboot, even after starting the service manually.
Port forwarding
Before the client configuration, there is an extra step you need to do.
Most likely, your Raspberry Pi is not directly on the Internet, but behind a router. So you need to configure this router to redirect the VPN connections to your Raspberry Pi.
The configuration will depend on the router model you have, so I can’t give you the exact step-by-step procedure, but your Internet provider can probably help you (for example AT&T has a documentation page for each modem).
You’ll need to configure:
- The external port: can be 1194 to keep it simple, or anything else.
- The internal IP address: the script displayed it at the beginning, or you can check this tutorial to get it now.
- The local port: which is 1194 by default, or what you set in the script if you didn’t keep the default value.
In my case, it looks like this:
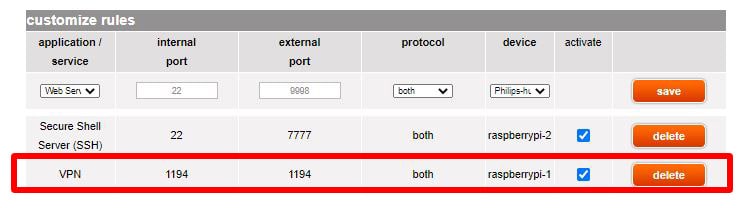
So I added the second line, to redirect the port 1194 to the Raspberry Pi, same port.
You can even use a domain name instead of your IP address, especially if your public IP address is not static.
Note: a good idea may be to use a static IP address on your Raspberry Pi, or configure the DHCP server to keep the IP address for your Raspberry Pi.
It's a free PDF guide containing every Raspberry Pi Linux command you should know!
Download now
OpenVPN client setup
Our VPN server is now available on the Internet, so we can configure a client to connect to it from anywhere.
OpenVPN is available for PC (Windows, Linux) and smartphone (iPhone, Android). I will show you how to install and configure it.
Get the OVPN file
The first step, whatever your system, is to get the file generated on the Raspberry Pi by the OpenVPN wizard.
Remember? For me, it was /home/pi/android.ovpn
You need to get it on the client where you want to install OpenVPN.
The easiest way to do this if SSH is enabled, is to connect to the Raspberry Pi with FileZilla or WinSCP, and transfer the file on your computer.
Then you can send it to any device you want to configure.
On FileZilla, create a new site, and use SFTP to connect to the Raspberry Pi.
Set the host IP address, and the username and password.
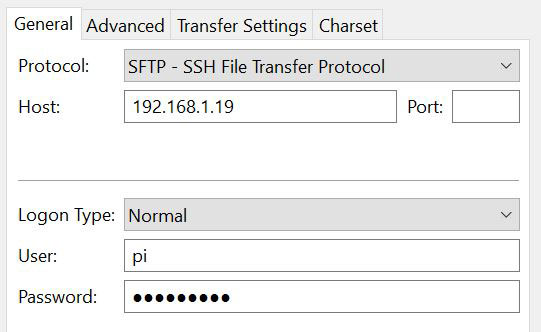
Once connected, you can download the file located in /home/pi, and send it to the device you want to use as a client (I often do this by email, but for a PC you can use a USB key too).
Edit the file to use your No-IP hostname
If you have a dynamic public IP address and are using the service from No-IP, there is an extra step:
- Open the .ovpn file
- Find this line at the beginning:
remote <IPADDRESS> 1194 - Replace it with:
remote <HOSTNAME> 1194 - Save and close the file
That’s it, you can now use it on any device.
Installation on Windows
- Download OpenVPN installer from the official website
- Install it (you can keep the default values)
- Once done, an OpenVPN icon should appear in the tray, near the clock on the bottom right of your screen.
If not, you can start it from the main menu. - Right-click on this icon and select “Import file…”.
- Select the file generated on the Raspberry Pi and confirm.
- Right-click again, and click on “Connect”.
It will only work if the device is not on your home network, but you can test it by sharing your phone connection for example. - Enter your password if you chose to set one in the configuration.
That’s it, you are now connected to your VPN server 🙂
Installation on iPhone / Android
You can also install OpenVPN on your Phone!
The app is named “OpenVPN Connect” and it’s available on the App Store and Google Play Store.
- Install the app on your phone
- Transfer the .ovpn file to your phone: the easiest way to do this is to send it by email, and download it from your email app.
- Open OpenVPN Connect
- Go to Import Profile > File, and select the .ovpn file from your Download folder
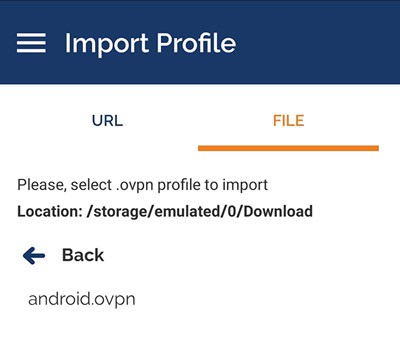
- Click on “Import” and “Add”
- A new profile is added, and you can connect by clicking on it
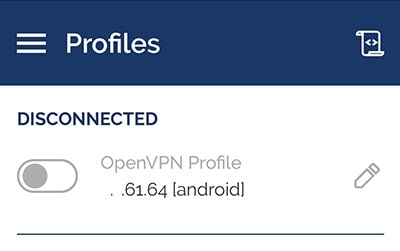
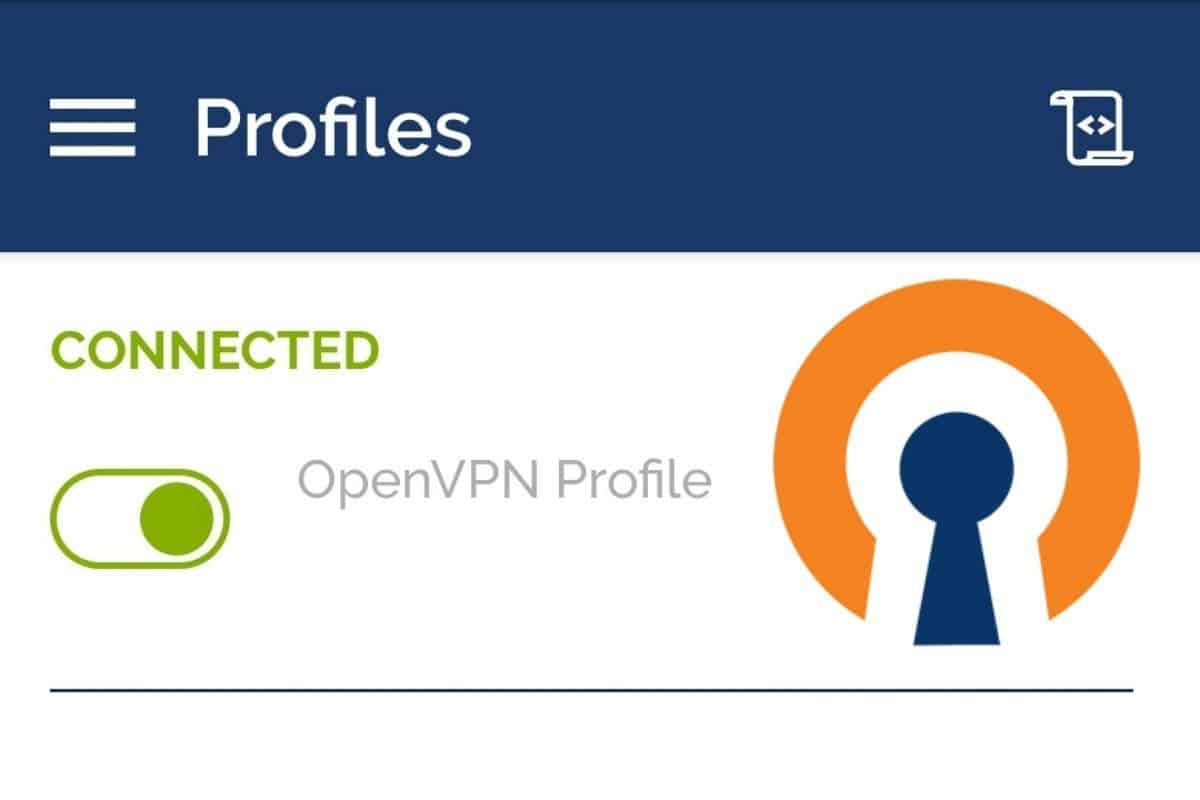
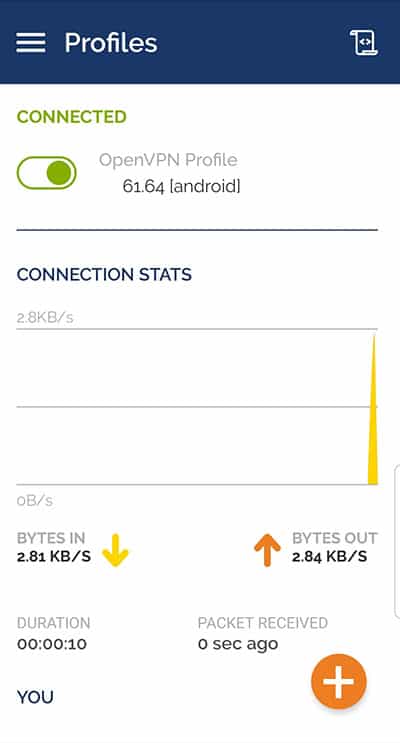
Don’t forget to disconnect from the Wi-Fi if you are on the same network as the Raspberry Pi - That’s it, you are now connected:
It's a free PDF guide containing every Raspberry Pi Linux command you should know!
Download now
Want to chat with other Raspberry Pi enthusiasts? Join the community, share your current projects and ask for help directly in the forums.
Conclusion
That’s it, you now know an easy way to install OpenVPN on your Raspberry Pi, and connect to your home network from anywhere on the planet.
The IP address and port forwarding stuff might be a bit complicated for beginners (that’s why I explain everything here), but the OpenVPN installation is really straightforward with this method.


No mention in the article about cost of OpenVPN. Plus, no mention about logs kept or not by server sites. Plus, no mention about how OpenVPN actually works. So one installs it finds it cost bucks to use, stumbles around until somehow it may work, then the cops are knocking on the front door. Not sure this is for me. As Paul Harvey used to say “now for the rest of the story.”
Not sure to understand the point of your whole comment.
But for the first part, there is an open-source version for OpenVPN, it’s free.
Hey Patrick, thanks for this article… I’ve been having some troubles with setting up OpenVPN but now that I have stumbled across this method I will give it a try! Hopefully I will have success! In the other methods things seem to go fine but I find it frustrating that I can’t confirm if the service is even running, which is probably due to my lack of knowledge with a pi. Firewall rules are set up correctly as things were working when I had a synology nas running ovpn, with the only difference is a different IP at this point … OpenVPN is great, and yes as you pointed out it is free 👍