How To Use ‘mount’: The Complete Linux Command Guide
Mount is an essential Linux command used to manage additional storage, whether a simple USB stick, hard drive or remote network storage. It’s not that intuitive, however, which is why I created this quick guide to help with the command syntax and the most useful options.
In short, the ‘mount’ command connects an external storage to a temporary location on the system. This allows the current user to access the files on the external storage. Mount can handle different types of file formats, as long as they are installed on the system.
I’ll start with the basics, and give you more details after that. Check the table of contents below to quickly navigate to what you’re interested in.
Command syntax
The base of the mount command syntax looks like this:mount <options> <device> <mountpoint>
The idea of the mount command is to map a storage drive (device) to a local folder (mount point). Once the link is created, you can access the files on the drive from the mounting point.
Many options can be used to specify the drive format, and permissions or use sub-commands.
Usage examples
Let’s take a few examples of how to use the ‘mount’ command to make this a bit clearer.
List all mounted file systems
One of the first options you can try with the ‘mount’ command is to list the drives that are currently connected to the system. You can do that with:mount -l
For example, on a standard Raspberry Pi installation, you will get something like this:
Download your exclusive free PDF containing the most useful Linux commands to elevate your skills!
Download now
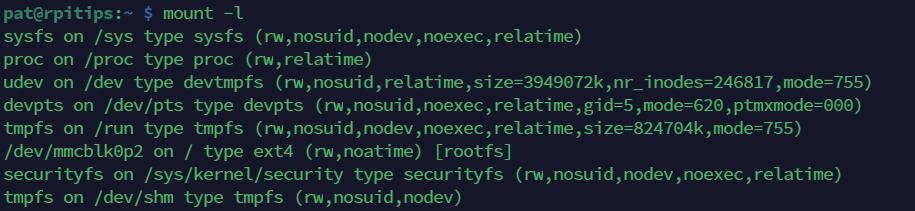
So, even before doing anything with this command, mounting points already exist and are used by the operating system. For example, /dev/mmcblk0p2 is the main partition on my SD card, mounted on “/”, as the root folder of this system.
You’ll probably use grep in combination with this command to only show lines you’re interested in, for example:mount -l | grep fatTo only list file systems using FAT32.
You can find my command guide about grep here.

Join Our Community!
Connect, learn, and grow with other Raspberry Pi enthusiasts. Support RaspberryTips and enjoy an ad-free reading experience. Get exclusive monthly video tutorials and many other benefits.
Learn moreMount a USB drive with a specific file system
The most common use of the mount command is to get access to a USB drive content within the current system. Most systems will automatically detect USB drives, but won’t necessarily mount them.
This can be done with the following syntax:mount -t <format> <partition> <destination>
- Format: the file system format used. For example: FAT32, EXT4, NTFS, etc.
- Partition: the device identifier, which is generated by the operating system when you connect the USB drive (ex: /dev/sdb1).
- Destination: the folder where you want the USB drive files to be listed and accessible for your users (ex: /media/usb).
Let’s take an example:mkdir ~/usb
sudo mount -t vfat /dev/sda1 ~/usb
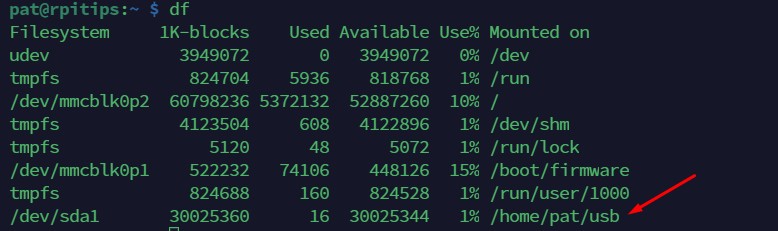
In this example, I’m creating a new folder in my home directory to be used as a mounting point (~/usb). Then I use the ‘mount’ command to map /dev/sda1 to this folder, specifying that the partition is formatted with FAT32 (vfat).
Once done, the USB drive is now accessible via the ~/usb path. You can check that by using the ‘df’ command to list all the available partitions:
Note: To find the device name or partition identifier to use in your ‘mount’ command, you might need to read my guide about the ‘fdisk’ command here first.
Mount a file system in read-only mode
Based on the same command syntax, you can then play a bit with the options available with the ‘mount’ command. For example, it’s possible to mount a partition in read-only mode, by adding the ‘-r’ option in the beginning:mount -r <options> <partition> <destination>
Same syntax, and same idea, just another option to add in the beginning (-r).
Download your exclusive free PDF containing the most useful Linux commands to elevate your skills!
Download now
Main options
There are tons of options available with the ‘mount’ command on Linux, but here are the ones you might be interested in:
- -t: Specify the file system type.
The most common are ext4 (Linux), vfat (FAT32), ntfs (Windows) and cifs (Samba). - -o: Allow to pass various options with a comma-separated format:
mount -o arg1=val1,arg2=val2,arg3 - -a: Mount all file systems defined in fstab.
See the related questions below if you don’t know what it is. - -r: Mount the file system in read-only mode.
- -v: Enable verbose mode.
- -l: List all mounted file systems.
Use man for a complete list of options:man mount
Tips
Un-mount drives
We have seen how to mount a drive to a local folder, but it’s also recommended to “un-mount” it before physically removing it (especially for USB drives).
Here is the command to do this:umount <destination>
umount <device>
So, you can either use the device identifier (/dev/sda1) or the mounting point (~/usb) to properly disconnect the drive. For example:sudo umount /dev/sda1
Mount network drives
The ‘mount’ command is also often used to access shared folders. For example, on another computer, or if you have a NAS on the same network.
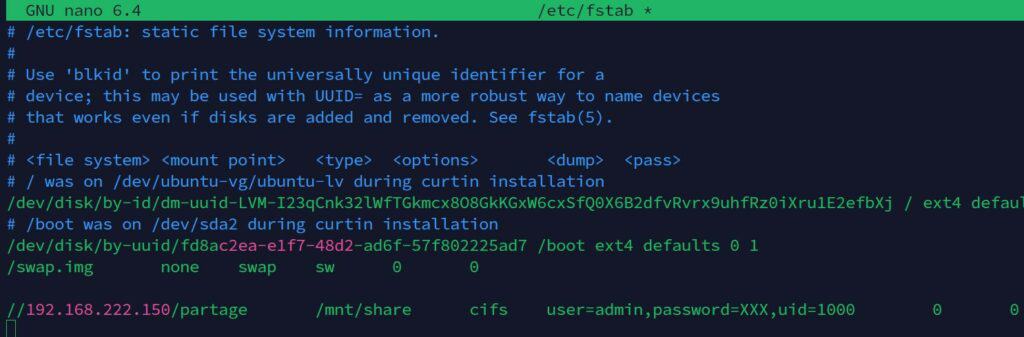
As an example, I have a NAS at home (IP: 192.168.222.150), with a shared folder on it (named “partage”). I can use the user “admin” to access this folder.
If I use these elements to create a ‘mount’ command, it will look like this:sudo mount -o user=admin -t cifs //192.168.222.150/partage /home/pat/usb

You already know most of the parameters for this command, but here is an explanation:
- I use “-o” to specify a different username, as it’s not my current one (which is “pat” as you can see in the prompt).
- The file format for a Samba shared folder is generally “cifs”.
- The device identifier for a remote folder is expressed in this format: //IP_ADRESS/FOLDER.
- Then I’m using the same local folder as with the USB drive to connect it.
The ‘mount’ command will ask for the password (which can be added to the options if you prefer), and then I get access to the remote files directly under the ‘usb’ folder.
Related questions
What is the ‘fstab’ file, and how it relates to the ‘mount’ command?
The ‘fstab’ file, typically located at /etc/fstab, is used to define how disk partitions, remote file systems, and other storage devices should be automatically mounted by the system.
Each line in this file represents a filesystem, providing details like the device name, mount point, filesystem type, and options.
If a device is listed in the fstab file, it can be mounted more simply, by using either:mount -aTo mount all devices at once. Or with just its name, like:mount /home/pat/usb
All the missing options are recovered from the fstab file.
Would it be possible to mount NTFS partition on Linux?
It is possible to mount NTFS partitions on Linux, with NTFS-3G used as a driver for read-write access.
It’s possible to use mount with all kinds of devices, partitions and file systems, as long as the operating system knows how to read the file on it.
Can I use ‘mount’ to read an ISO file on Linux?
ISO files can be mounted and read on Linux systems using the mount command, with the loop device feature enabling this functionality:mount -o loop file.iso /mnt/iso
This can be pretty useful if you have system or application images that you need to read to access installation files.
Download your exclusive free PDF containing the most useful Linux commands to elevate your skills!
Download now
Going further
The ‘mount’ command is rarely used in a vacuum, on its own. It is usually part of a larger project, or at least with a specific goal in mind, such as accessing a USB drive or network folder. For more specific instructions, you can check out these other tutorials on the website:
- How To Mount a USB Drive On The Raspberry Pi (3 ways)
- How To Mount a USB Drive On Ubuntu Server (2 Ways)
- Can You Connect an External Hard Drive to Raspberry Pi?
- How to turn a Raspberry Pi into a file server?
Download your exclusive free PDF containing the most useful Linux commands to elevate your skills!
Download now
If you are looking for exclusive tutorials, I post a new course each month, available for premium members only. Join the community to get access to all of them right now!
Additional Resources
Overwhelmed with Linux commands?
My e-book, “Master Linux Commands”, is your essential guide to mastering the terminal. Get practical tips, real-world examples, and a bonus cheat sheet to keep by your side.
Grab your copy now.
VIP Community
If you just want to hang out with me and other Linux fans, you can also join the community. I share exclusive tutorials and behind-the-scenes content there. Premium members can also visit the website without ads.
More details here.
Need help building something with Python?
Python is a great language to get started with programming on any Linux computer.
Learn the essentials, step-by-step, without losing time understanding useless concepts.
Get the e-book now.