How To Set Up a VPN Gateway with Raspberry Pi: Easy Guide
Having a VPN gateway has many advantages: control over who has access to the network, access to content from other geographical locations, etc. However, setting up the Pi as a VPN server is quite complex. So in this tutorial, we will set up the Pi as a VPN gateway using a VPN client that supports OpenVPN.
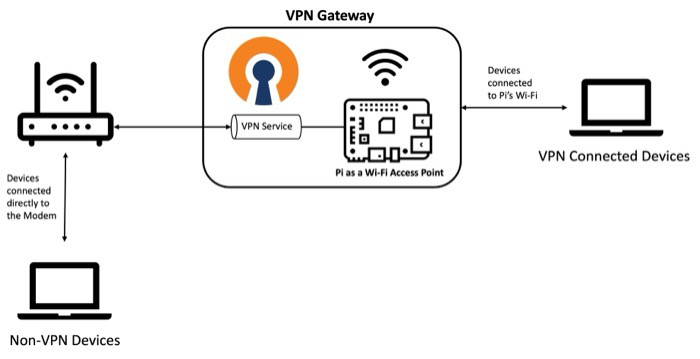
The Raspberry Pi VPN gateway can be created by first connecting the Raspberry Pi to a VPN provider. Then, it will be configured as an access point, which allows the Pi to route all the incoming traffic through the VPN service, thus acting as a gateway.
Building this VPN gateway involves two main steps: first, we will connect our Raspberry Pi to an OpenVPN-supported VPN service, and second, we will set up the Pi as a Wi-Fi access point (which allows it to act as a Wi-Fi extender). So, let’s get started! Let’s learn a bit more about what exactly a VPN (Virtual Private Network) gateway is.
If you’re looking to quickly progress on Raspberry Pi, you can check out my e-book here. It’s a 30-day challenge where you learn one new thing every day until you become a Raspberry Pi expert. The first third of the book teaches you the basics, but the following chapters include projects you can try on your own.
What is a VPN Gateway?
A VPN, or Virtual Private Network, is a technology that allows a user to establish a secure and encrypted connection over the internet to another network, often in a different location.
To learn more about this, refer to the following article What is a VPN?
A VPN Gateway is a hardware device (it can be a computer, router or even a Raspberry Pi as in our case) that is connected to a VPN service and routes all the traffic through the VPN so the clients can access the VPN without having the VPN software installed on their system.
It basically acts as an intermediary between the client devices and the VPN network.
Now that we have an idea of what we will be creating, let’s start with the tutorial. We will begin with the hardware and software requirements for this tutorial.
Hardware and Software Prerequisites
To set up the Raspberry Pi as a VPN Gateway, you will need the following:
It's a free PDF guide containing every Raspberry Pi Linux command you should know!
Download now
- VPN Subscription.
Most VPN providers have a 30-day money-back guarantee, so you don’t take any risk by testing it out. There are many VPN providers you can try (I tested a few of them here), but I’ll use Surfshark for this tutorial. - A Raspberry Pi.
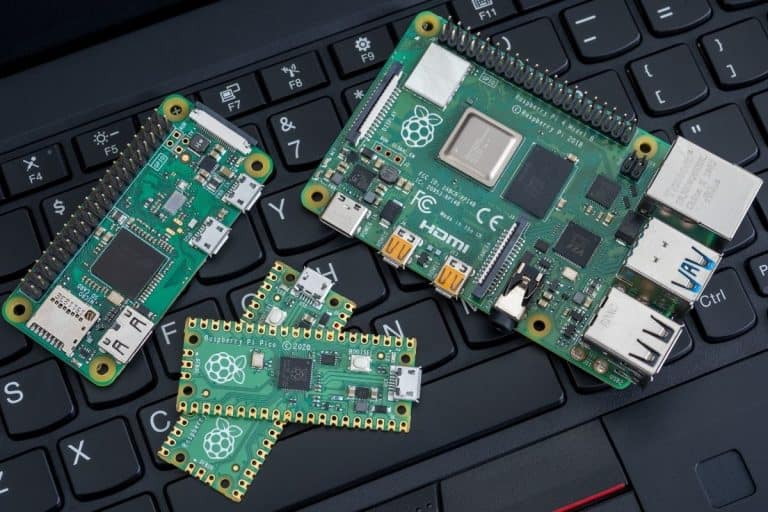
The steps will be similar on any Linux computer, but I’m testing this tutorial for you on a Raspberry Pi 4. It should work with any model. - A good SD card or USB drive (I’ve linked my favorite products).
There’s nothing special here, but if it’ll be an important node of your network later, choosing the right storage is essential. You want something reliable. - An Ethernet Cable.
You will need an Ethernet cable to connect your Pi to your router, as we will be using the Wi-Fi interface to create an access point. - Raspberry Pi OS (Bookworm).
I would always recommend opting for the latest version of the Raspberry Pi OS Bookworm. This tutorial will only work for the latest Bookworm OS as the software providers switched to Network Manager in this version, which is what we will be using in this tutorial.
Once you have everything set up, we are ready to start with the tutorial.
We will first set up the Surfshark VPN, an OpenVPN client on the Raspberry Pi.
Note that you can use any VPN provider which supports OpenVPN to follow this tutorial.
Here are a few alternatives to Surfshark along with the articles that will help you set them up on the Pi:
- ExpressVPN: ExpressVPN on Raspberry Pi: The Ultimate Guide.
- NordVPN: Ultimate guide to NordVPN on Raspberry Pi (Kodi & Raspbian).
- ProtonVPN: How To Install & Use ProtonVPN On Raspberry Pi (GUI & CLI).
Setting up Surfshark VPN on Raspberry Pi
In this step, we will go through the steps to set up Surfshark VPN on the Raspberry Pi:

Join Our Community!
Connect, learn, and grow with other Raspberry Pi enthusiasts. Support RaspberryTips and enjoy an ad-free reading experience. Get exclusive monthly video tutorials and many other benefits.
Learn more- Getting the Authentication Credentials from Surfshark.
- Installing OpenVPN on the Raspberry Pi.
- Connecting to Surfshark VPN.
Fetching Authentication Credentials from Surfshark
The first step is to fetch the authentication credentials that we will use to connect to any Surfshark VPN server. Note that these are not the login credentials you use. Also, you will need an active Surfshark subscription for this.
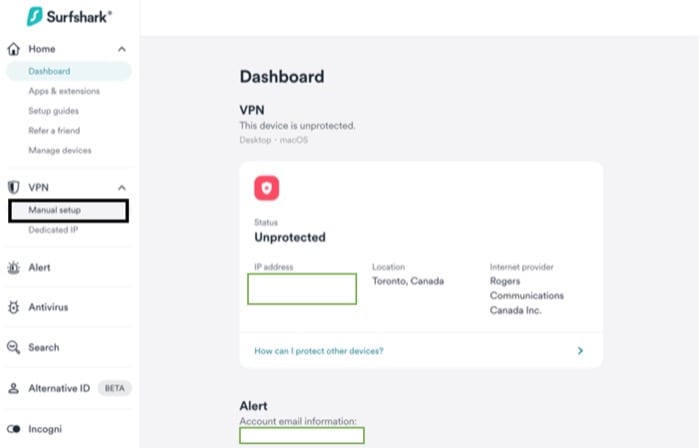
- First, log in to your Surfshark account. You will be brought to the dashboard once you successfully log in. From the VPN section on the left, click on Manual Setup.
- In Setup methods, select the Router option and on the right, select OpenVPN (WireGuard is yet another protocol supported on the Pi – WireGuard Installation on Raspberry Pi: Easy Setup Guide).
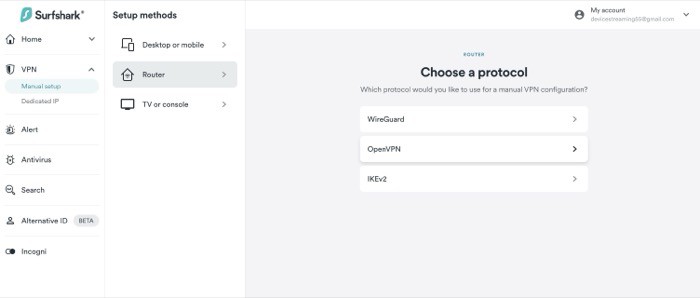
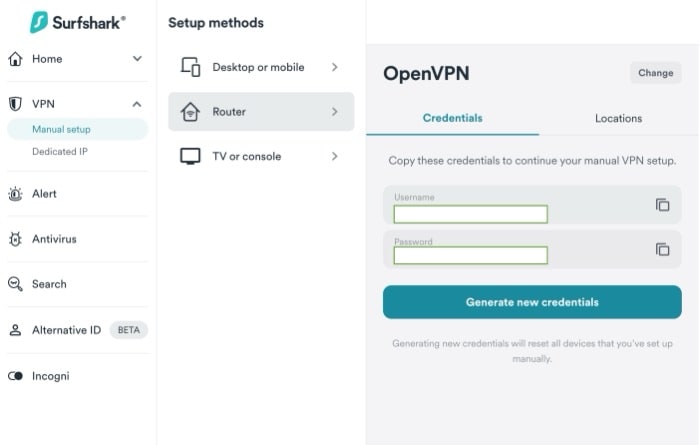
- Once you click on OpenVPN, you should see the required credentials (username and password) on the screen. Just copy and keep these credentials, as we will be using them later to establish a connection to Surfshark servers from our Pi.
Next, we will move to our Pi and set it up so that we can connect to Surfshark VPN. That involves installing OpenVPN on our Pi.
Configure Raspberry Pi for Surfshark
In this section, we will set up our Pi so that we can establish a VPN connection through it. For this, we will first need the OpenVPN client, which is what we will be using to establish this connectivity.
- To install the OpenVPN on Pi (running the latest version of Raspberry Pi OS) and a required dependency package (which will be used later), just type in the following command (If you are requested to enter a password, please enter the root user password):
sudo apt install openvpn unzip -y - After this, navigate to the OpenVPN directory using the below command:
cd /etc/openvpn - We will now download the Surfshark OpenVPN configuration files, which will allow us to connect to various VPN servers hosted by Surfshark. Run the following command for this:
sudo wget https://my.surfshark.com/vpn/api/v1/server/configurations - This should download a zip file with all the config files. Just unzip and delete the original zip file using these commands.
sudo unzip configurations
sudo rm configurations - To see the list of available servers, you can just execute the
lscommand to list all the files present in the directory. All the available servers will have .opvn files.
This completes the required configurations. In the next section, we will learn how to establish a connection with Surfshark.
Connecting to the Surfshark VPN Server
Follow the steps given below:
- Once you have selected a server, just type in the following command to establish a connection with Surfshark:
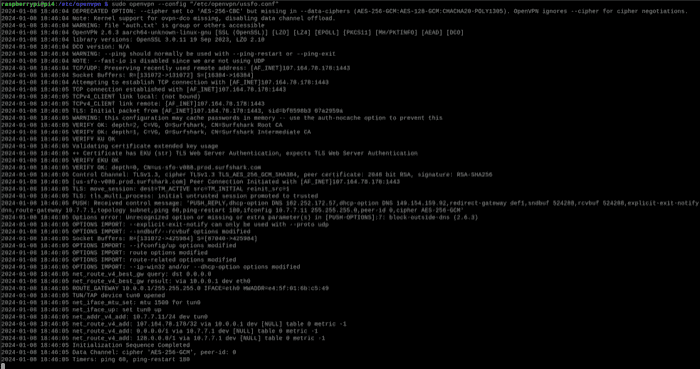
sudo openvpn <server-file-name>
An example command for the same is:sudo openvpn us-dal.prod.surfshark.com_tcp.ovpn - Here, you will be prompted for credentials. Enter the credentials we obtained in the first part of this tutorial. If you have followed everything correctly, you should see the Initialization Sequence Completed message on the terminal, indicating a successful connection.

Congratulations! You have successfully connected your Pi to a VPN service. Now, we want to create a wireless access point on our Pi (fancy word for Wi-Fi Hotspot) and then route all the incoming traffic through the VPN we connected to.
This is what we will be doing in the next section. So, let’s get started.
If you’re new to the Linux command line, this article will give you the most important Linux commands to know, plus a free downloadable cheat sheet to keep handy.
It's a free PDF guide containing every Raspberry Pi Linux command you should know!
Download now
Raspberry Pi as a Wireless Gateway
In this section, the following things will be covered:
- Setting up the Pi as a Wireless Access Point (Wi-Fi Hotspot).
- Raspberry Pi VPN Configuration for the Gateway.
- Test the gateway in action!
We will first learn how to set up the Pi as a wireless access point. Note that this tutorial assumes that you are running the latest Bookworm distribution, which uses the Network Manager package by default.
It's a free PDF guide containing every Raspberry Pi Linux command you should know!
Download now
Raspberry Pi as a Wireless Access Point
Setting this up will allow other devices to connect to your home router through the Raspberry Pi (we will be creating a standalone network), which will allow us to route this traffic through our VPN service. Follow the steps given below:
- We will be using the nmcli package to set up a new Wi-Fi access point for our Raspberry Pi. We will have to run a series of commands to achieve this.
- The first command creates a new connection called “vpn-gateway” and sets the SSID (Wi-Fi name) to “RaspberryTips-VPN-Gateway” where the device (ifname) is wlan0 and the type is wifi (it may be different for you if you are using an external Wi-Fi dongle).
nmcli con add con-name vpn-gateway ifname wlan0 type wifi ssid "RaspberryTips-VPN-Gateway" - The second and the third command set up the Wi-Fi password. Choose a complex password of your choice for enhanced security.
nmcli con modify vpn-gateway wifi-sec.key-mgmt wpa-psk
nmcli con modify vpn-gateway wifi-sec.psk "p@ssW0rd#123" - The fourth command does the following: sets the wireless mode to Access Point, sets the band to BG (2.4 GHz) (you can set it to A for 5 GHz) and sets the IPv4 configuration to shared.
nmcli con modify vpn-gateway 802-11-wireless.mode ap 802-11-wireless.band bg ipv4.method shared - Finally, we activate the vpn-gateway connection using the “con up” command.
nmcli con up vpn-gateway
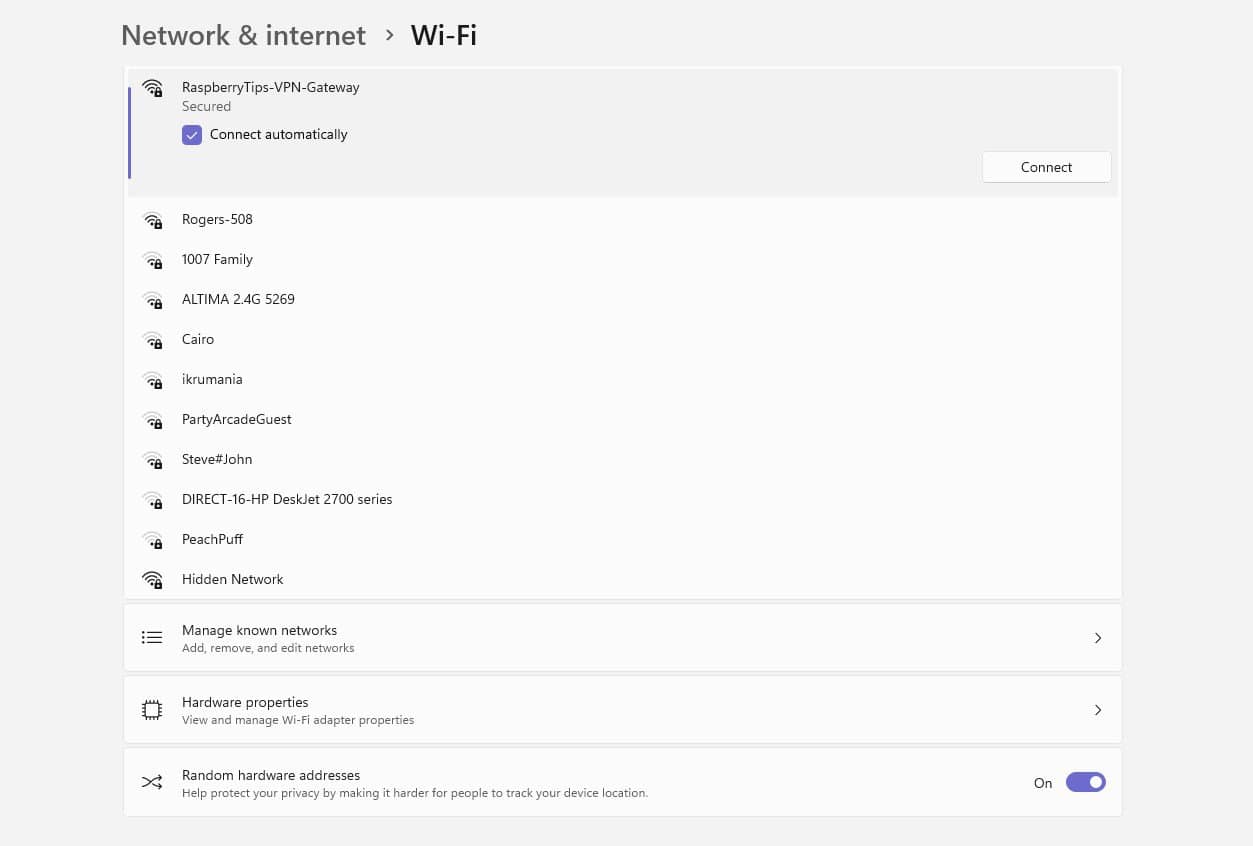
- After a few seconds, you will be able to connect to the “RaspberryTips-VPN-Gateway” network from your system.
Next, we will connect our Raspberry Pi to a VPN (Surfshark in our case) so that we can tunnel all the incoming traffic through it.
Related article: Turn Your Raspberry Pi into an Access Point (Bookworm ready)
Raspberry Pi VPN Configuration for the Gateway
In the last section, we saw how to connect to Surfshark VPN from the Pi. Now, we will configure the VPN so that we can turn our Wi-Fi Access Point into a full-blown VPN Gateway. For this, we will need to do some configurations.
Creating the auth.txt file
When connecting to the VPN, one thing we saw is that running the connection command requires us to enter the username and password every time. So, when you reboot the Pi, you will have to connect with the VPN again. This is not ideal if we would like to run everything as a service which starts on boot.
So, let’s do something about it. We will run the following commands on a new terminal window:
cd /etc/openvpnsudo nano auth.txt
Now, we will add the credentials we obtained from the VPN provider in the last section.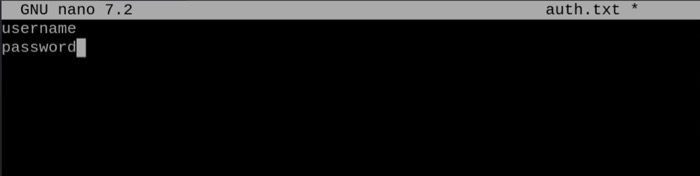
Once you have entered these details, press Ctrl + X and then Y to save the file. Now, we will modify and create a configuration file which will allow us to connect to a VPN server situated in San Francisco (US).
Automating Authentication for VPN Connectivity
To create these config files, we will use the existing ovpn files we obtained from Surfshark as the base files. In particular, we will focus on this file: us-sfo.prod.surfshark.com_tcp.ovpn.
We will create a copy of this file using the below commands:
sudo cp us-sfo.prod.surfshark.com_tcp.ovpn ussfo.conf
Next, change line 15 of the file as shown below.
# Opening the file
sudo nano ussfo.conf
# Existing Line 15
auth-user-pass
# Updated Line 15
auth-user-pass auth.txt
This will allow the configuration file to complete the authentication process using the auth.txt file we created. We can easily connect to Surfshark VPN now using the following command (note that you should be in the same directory where you placed the config file):
sudo openvpn --config "ussfo.conf"
This command will allow you to connect to the US SF server hosted by Surfshark.
Great! We will now see our VPN Gateway in action.
Testing the VPN Gateway
Now that everything is set up, we can test that our VPN gateway is operational. To do this, just start an access point by running the nmcli commands in the previous section and connect to the VPN server using the configuration file we created.
This is where using Network Manager comes in handy. We do not need to do any additional routing configurations, everything is done automatically.
Now, I will connect to my Pi’s Wi-Fi from my laptop. Once I have done that, I can open a browser window and search “What is my IP” on Google to fetch the details about my current location, which in this case will be San Francisco.
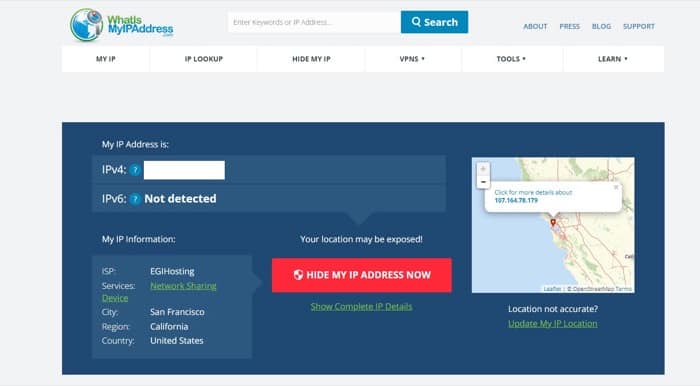
This is awesome! You now have a fully operational VPN Gateway that you can use to access content from different geographical locations or just have a more secure and encrypted home network.
It's a free PDF guide containing every Raspberry Pi Linux command you should know!
Download now
Reminder: Remember that all the members of my community get access to this website without ads, exclusive courses and much more. You can become part of this community for as little as $5 per month & get all the benefits immediately.
Conclusion
We successfully configured a Raspberry Pi to work as a VPN Gateway in two simple steps in this tutorial. Here are the advantages of having a gateway between your home devices and the Internet:
- You can set up a firewall that will allow you to moderate the incoming and outgoing traffic on your network. Refer to this article to know more about it: How to use Raspberry Pi as a Wireless Router with Firewall.
- You can access content from different countries which may not be normally allowed.
- It provides more security for the overall network.
That being said, using a VPN service does limit you in terms of capabilities and it also incurs a monthly charge to use them for longer periods. Alternatively, you can set your Pi as a standalone VPN server which gives you a lot more control.
Refer to this article for a detailed article on how to do just this: How to install your own VPN server on Raspberry Pi? (OpenVPN).
Whenever you’re ready, here are other ways I can help you:
The RaspberryTips Community: If you want to hang out with me and other Raspberry Pi fans, you can join the community. I share exclusive tutorials and behind-the-scenes content there. Premium members can also visit the website without ads.
Master your Raspberry Pi in 30 days: If you are looking for the best tips to become an expert on Raspberry Pi, this book is for you. Learn useful Linux skills and practice multiple projects with step-by-step guides.
The Raspberry Pi Bootcamp: Understand everything about the Raspberry Pi, stop searching for help all the time, and finally enjoy completing your projects.
Master Python on Raspberry Pi: Create, understand, and improve any Python script for your Raspberry Pi. Learn the essentials step-by-step without losing time understanding useless concepts.
You can also find all my recommendations for tools and hardware on this page.