How to Fix ‘pip: command not found’ on Raspberry Pi
While Python is installed by default on all Raspberry Pi OS versions, this isn’t necessarily the case with PIP, the Python packages installer. As PIP is useful for most Python projects, you’ll often need to address this error as soon as possible. Here is how to do it.
The error ‘-bash: pip: command not found’ appears when trying to use the PIP command when it isn‘t installed. The main PIP package is available in the default repository and can be installed using the system package manager.
So don’t worry, it should be a quick fix, and you’ll be back to your project in a minute. Just follow the steps below to install PIP on your system.
By the way, if you get overwhelmed as soon as Python is required for a project, I recommend checking out my e-book “Master Python on Raspberry Pi“. It will guide you step-by-step to learn the essential concepts (and only the essential concepts) required to achieve any project in the future. Raspberry Pi without Python is like a car without an engine, you miss all the fun parts. Get 10% off by downloading it today!
It's a free PDF guide containing every Raspberry Pi Linux command you should know!
Download now
How to install PIP on Raspberry Pi
Installing PIP on a Raspberry Pi is quite straightforward, but there is a prerequisite to make sure you install the right package: knowing which Python version you use.
Checking your Python version
While the latest version of Raspberry Pi OS only comes with Python 3, they have been preinstalled with both versions: Python 2 and 3 for years, and if you have an older version of Raspberry Pi OS, you may even only use Python 2.
If like me, you always mix the languages syntax, download my cheat sheet for Python here!
Download now
Anyway, before installing PIP, make sure to know which version you are using for your project.
You can quickly check which version is installed by using these commands:python --version
python2 --version
python3 --version

Join Our Community!
Connect, learn, and grow with other Raspberry Pi enthusiasts. Support RaspberryTips and enjoy an ad-free reading experience. Get exclusive monthly video tutorials and many other benefits.
Learn more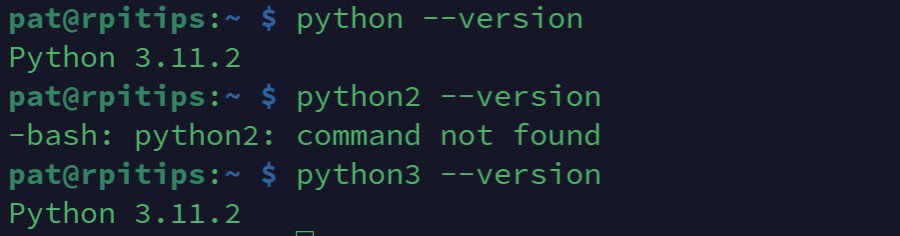
In this example (on a fresh Raspberry Pi OS Bookworm), I only have Python 3 installed (3.11.2). But sometimes you may get different results. If this is your case, you have to decide with which version you’ll use PIP.
The command to install PIP is slightly different depending on your Python version, that’s why it’s important to not skip this step.
Installing PIP via APT
The easiest way to install PIP on a Raspberry Pi is to use the package manager like you would to install any other application.
I’ll show you with the command line because it’s faster when you know the package name, but feel free to use the “Add / Remove software” tool if you are not familiar with the terminal. I explain everything in this article if you need more guidance: How to Easily Install Apps on Raspberry Pi OS? (5 methods).
Anyway, open a terminal and follow these steps to install PIP:
If like me, you always mix the languages syntax, download my cheat sheet for Python here!
Download now
- Start by updating the repository with:
sudo apt update - If upgrades are available, it’s generally a good practice to install them first:
sudo apt upgrade - We can now install the main package for PIP, with:
sudo apt install python3-pipThat’s where the command might be slightly different. If you don’t have Python 3 installed (you should), you can try installing python-pip or python2-pip instead.
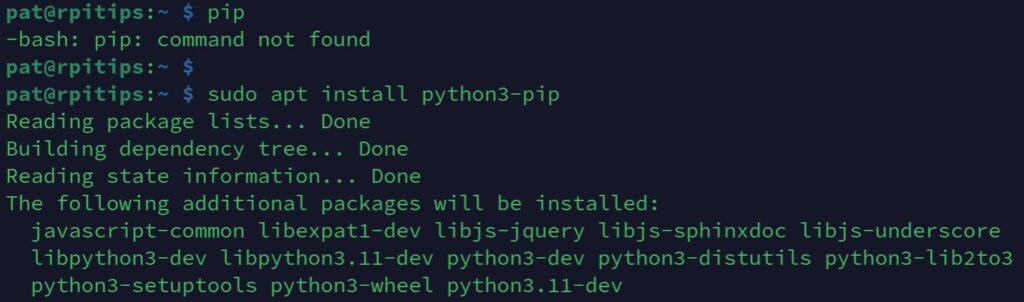
If everything goes as expected, APT will install the main package, as well as a few dependencies, and a few seconds later, the “pip: command not found” error should be a thing of the past.
You can check that pip is installed and get its version with:pip --version

In this example, I now have PIP version 23.0.1 installed on my Raspberry Pi, and can use this command to install additional libraries required for my project. Here are some examples where PIP is convenient:
- Install OpenCV on Raspberry Pi: The only guide you need
- The Best Python GUI Libraries for Raspberry Pi to Try Out
- 15 Fun Raspberry Pi Projects to Experiment with Python
Are you a bit lost in the Linux command line? Check this article first for the most important commands to remember and a free downloadable cheat sheet so you can have the commands at your fingertips.
It's a free PDF guide containing every Raspberry Pi Linux command you should know!
Download now
Reminder: Remember that all the members of my community get access to this website without ads, exclusive courses and much more. You can become part of this community for as little as $5 per month & get all the benefits immediately.
Related questions
What if PIP is installed, but the command is still not recognized?
If you have installed PIP and the error persists, it may be that the installation directory is not in your system’s PATH.
You can check your PATH with:echo $PATHAnd make sure that the pip executable is in one of the folders mentioned, as in my screenshot below:

If it’s not the case, you can edit the “.bashrc” file, to add it to the list. Make sure to restart the terminal or your session after editing the PATH variable.
What is the difference between pip and pip3?
The main difference between “pip” and “pip3” is the version of Python they are associated with: pip is traditionally used for managing packages in Python 2, whereas pip3 is designated for Python 3.
You should be aware that on some systems, pip may point to the Python 3 version if Python 2 is not installed, or if the system has been configured to treat Python 3 as the default (like on Raspberry Pi OS Bookworm).
How to install the latest version of PIP on a Raspberry Pi?
While installing PIP via the package manager (APT) is the easiest way, it doesn’t necessarily install the latest version available. Once installed, you can use PIP itself to upgrade it to the latest version:pip3 install --upgrade pip
Note that on the latest version of Raspberry Pi OS, you may have to force this upgrade or use a virtual environment. I have a full tutorial about this, so if interested, I recommend you to read it there.
Whenever you’re ready, here are other ways I can help you:
The RaspberryTips Community: If you want to hang out with me and other Raspberry Pi fans, you can join the community. I share exclusive tutorials and behind-the-scenes content there. Premium members can also visit the website without ads.
Master your Raspberry Pi in 30 days: If you are looking for the best tips to become an expert on Raspberry Pi, this book is for you. Learn useful Linux skills and practice multiple projects with step-by-step guides.
The Raspberry Pi Bootcamp: Understand everything about the Raspberry Pi, stop searching for help all the time, and finally enjoy completing your projects.
Master Python on Raspberry Pi: Create, understand, and improve any Python script for your Raspberry Pi. Learn the essentials step-by-step without losing time understanding useless concepts.
You can also find all my recommendations for tools and hardware on this page.