How to Set Up Raspberry Pi OS Desktop on VMware Workstation
With all the articles related to Raspberry Pi, you may be curious to try its operating system, Raspberry Pi OS, without having a physical device. Good news! It’s possible thanks to a great solution: Virtualization. And today, I will specifically explain how to run the Raspberry Pi OS with VMware.
To run Raspberry Pi OS on a virtual machine, a specific image file (.iso) must be downloaded from the official website. The system can then be installed on a typical virtual machine, with at least 2GB of memory.
In this article, I will show you how you can test Raspberry Pi OS without having a physical device. I will show you how to install it on a virtual machine that is separate from your main machine, so you won’t have to worry about any mistakes you make. I will also show you all the benefits that VMware has for you to use.
If you’re looking to quickly progress on Raspberry Pi, you can check out my e-book here. It’s a 30-day challenge where you learn one new thing every day until you become a Raspberry Pi expert. The first third of the book teaches you the basics, but the following chapters include projects you can try on your own.
Installing VMware
VMware Workstation is a desktop virtualization software (also called hypervisor) that allows you to create, manage, and run virtual operating systems separately from your main system. It allows you to run any kind of OP (operating system) like Windows, Linux, Mac, etc.
Before we start, you will need to have installed VMware Workstation on your computer. The process may change depending on the operating system that you are using (Windows or Linux), despite that, the instructions will be easy to follow.
Windows (Download Link): In Windows environments, the installation is pretty much simple, you just have to follow the installation of the executable until it is finished.
Linux (Download Link): In GNU/Linux environments, although it may be different, it does not present much difficulty. After downloading the installation file, you must run it using the CLI with this command:sudo sh VMware-Player-VERSION.x86_64.bundle
Where <VERSION> will change depending on the version you download.
Are you a bit lost in the Linux command line? Check this article first for the most important commands to remember and a free downloadable cheat sheet so you can have the commands at your fingertips.
Setting up the Virtual Machine
Before creating and setting up the Virtual Machine, you must download the ISO for Raspberry PI OS Desktop. You can download it here.
Note: The process of creating virtual machines may be different if you are using the pro version of VMware Workstation. In which you can choose the type of SCSI controller, the type of virtual disk and many other features. You can compare the versions on the official VMware website.
A quick guide on creating the VM
The first step is to open the VM Creation Panel using the “Create a New Virtual Machine Button”.
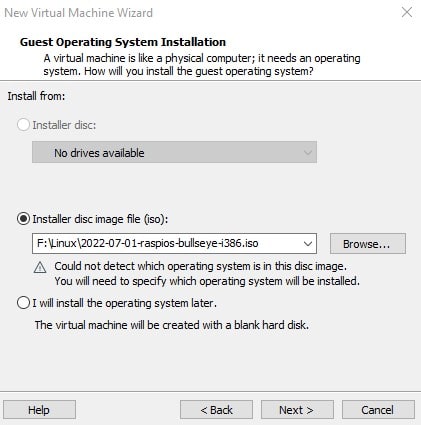
Select the “Installer Disc Image” option and look for the ISO you previously downloaded of Raspberry Pi OS Desktop.
Normally VMware detects which system you are going to install, but in this case, it doesn’t have any info about Raspberry Pi, so it won’t detect it and we will have to specify it.
It's a free PDF guide containing every Raspberry Pi Linux command you should know!
Download now
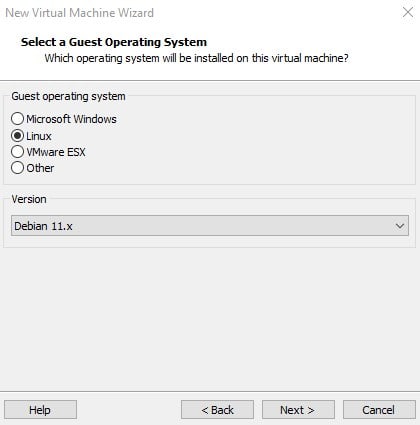
The next step is to choose the OS. We will choose the Linux option and select Debian since it is the distribution on which Raspberry Pi OS Desktop is based. You can find the Debian version on the official ISO download page.
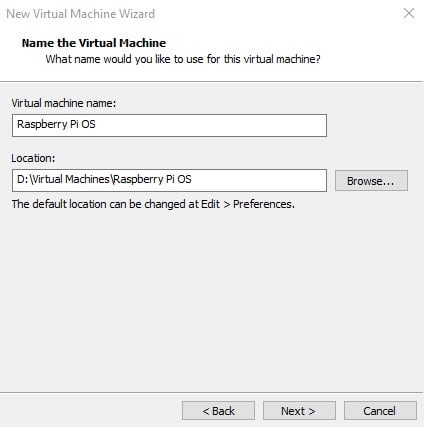
Here you can choose the name of the virtual machine and the directory where the virtual machine data will be saved, which is important to keep in mind in case you need to move it or make a backup.
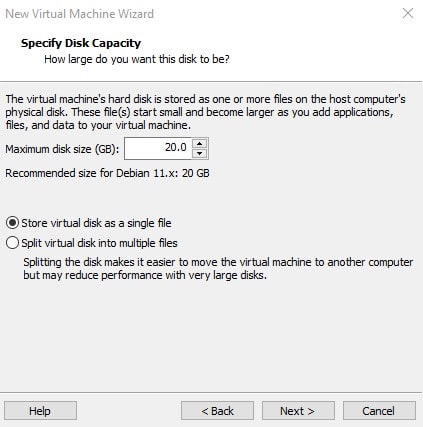
Now you will have to choose the size of storage that the virtual machine will have, and how it will save the files.
In this case, since you will have a small disk size, it is recommended to use a single file as a virtual disk, because it will be much easier to manage and will give you more simplicity when backing up (since it will be only one file to backup).
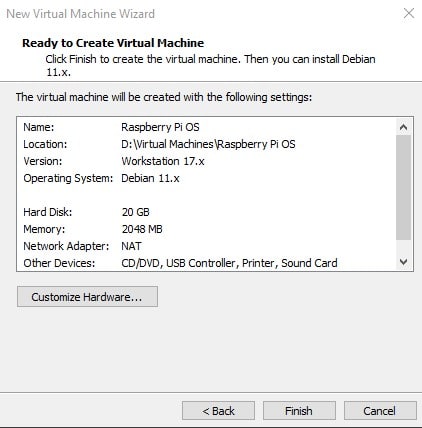
After having everything configured, you will be able to see a summary of the details of your virtual machine. If you choose to customize the hardware, you will have access to more options, such as the following:

Join Our Community!
Connect, learn, and grow with other Raspberry Pi enthusiasts. Support RaspberryTips and enjoy an ad-free reading experience. Get exclusive monthly video tutorials and many other benefits.
Learn moreMemory
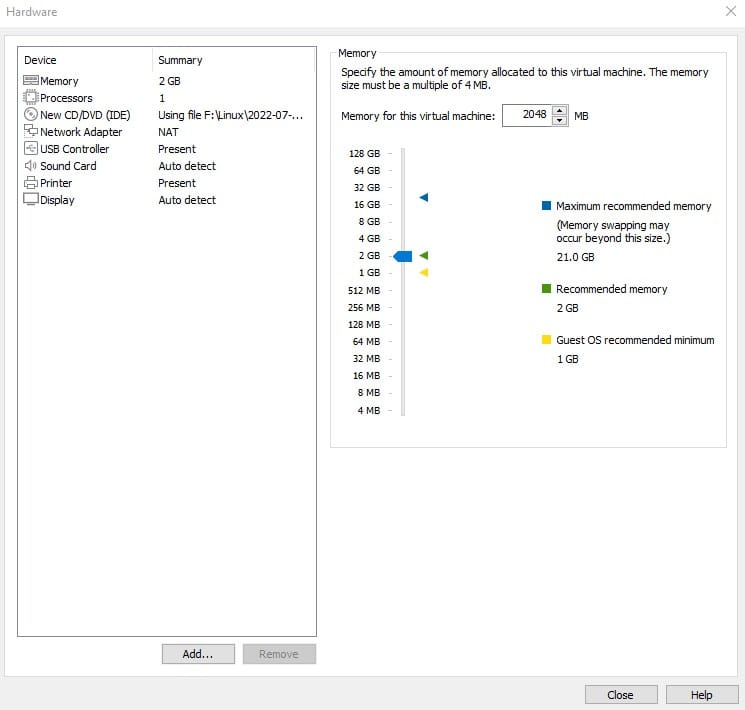
Depending on the operating system you are going to install, VMware will assign by default a specific amount of RAM based on the requirements of that system.
In this panel, you will be able to select the amount of memory you want for the virtual machine. Keep in mind that it must be represented in MB (Megabits), so you must multiply by 1024 the amount you want (if it is 2GB, it will be 2×1024=2048MB).
I recommend that you have at least 2GB of memory in your virtual machine because it’s the recommended requirement of Debian (which Raspberry Pi is based on).
Processor
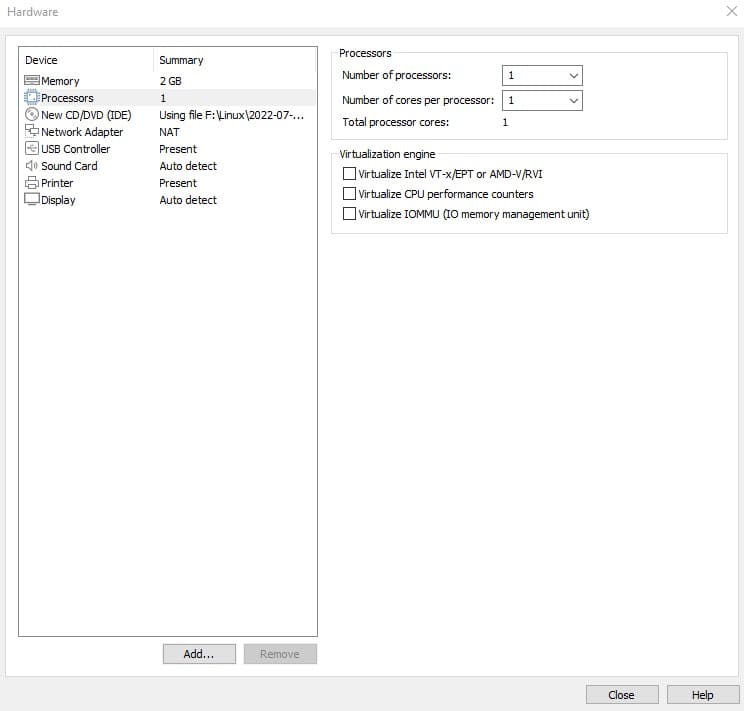
By default, the number of processors and cores is set to 1. For Raspberry Pi OS since it is a Debian-based distribution, it is recommended to have at least 1 processor with 2 cores.
To match the real hardware of Raspberry Pi, I recommend using a single processor and only changing the number of cores to the number you need. It should be noted that you can only assign the same number of cores that you have in the processor of your main machine.
Networking

In a virtual machine, we have different ways in which you can configure its network. By default, it is specified to use a NAT, but the different options that we can choose are:
- NAT: By choosing this option, the virtual machine will have an IP address on its own network, and at the same time will have access to the main machine’s network (and to the internet).
- Host-Only: The virtual machine will only have access to its private network, without having access to the main machine’s network, nor will it be able to access the Internet.
- Bridge: When using this option, the virtual machine will be considered part of your main machine’s network and will be considered as if it were just another device on the network.
In the case of Raspberry Pi, when installing it is recommended to use the NAT or Bridge option, since it is necessary to have internet access to update the system during the installation and afterward.
After that, you can switch it to Host Only if you need to do local testing and if you want to completely isolate the network. Otherwise, you can keep the NAT or Bridge option if you have a project that requires web connectivity.
It's a free PDF guide containing every Raspberry Pi Linux command you should know!
Download now
Setting up Raspberry Pi OS
Overview of the boot and installation process
After creating the virtual machine and assigning the ISO. The virtual machine at startup will display a boot window like this. If we do not choose anything within a few seconds, it will automatically start the first option.
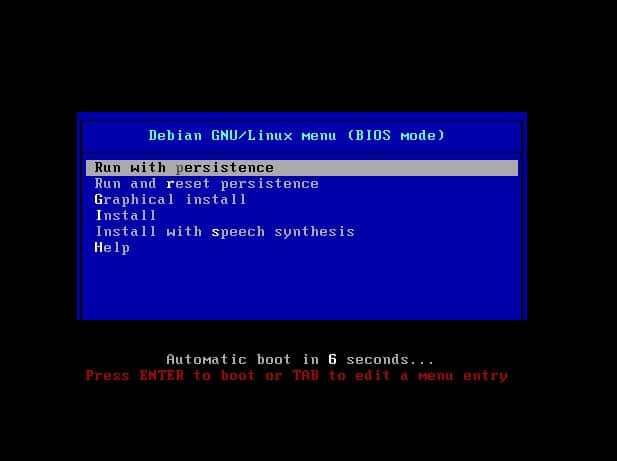
For this tutorial, we will choose the “Graphical Install” option, which is a more user-friendly and graphical way to view the installation process. If you don’t care much and you have experience performing the installation, the “Install” option is also valid for doing the installation process.
The “Run with persistence” and “Run and reset persistence” options are designed to boot Raspberry Pi from a physical storage device like a flash drive, allowing you to boot the system without having to install it, and giving you the option to keep the data or not.
It's a free PDF guide containing every Raspberry Pi Linux command you should know!
Download now
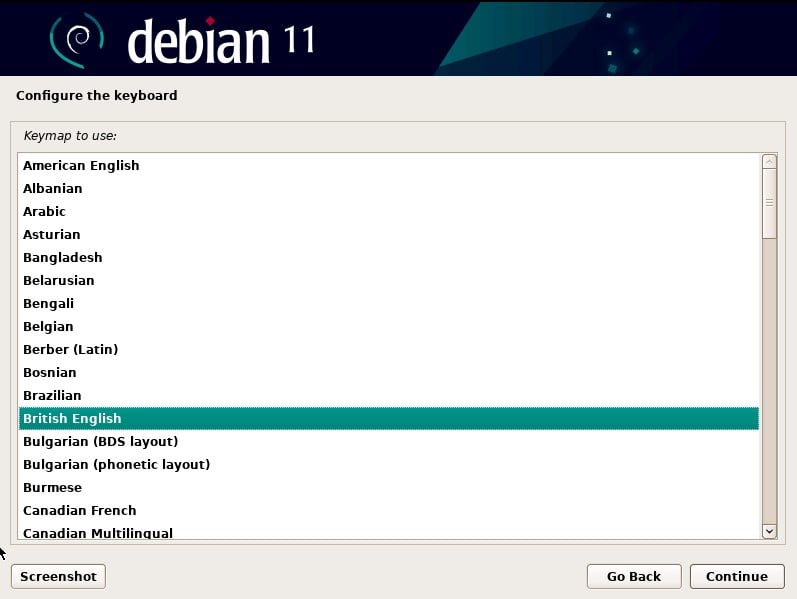
After you choose the installation option, you will be prompted to choose the language that matches your keyboard.
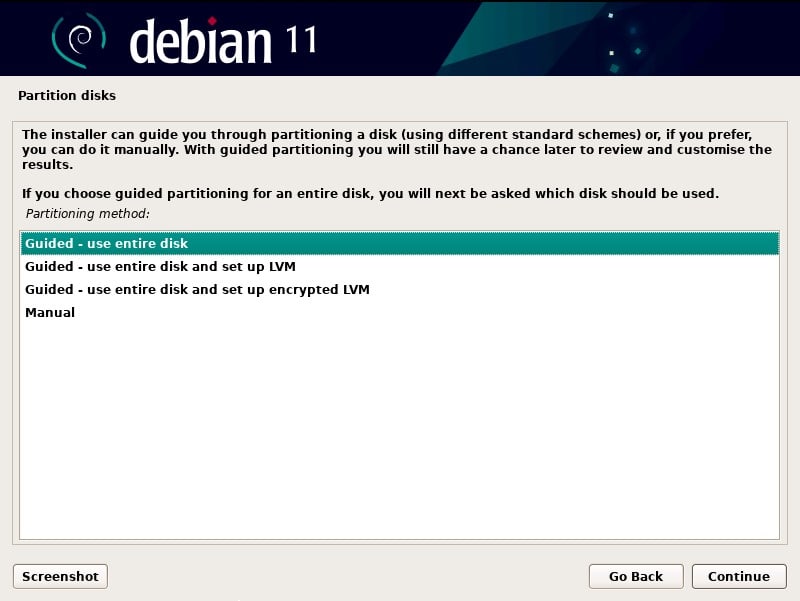
Now you will need to configure how the disk will be partitioned, the most recommended option is “Guided – use entire disk” since we already have a specified amount of storage in the virtual machine, and it is the easiest way to configure the virtual disk.
The options of using LVM (Logical Volume Manager) and Manual Partitioning are more used by people with experience in the IT area. While LVM gives you more flexibility in partition configuration, the manual option allows you to configure from scratch how you want to structure the partitions.
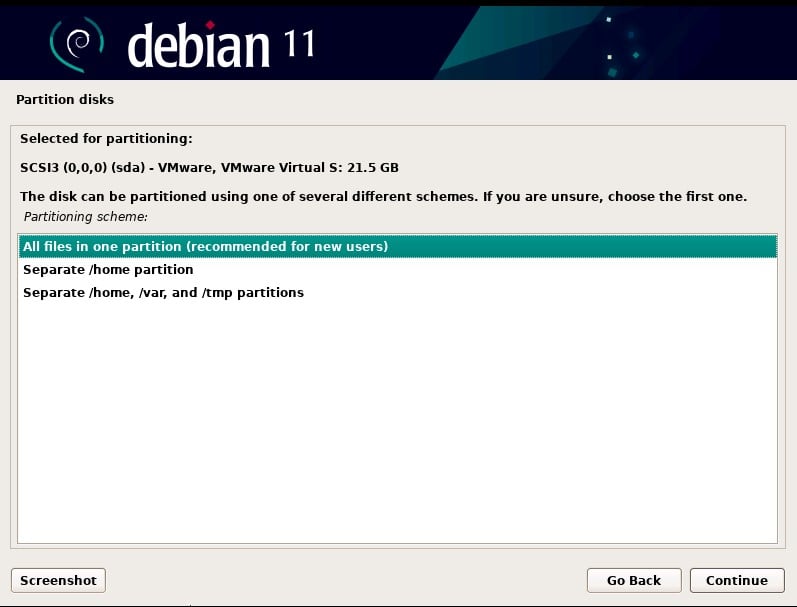
When you select the Guided option, the installer will also offer you how you want to partition the disk. The most recommended option for beginners is “All files in one partition“. It allows you to have only 1 partition with everything together without complications.
In advanced cases where you want to have more control when developing projects on Raspberry Pi, it will be recommended to use the manual option to separate important folders into partitions. Another recommended option is not to allocate all the space when installing the system and leave the remainder to be used and configured later.

Finally, you will be asked to install GRUB on your primary drive, and it will be important to select yes. This component is in charge of detecting and starting the operating systems installed on the disk.
After performing all the installation configuration processes, the operating system will be installed on the virtual disk, this process can take more than 10 minutes (and will depend on the specifications of the virtual machine).
Lastly, after performing the Debian installation, you will see the Raspberry Pi OS installation window when you start the system. The installation is similar to what you normally do on a Raspberry Pi, you can see more information and details in my article here.
From there, you can follow the tutorials available on this website, even if you don’t have a Raspberry Pi, for example:
- 5 Ways to Remote Desktop on Raspberry Pi (Windows/Linux/Mac)
- How to Install On-Screen / Virtual Keyboard in Raspberry Pi?
- How to Create a New User on Raspberry Pi?
Installing VMware Tools
After doing both installations in the virtual machine, it is recommended to install VMware tools, which is a package of tools that help the system to integrate with VMware software more optimally.
The benefits include:
- The resolution of the virtual machine automatically adjusts to the screen size.
- It allows copying and pasting of text between the Host (the main computer) and the Guest (the virtual machine).
- Files can be transferred from the Host to the Guest by dragging them to the virtual machine.
- Automatic synchronization of the Guest time with the Host time.
- Fixes possible network, color, and sound errors that may be encountered.
Before installing VMware tools, the virtual machine screen may look like this:
The resolution will not adjust to the size of the virtual machine window, and although you can change the resolution, it is not a very effective solution. To install VMware tools, you must first upgrade the system:sudo apt update
sudo apt upgrade
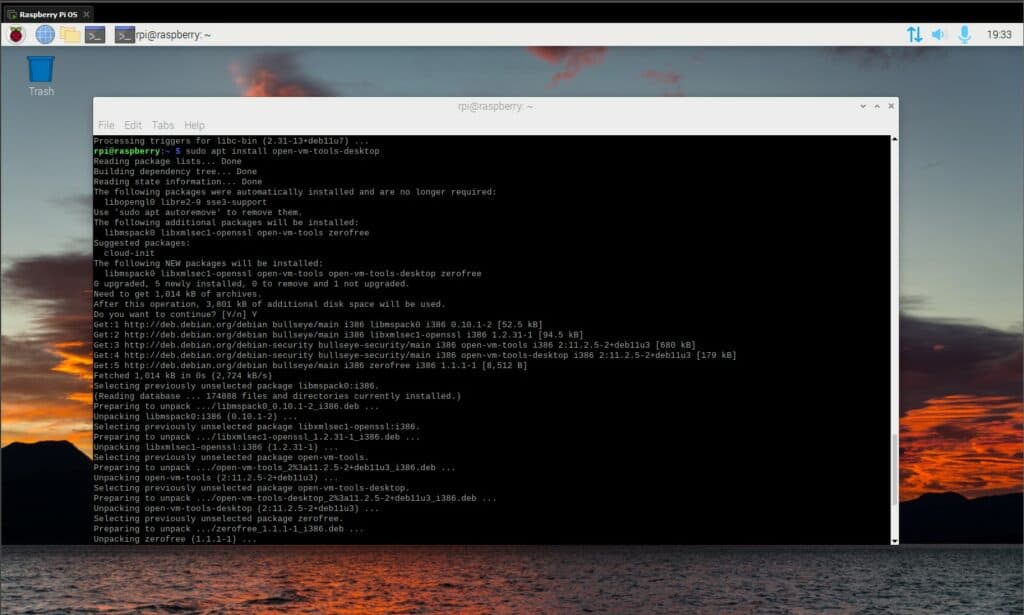
Then, you will be able to install the VMware tools packages:sudo apt-get install open-vm-tools-desktop
In case the system does not have a graphical interface, the command will be:sudo apt-get install open-vm-tools
After installing the packages, you can reboot the system using: sudo reboot
When the system restarts, you will be able to see the resolution of the machine automatically adjust to the virtual machine window.
These benefits are helpful because they will enhance your overall user experience when testing on Raspberry Pi OS. You will be able to transfer files as easily as if you were dragging a file from one folder to another, and you can easily perform your tasks in the CLI (Command Line) by copying and pasting the commands you need.
I’ve written a complete tutorial on installing VMWare tools here if you need more guidance.
It's a free PDF guide containing every Raspberry Pi Linux command you should know!
Download now
Want to chat with other Raspberry Pi enthusiasts? Join the community, share your current projects and ask for help directly in the forums.
Related Questions
What’s the difference between installing Raspberry Pi OS on VMware Workstation vs a physical Raspberry Pi?
One of the main differences you will find when installing Raspberry Pi OS on physical hardware is the fact that most of the process of installing Debian is skipped and you will be taken straight to the Raspberry Pi OS installation.
Also, by using a virtual machine you will have more control in customizing the specifications. You will have the option to choose how much memory, processor, or storage you want when you do the installation.
What are the primary limitations of using Raspberry Pi OS in a virtualized environment compared to a physical Raspberry Pi?
There can be limitations and differences when using Raspberry Pi OS in a virtualized environment. First, when using a virtual machine even if you put the same specifications as a Raspberry Pi the performance will be different in the two environments because the virtual machine cannot simulate the Raspberry Pi hardware perfectly.
Moreover, at the hardware level, using a virtual environment will be more limited, since you won’t have access to components such as GPIO pins or specific peripherals. This limitation may affect the functionality of the tests you are going to perform.
Finally, you may encounter driver compatibility failures, because you are not using real Raspberry Pi hardware, and a virtual environment is unable to fully emulate all the features of the hardware, so it is possible that the capacity of the drivers or their functionality could be affected.
My VM freezes and needs to be restarted after a while. How can I solve this problem?
Currently, in VMware Workstation 17.5, there is a widespread problem when it is used in Windows 10/11 environments, and it lies in the features related to native Windows virtualization like Hyper-V and WSL.
Having such features enabled causes conflicts when using virtual machines in VMware Workstation, causing the screen to freeze and the keyboard to stop working. For this reason, it is best to disable these features by doing the following:
- Disable Hyper-V and Windows Subsystem for Linux in the “Turn Windows features on or off” section of the system configuration.
- Disable WSL completely using Powershell. You can open Powershell by using Windows + X and choosing “Windows Powershell (Admin)”, and then entering the following command:
oDisable-WindowsOptionalFeature -Online -FeatureName Microsoft-Windows-Subsystem-Linux
Even if none of this works, another option is to install a version of VMware Workstation older than 17.5. You can download it using the following link.
Finally, several alternatives exist to virtualize Raspberry Pi. VMware is not the only virtualization software, you can also use QEMU and VirtualBox. Read my article that details more information about this in the following link.
Whenever you’re ready, here are other ways I can help you:
The RaspberryTips Community: If you want to hang out with me and other Raspberry Pi fans, you can join the community. I share exclusive tutorials and behind-the-scenes content there. Premium members can also visit the website without ads.
Master your Raspberry Pi in 30 days: If you are looking for the best tips to become an expert on Raspberry Pi, this book is for you. Learn useful Linux skills and practice multiple projects with step-by-step guides.
The Raspberry Pi Bootcamp: Understand everything about the Raspberry Pi, stop searching for help all the time, and finally enjoy completing your projects.
Master Python on Raspberry Pi: Create, understand, and improve any Python script for your Raspberry Pi. Learn the essentials step-by-step without losing time understanding useless concepts.
You can also find all my recommendations for tools and hardware on this page.