
How to Create a New User on Raspberry Pi?
Whatever your reason is, you may need to create a new user on Raspberry Pi. The procedure is not really intuitive for a beginner, so I will explain it in this tutorial. Here is the short answer if you are already familiar with Linux:
- Open a terminal (or SSH connection).
- Type the following command:
sudo adduser <username> - Fill the information (home directory, password, etc.)
- Done. The new user is ready to use.
Don’t worry, I will now explain everything in details in this post, starting with the reasons why you’ll probably need to create a new user, then the step-by-step procedure, and finally, I’ll give you a few extra tips about users management on Raspberry Pi.
By the way, if you are new on Raspberry Pi, I can help you to get started. In my mini-course, you’ll easily improve your skills on Raspberry Pi, from the very first steps to your first entire projects. Currently, my e-book is included for free in this course. Click here to get all the details.
Why will you need to create a new user?
Let’s start by examining a few reasons why you would need to create a new user on your Raspberry Pi.
Security
As explained in my 17 security tips post, using the default user is not a good idea, and the reasons to look at how to create a new one.
Many people keep using the default user on various operating systems (Administrator, root and pi).
However, I recommend disabling it if possible, and create another user with the same privileges.
The pi user is one of the most brute-forced logins with root.
Hackers have a list of commonly used logins and try mainly these ones.
If possible, create a new user and disable the pi user to prevent this kind of attacks (I’ll show you how in the next part).
Note: the pi user is no longer created by default on the latest Raspberry Pi OS versions. You’ll be asked to create the first user yourself, with a unique name and password, which is already way better.
Multi users
Another good reason, is for creating several users for different permissions or persons.
For example, if you use your Raspberry Pi at home as a desktop PC (check my review here if you’re interested), it’s probably a good idea to create a different username for each person that will use it.
You can also create an administrator user for you (don’t name it admin), and a standard user for the person that will use the Raspberry Pi with the basic permissions.
Applications
Finally, the last reason I see where you’ll need to create a new user is the installation of a new application.
Some applications need a specific user to run.
It's a free PDF guide containing every Raspberry Pi Linux command you should know!
Download now
And, you can have something similar to manage the user of an application.
For example, services like FTP, Samba or even an email server often use system users for their access.
How to create a new user on Raspberry Pi?
Whatever the reason that led you here, here is how to create a new user on Raspberry Pi :).
Open a terminal
If you are using a Desktop version of Raspberry Pi OS (or another Linux distribution for Raspberry Pi), you can simply open a terminal and follow the instructions below.
I generally use SSH, to connect to my Raspberry Pi from my computer. It’s often easier and more comfortable. I have better accessories on my computer, and I can copy and paste commands directly. But do as you prefer, it doesn’t matter.
Check my guide about SSH here if you need a good introduction to this protocol.

Join Our Community!
Connect, learn, and grow with other Raspberry Pi enthusiasts. Support RaspberryTips and enjoy an ad-free reading experience. Get exclusive monthly video tutorials and many other benefits.
Learn moreCreate the new user
The user creation is based on only one command: adduser
Here is how to create a new user:
- Type the following command:
sudo adduser <username>
For example:sudo adduser patrick - You will need to answer a few questions:
$ sudo adduser pat
Adding user 'pat' ...
Adding new group'pat' (1002) …
Adding new user 'pat' (1002) with group'pat' …
Creating home directory '/home/pat' ...
Copying files from'/etc/skel' …
New password:
Retype new password:
passwd: password updated successfully
Changing the user information for pat
Enter the new value, or press ENTER for the default
        Full Name []: FROMAGET
        Room Number []:
        Work Phone []:
        Home Phone []:
        Other []:
Is the information correct? [Y/n]
As soon as the wizard is completed, you can log in with the new username.
But, the new user will have no particular permission.
We’ll learn how to add permissions in the next paragraph.
Are you a bit lost in the Linux command line? Check this article first for the most important commands to remember and a free downloadable cheat sheet so you can have the commands at your fingertips.
Permissions
I’m not talking about the file permissions (maybe for another post), but about the user permissions (sudo or specific groups for example).
Add the sudo right
If you are following this tutorial to replace the pi user, you’ll probably look to add the sudo privilege to your new user.
Here is how to do this:
- Type the following command:
sudo adduser <username> sudo
In my case:sudo adduser pat sudo
$ sudo adduser pat sudo
 Adding user 'pat' to group'sudo' …
 Adding user pat to group sudo
 Done.
That’s it, your new user is now allowed to user the sudo command.
But there is still one difference with the pi user: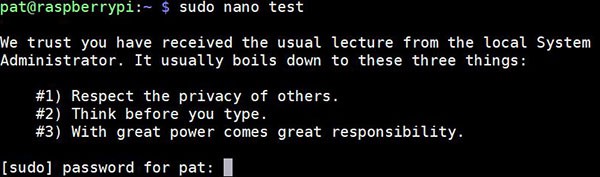
The system will ask for your password every time you use the command.
Even if it’s possible to use “root” directly on Raspberry Pi, it’s generally not the best practice. The “sudo” command should be enough for everything.
It's a free PDF guide containing every Raspberry Pi Linux command you should know!
Download now
Sudo without password
If you prefer to keep it as with the default pi user, you need to follow this procedure:
- You will need to create a new file under /etc/sudoers.d
- This file will allow the user of your choice to use sudo without password.
- You can create this file in only one command:
echo '<username> ALL=(ALL) NOPASSWD: ALL' | sudo tee /etc/sudoers.d/010_<username>-nopasswd
For example:echo 'pat ALL=(ALL) NOPASSWD: ALL' | sudo tee /etc/sudoers.d/010_pat-nopasswd
That’s it, you can now use sudo without typing your password each time.
Add the user to a group
The other thing you’ll probably need to do after creating a new user, is to add it to some groups.
You can do this with the adduser command too:sudo adduser <username> <group>
For example:sudo adduser pat www-data
Delete a user
Once you have created your new users, you can delete the pi user (don’t forget to try the new admin user first).
You can also use this command to delete useless users on your system.
Here is the command syntax:sudo deluser --remove-home <username>
The –remove-home is optional, as the name suggests it will delete the /home/<username> folder.
So, if you want to delete the pi user without deleting the home folder, type this:sudo deluser pi
It's a free PDF guide containing every Raspberry Pi Linux command you should know!
Download now
Extra tips
Before closing this post, here are a few extra tips to manage the users on Raspberry Pi.
Skel
The /etc/skel is used as a template directory (skeleton).
Each time you create a new user on your system, the files in /etc/skel will be copied to the new home directory (/home/pat for example).
pi@pizero:~ $ ls -latr /etc/skel
 total 20
 -rw-r--r--   1 root root  675 May 15  2017 .profile
 -rw-r--r--   1 root root  220 May 15  2017 .bash_logout
 -rw-r--r--   1 root root 3523 Nov 13  2018 .bashrc
 drwxr-xr-x   2 root root 4096 Nov 13  2018 .
 drwxr-xr-x 106 root root 4096 Dec 12 12:25 ..
You can add new files here if you want to set each new user with custom files you create.
List active users
All the users you create are stored in the /etc/passwd file.
So if you want to get the complete list of all users enabled on your system, you can just type:cat /etc/passwd
The following command will do the same thing:getent passwd
Manage sudo permissions
And to conclude, you can manage more precisely the sudo permissions for each user on your system.
In a previous part, I showed you a way to give all privileges to a specific user, but you can also edit the sudoers file to configure this as you want.
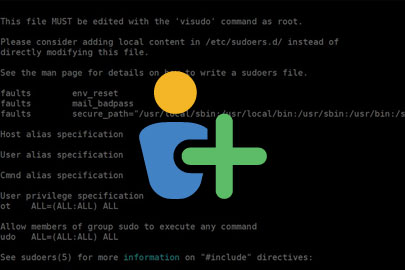
Here is the command you can use to open this file:sudo visudo
The file content looks like this:
As you can see, the root has “ALL” privileges on the system.
But you can be more specific, and give only one command to a user by using the following syntax:<username> ALL=(ALL) <command>
For example:pat ALL=(ALL) /path/to/command
If you are interested in this topic, you can check this post on Kifarunix to get more details.
It's a free PDF guide containing every Raspberry Pi Linux command you should know!
Download now
Reminder: Remember that all the members of my community get access to this website without ads, exclusive courses and much more. You can become part of this community for as little as $5 per month & get all the benefits immediately.
Conclusion
That’s it! You now know how to create a new user on your Raspberry Pi and how to manage their permissions.
I hope this tutorial was useful for you.
If it’s the case, feel free to leave a comment in the community or to share it on any social network you want :).
Whenever you’re ready, here are other ways I can help you:
The RaspberryTips Community: If you want to hang out with me and other Raspberry Pi fans, you can join the community. I share exclusive tutorials and behind-the-scenes content there. Premium members can also visit the website without ads.
Master your Raspberry Pi in 30 days: If you are looking for the best tips to become an expert on Raspberry Pi, this book is for you. Learn useful Linux skills and practice multiple projects with step-by-step guides.
The Raspberry Pi Bootcamp: Understand everything about the Raspberry Pi, stop searching for help all the time, and finally enjoy completing your projects.
Master Python on Raspberry Pi: Create, understand, and improve any Python script for your Raspberry Pi. Learn the essentials step-by-step without losing time understanding useless concepts.
You can also find all my recommendations for tools and hardware on this page.


Thank you!
Thank you – from a previously confused 77 year old,