How to Use your Raspberry Pi as a DNS Server (Easy guide)
Today, you’ll install a new service on your Raspberry Pi: a DNS server.
It’ll speed up your web browsing, secure your requests and teach you a few things about how DNS is working.
I’ll show you how to do this easily on a Raspberry Pi.
DNSMasq is a service that can be installed on Raspberry Pi to answer DNS requests, the package is available in Raspberry Pi OS default repositories. It’s a free software that forwards the queries to other DNS servers and keep a local cache to speed up the process.
Let’s do it!
I will start with a quick reminder about DNS theory and after that, we’ll install it on your Raspberry Pi.
If you’re looking to quickly progress on Raspberry Pi, you can check out my e-book here. It’s a 30-day challenge where you learn one new thing every day until you become a Raspberry Pi expert. The first third of the book teaches you the basics, but the following chapters include projects you can try on your own.
A quick DNS reminder
If you’re here, you probably know the basics about DNS services.
But it’s a good idea to check this paragraph to make sure you understand everything during the installation process.
What is DNS?
DNS stands for Domain Name System.
It’s a main service on the Internet.
Its role is to translate domain names into IP addresses.
On a network, devices only speak with IP addresses, and they need a DNS server to help convert host name to IP.
For example, a DNS request could be:
- Your computer: What’s the IP address of raspberrytips.com?
- The DNS server: You can use 35.180.0.215

This kind of request happens all of the time on a network with Internet access.
How it works?
Your DNS server is a member of a hierarchy.
It's a free PDF guide containing every Raspberry Pi Linux command you should know!
Download now
When you send a request there are two options:
- The server knows the answer: you get the IP address directly.
- The server doesn’t know the corresponding IP address: the server sends the same request to its own DNS server and sends you back the answer.
If its own DNS server doesn’t have the answer, it will ask the upper server, etc.

In this schema, your Raspberry Pi will be at the bottom of the tree, and each circle is another DNS server.
We call the node at the top a root server, and it has the answer for any requests with an existing domain name.
Each request starts at the bottom and climbs the tree every time a DNS server doesn’t have the answer.
Why do you need to install a DNS server in your local network?
There are four reasons why you need a DNS server inside your network:
Join Our Community!
Connect, learn, and grow with other Raspberry Pi enthusiasts. Support RaspberryTips and enjoy an ad-free reading experience. Get exclusive monthly video tutorials and many other benefits.
Learn more- Speed up your Internet browsing: On the tree above, each time the request goes to the next DNS server, there is an additional time to wait. With a DNS server on your network, using a caching system, most of the requests can be answered directly.
- Keep your browsing safe: When you use your provider’s DNS servers, or the Google ones, you are allowing them to know any website you visit on the Internet. By keeping the control on the DNS service, you keep this private (most of the time).
- Stability: Even with using well known DNS servers, you can lose your Internet connection if the servers you’re using are down or too slow. By having DNS servers on your network, you also keep the control on this.
- Custom records: With a DNS server at home you can create your records in the DNS server. For example, if I want to redirect kodi.me.local to my media center Raspberry Pi it’s possible.
There are probably other advantages, and maybe some cons.
But if you are a Linux expert, this is easily manageable.
Install a DNS server on Raspberry Pi
The software choice
First, you need to select the software you’ll use for your DNS service.
I already shared my choice with you, but you can choose between:
- Bind: the most used DNS service on Linux, but complicated to set up.
- DNSMasq: a lightweight and easy-to-use DNS server.
So, for this project, you will probably use your Raspberry Pi at home in a small network.
DNSMasq is the best option, it will not take many resources and will be easy to configure.
Install Raspberry Pi OS
I already wrote an entire article about how to install Raspberry Pi OS on Raspberry Pi. Click on the link to read the step-by-step tutorial.
Raspberry Pi OS Lite will be perfect for this, enable the network, SSH, and move to the next paragraph.
Install DNSMasq on your Raspberry Pi
The DNSMasq installation process is straightforward:
- Connect to your Raspberry Pi via SSH (or type directly the following commands on it).
- Update your system:
sudo apt update
sudo apt upgrade - Install the DNSMasq package:
sudo apt install dnsmasq
That’s it, DNSMasq is now installed.
Are you a bit lost in the Linux command line? Check this article first for the most important commands to remember and a free downloadable cheat sheet so you can have the commands at your fingertips.
DNSMasq configuration
The DNSMasq configuration file is /etc/dnsmasq.conf.
I will show you a basic configuration, but each setting is well commented to allow you to easily find the best one to use.
It's a free PDF guide containing every Raspberry Pi Linux command you should know!
Download now
- Open the configuration file with nano:
sudo nano /etc/dnsmasq.conf - Uncomment these three lines (remove the # symbol on each line):
domain-neededbogus-privexpand-hosts
The two firsts are at the beginning of the file, the expand-hosts is way lower (use the Nano shortcuts to quickly find them).
You can also add them manually if you prefer.
The “domain-needed” line allows sending DNS requests to the main DNS server only for domain name.
“bogus-priv” avoids sending DNS requests to the main DNS server if it’s a local IP.
And finally, “expand-hosts” will be useful later to add a fake domain name to our local devices. - Then add this line:
domain=me.localYou can set anything you want. In my case, me.local will be my local domain name.
If I have a host named “kodi”, I can now access it with “kodi.me.local”.
We’ll see that later. - Save and exit (CTRL+O, CTRL+X).
- Restart DNSMasq to apply changes:
sudo service dnsmasq restart
Add a local host
To create a local host (as kodi.me.local), you need to add it in the hosts file.
- Open the hosts file with nano:
sudo nano /etc/hosts - Add a line like this at the end:
192.168.1.17 kodi
This line allows the Raspberry Pi to use “kodi” as a name to reach 192.168.1.17.
After saving, you can ping kodi from the Raspberry Pi.ping kodi - Save and exit (CTRL+O, CTRL+X).
The Raspberry Pi can now use kodi as a host name.
And, any computer using the Raspberry Pi as its DNS server can use kodi.me.local.
Tests
Before changing the computer configuration, we have to make sure the DNS server is now working correctly.
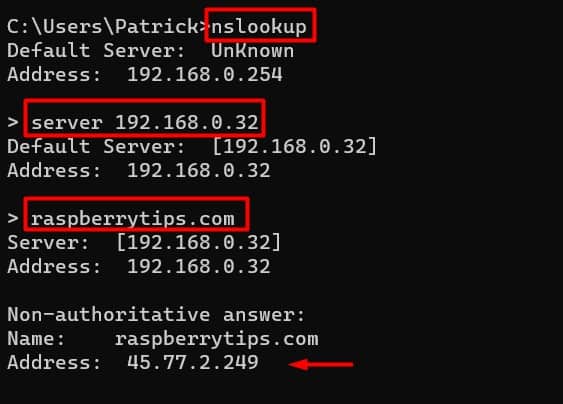
You can use nslookup to make DNS requests.
It’s a free tool available on any operating system.
- Open a terminal on your computer (command-line interface on Windows).
- Start nslookup:
nslookup - By default, nslookup is using your current DNS server.
You have to change it like this:server A.B.C.D
Replace A.B.C.D by the Raspberry Pi IP address. If you don’t know it, you can read my post about how to get the Raspberry Pi IP address. - Then type any domain name to check that the Raspberry Pi is correctly resolving it:
raspberrytips.com - It will show you an IP address corresponding to the domain name.

Your DNS server is working.
You can also try to resolve the local host (ex: kodi.local.me) to check that it is also working.
Computer configuration
The last step is to configure your computer to use the Raspberry Pi as a DNS server.
To do this, you have two options.
Manual configuration
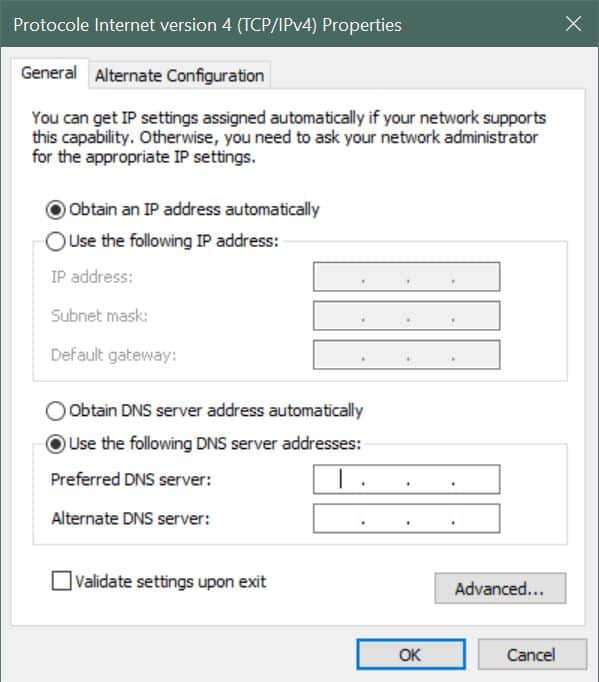
The first way is to configure the DNS server manually on your computer.
Depending on your operating system, you need to go in your network settings and set the main DNS server with the Raspberry Pi IP address.
On Windows, it’s in the Control Panel > Network and Internet > Network and Sharing Center > Change adapter settings.
Right-click on the network interface you are using and go into Properties.
Double-click on Internet Protocol Version 4 and the set the preferred DNS server with the Raspberry Pi IP address.

On Ubuntu/Debian you can change it directly in the /etc/resolv.conf file or in the network manager if you have a graphic desktop.
Related: How To Change DNS Settings On Ubuntu Servers (Commands)
DHCP configuration
The other option is to change the DNS server in your DHCP server.
In the DHCP configuration, you can choose the IP range and the DNS server sent to clients.
If you have access to this, it’s probably the best option.
It’ll work directly with all of your devices, including smartphones.
If you choose this option, don’t forget to set manually an external DNS server on your Raspberry Pi.
By the way, you can also use your Raspberry Pi as a DHCP server, it will be simpler.
Related Questions
How to enable request caching on DNSMasq? DNSMasq uses caching by default. If needed, you can increase the cache-size value in the /etc/dnsmasq.conf file. For a small network, a value near 3000 should be fine.
How to measure the real Internet speed up with DNSMasq? The best option is to use the dig command from your computer. With a dig query (dig google.com) you get the corresponding IP, but also the query time. By using an Internet DNS server, query time will be at least 30ms each time. With a local server, the first one will be 30ms, and all the following under 5ms.
It's a free PDF guide containing every Raspberry Pi Linux command you should know!
Download now
Video
If you need a more step-by-step demonstration, I have recorded a video on the topic. You can watch it here if you want:
Subscribe to the RaspberryTips YouTube channel to receive new videos in your feed:
It's a free PDF guide containing every Raspberry Pi Linux command you should know!
Download now
Want to chat with other Raspberry Pi enthusiasts? Join the community, share your current projects and ask for help directly in the forums.
Conclusion
That’s it, you now know how to install a DNS server on a Raspberry Pi, and how to configure it.
The goal of this tutorial was to show you the basics about DNS services.
If you want to go further, I recommend you to read the official website for more options.
I didn’t write about the DHCP feature here as it was not the goal of this post, but you can use DNSMasq as a DHCP server too (I have a complete guide here).
To use your Raspberry Pi as an all-in-one network server, you can also check my post on how to use it as Wireless Hotspot, router and firewall.
The combination of the two tutorials should be perfect :).
Whenever you’re ready, here are other ways I can help you:
The RaspberryTips Community: If you want to hang out with me and other Raspberry Pi fans, you can join the community. I share exclusive tutorials and behind-the-scenes content there. Premium members can also visit the website without ads.
Master your Raspberry Pi in 30 days: If you are looking for the best tips to become an expert on Raspberry Pi, this book is for you. Learn useful Linux skills and practice multiple projects with step-by-step guides.
The Raspberry Pi Bootcamp: Understand everything about the Raspberry Pi, stop searching for help all the time, and finally enjoy completing your projects.
Master Python on Raspberry Pi: Create, understand, and improve any Python script for your Raspberry Pi. Learn the essentials step-by-step without losing time understanding useless concepts.
You can also find all my recommendations for tools and hardware on this page.


Thanks you, it’s working.
But I had to uncomment:
expand-hosts
in:
/etc/dnsmasq.conf
“Set this (and domain: see below) if you want to have a domain
automatically added to simple names in a hosts-file.”
Hi Geo,
Thanks for your comment
When running the command
“sudo service dnsmasq restart”
I get the following error:
“Failed to restart dnsmasq.service: Unit dnsmasq.service not found.”
I can use nslookup to look up public domains but none of the local ones I created in the hosts file will resolve.
Hi,
What’s your configuration? (Raspberry Pi model / Raspbian version)
I just tested it on Stretch, and it’s ok
Are you sure that the service is installed?
Shoud the dns be show’n as 127.0.0.1 or the ip of the pi? I get the 127.0.0.1
Hi David,
Could you clarify your question?
I’m not sure where you want to use 127.0.0.1
Patrick
Hi,
I just installed foowing your tuto.
All went fine, but when I try to ping one device from my windows PC, the DNS is not working.
PC with Windows 10, primary DNS is 192.168.22.16 (IP address of my PI DNS
Raspberry Pi 2B with the latest Debian installed
with lines in /etc/hosts like this: “192.168.22.36 RaspViewer1” without quotes.
What could be wrong ?
Thanks in advance for any help.
hi , I run sudo apt-get install dnsmasq it returns Err:1 http://mirror.ossplanet.net/raspbian/raspbian buster/main armhf dns-root-data all 2019031302
Could not connect to mirror.ossplanet.net:80 (163.22.17.70), connection timed out
E: Failed to fetch http://mirror.ossplanet.net/raspbian/raspbian/pool/main/d/dns-root-data/dns-root-data_2019031302_all.deb Could not connect to mirror.ossplanet.net:80 (163.22.17.70), connection timed out
E: Unable to fetch some archives, maybe run apt-get update or try with –fix-missing?
I have run sudo apt-get update already!
Hi,
You probably have an issue with your Internet connection
I just clicked on the link and downloaded the package
By the way, I installed dnsmasq yesterday following this tutorial without any problem 🙂
Patrick
In the “dnsmasq.conf” file, does the “domain=me.local” have to be “.local” or can it be anything, such as “.mynetwork”?
Many thanks for an easy to follow guide.
Hello,
I wanted to ask- if I have a raspberry on device, and I want to secure the dns that sent from the raspberry – can I make the raspberry as the secured-dns serer of tis own?
Hi Alon,
I’m not sure to understand the goal of this, but I think it should work.
You still need a DNS forwarder for most requests, so it only makes sense if you had some local hosts on the Raspberry Pi (and in this case a DNS server is not mandatory).
Hey, thanks for the answer.
I have the 127.0.0.1 IP for local host.
Can you explain please how should I use it?