
How to Install On-Screen / Virtual Keyboard in Raspberry Pi?
If you have a touch screen on your Raspberry Pi (or no keyboard available for it), installing a virtual keyboard on Raspberry Pi OS can be really useful. In this tutorial, I will show you how to install and use this keyboard.
On Raspberry Pi OS, a package named “matchbox” is available in the default repository and can be installed to enable a virtual keyboard on your screen. After the installation, the keyboard is available under “Accessories” in the main menu.
It’s particularly useful for touchscreens, like the RasPad 3 I tested in this article. It’s like an iPad with a Raspberry Pi inside.
In this article, I will give you all you need to know on how to enable the virtual keyboard, including how to use it and a few extra tips.
If you need help getting started on Raspberry Pi, I have an entire course to guide you through your first steps. I’ll help you use the perfect hardware, plug everything in and install your first system. You’ll also do your first projects with me, just to make sure you are ready for the next level. Get all the information on this page if you are interested.
Install the virtual keyboard on Raspberry Pi OS
Install Raspberry Pi OS
Obviously, the first step is to install an operating system on your Raspberry Pi.
If you need some help installing Raspberry Pi OS (ex Raspbian), you can read my detailed tutorial here.
The Desktop version is required to install the virtual screen on it.
But, if you don’t have a keyboard at home, you might get stuck during the configuration.
How do you configure the network or complete the welcome wizard without keyboard?
That’s why this tutorial for a headless installation on Raspberry Pi Zero will probably help.
You’ll learn how to configure the network and enable SSH from your computer, so you don’t need a keyboard. I often use this method when I create a new SD card, even if I have a good wireless keyboard.
This saves time on each installation.
Do the system updates
Ok, once your system is installed, there is an additional step.
As I told you, the package is available in the default Raspberry Pi OS repository.
So, it’s a good idea to start by updating your system.
If you are lost in all these new words and abbreviations, request my free Raspberry Pi glossary here (PDF format)!
Download now
Here are the commands to update all packages from a terminal:sudo apt update
sudo apt upgrade
sudo reboot
You can also do this in the “Add/Remove software” tool if you prefer.
Go to the main menu > Accessories > Add/Remove Software.
Then click on Options > Check for updates and upgrade everything.
Are you a bit lost in the Linux command line? Check this article first for the most important commands to remember and a free downloadable cheat sheet so you can have the commands at your fingertips.

Join Our Community!
Connect, learn, and grow with other Raspberry Pi enthusiasts. Support RaspberryTips and enjoy an ad-free reading experience. Get exclusive monthly video tutorials and many other benefits.
Learn moreEnable SSH
If you use a touch screen or don’t have a keyboard, it’s probably a good idea to enable SSH on your Raspberry Pi (if you didn’t already do it during the installation, as explained here).
This way, you can install and configure new packages from your computer.
This step is not mandatory, but here’s how to do it:
- Open the main menu.
- Go to Preferences > Raspberry Pi Configuration.
- Then enable SSH in the Interfaces tab.
You can now connect to your Raspberry Pi from your computer.
On Windows, you need a software like Putty.
On Linux, you can use a terminal with the command: ssh pi@IP.
You’ll find more detail in this tutorial if needed.
Install the virtual keyboard package
We can finally install the virtual keyboard package.
I will show you how to do this with two methods: with SSH or directly on Raspberry Pi OS with Desktop.
Installation on Raspberry Pi OS Desktop
If you have a keyboard for the installation, you can do this directly in the desktop interface:
- Open the main menu.
- Go to Preferences > Add/Remove Software.

- In the search field, type “matchbox” and press Enter.
- In the results, find the “on-screen keyboard” package.
The package name is something like matchbox-keyboard.
Check the corresponding box.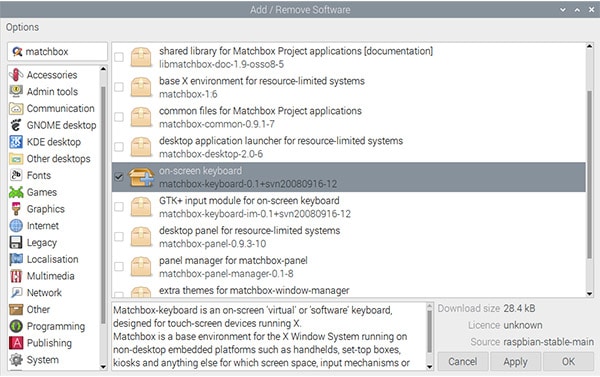
- Click on “Apply” to install it.
The system will automatically install the package dependencies.
You can now exit this tool and go directly to the keyboard utilization.
If you are lost in all these new words and abbreviations, request my free Raspberry Pi glossary here (PDF format)!
Download now
Installation via SSH
From your computer, you can also install the package on your Raspberry Pi if SSH is enabled:
- Connect to the Raspberry Pi with SSH.
(check this post if you need some help) - Type the following command:
sudo apt install matchbox-keyboard
That’s it!
You can now switch back to the Raspberry Pi screen and read the following part.
Use the virtual keyboard
Open the keyboard
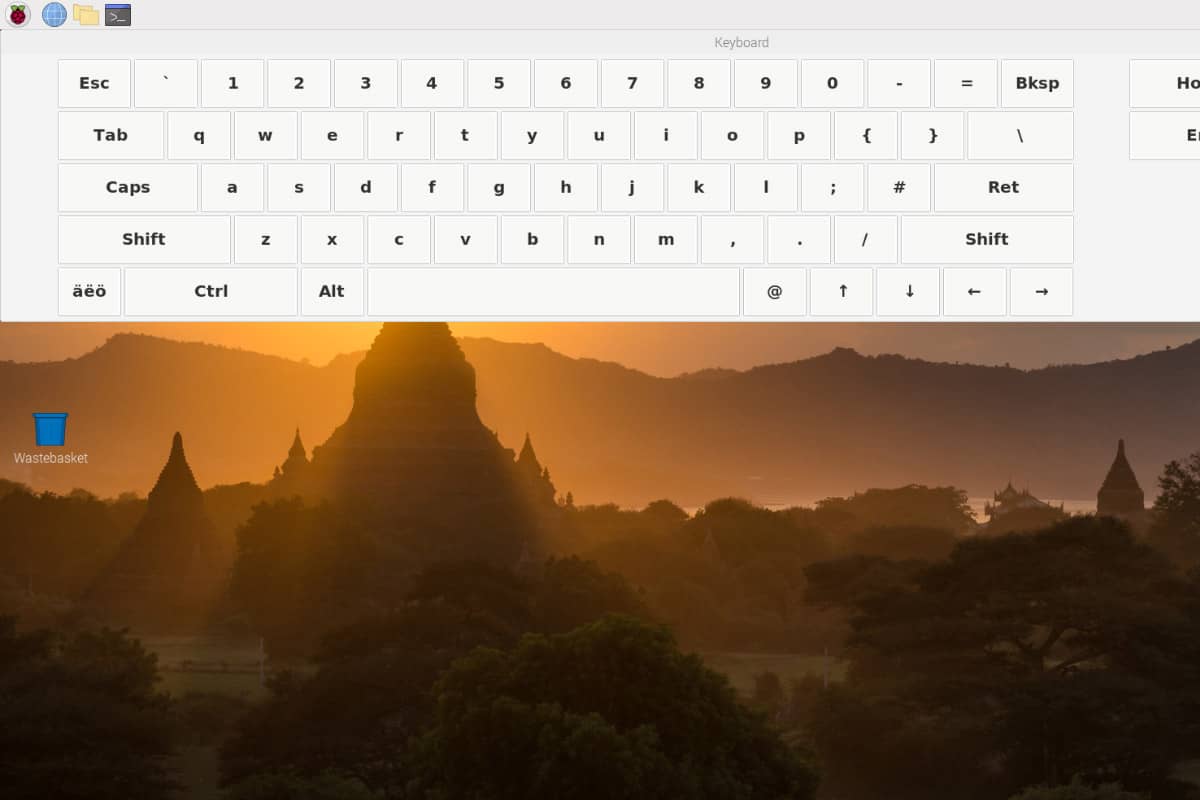
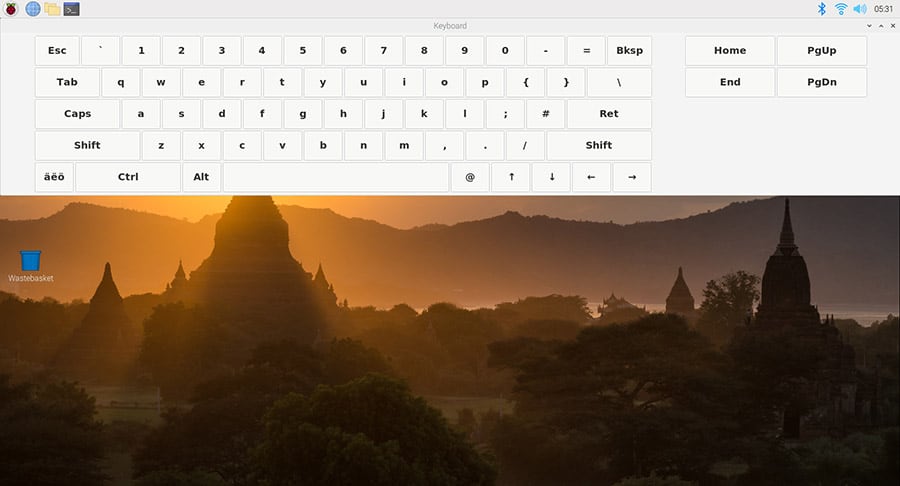
Once installed, the keyboard is available in the main menu.
Go to “Accessories” and click on “Keyboard”.
The keyboard will now show up on your screen:
The desktop icons will move in the bottom part, and you can also move the keyboard where you want (if you prefer it at the bottom for example).
From there, the usage is intuitive (it’s really close from a smartphone keyboard).
On a touch screen it’s perfect, but if you are on a large screen the keyboard probably takes up too much space. You can decrease the window size with your mouse, as with any other application.
Create a shortcut
If you use the virtual keyboard all the time, starting it from the main menu it not the most practical
You can create a shortcut in the top bar:
- Right-click on an icon from the top bar (Terminal for example).
- Click on “Application Launch Bar Settings”:

- A window like this shows up:
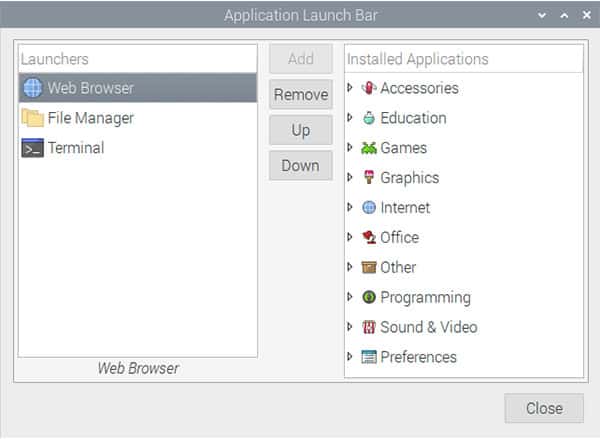
- Find the keyboard application on the right and click on “Add” to add it on the left.
- Close the window.
- The icon is now available on the top bar:
Auto-start
I already have a post on how to autostart a program on boot.
But unfortunately, none of the methods explained works well in this case.
There is probably a more elegant way to do this, but here is the one that worked for me:
- From your computer, connect to the Raspberry Pi via SSH.
- Create a new script in /usr/local/bin (or anywhere else):
sudo nano /usr/local/bin/keyboard.sh - Paste the following lines:
#!/bin/bash
sleep 5
/usr/bin/matchbox-keyboard - Save & exit (CTRL+O, CTRL+X).
- Add the execution permission:
sudo chmod +x /usr/local/bin/keyboard.sh - Edit the following file:
sudo nano /etc/xdg/lxsession/LXDE-pi/autostart - Add this line at the end:
@/usr/local/bin/keyboard.sh - Save & exit
If you add the matchbox-keyboard command in the autostart file, the keyboard will open at a minimal size, which is not very useful.
So, I created a script with a wait time (sleep 5) while the Desktop is loading.
After a reboot, everything is ok, the keyboard shows up in full size automatically.
It's a free PDF guide containing every Raspberry Pi Linux command you should know!
Download now
Video
If you want to follow me enabling the virtual keyboard on my Raspberry Pi, you can watch this video on my YouTube channel where I do exactly that:
It's a free PDF guide containing every Raspberry Pi Linux command you should know!
Download now
Reminder: Remember that all the members of my community get access to this website without ads, exclusive courses and much more. You can become part of this community for as little as $5 per month & get all the benefits immediately.
Conclusion
That’s it! You now know how to install an on-screen keyboard on your Raspberry Pi.
In general, I prefer using a wireless keyboard (as explained here), but this solution may help if you have no other choice.
Obviously, you can also use a remote access tool like Anydesk to control your Pi from your computer, or any other remote desktop solutions (I list my favorites one here).
I hope this post was useful for you. Ultimately, it’s probably better to get a keyboard for your Raspberry Pi if you start being serious with it. I tested many of them over the years, and you can find my current recommendations here.
There is no one size fits all for this, the best keyboard for you depends on your needs and how you use your Raspberry Pi, it’s not necessarily the same as mine. Click on the previous link to know which one you should use.
Whenever you’re ready, here are other ways I can help you:
The RaspberryTips Community: If you want to hang out with me and other Raspberry Pi fans, you can join the community. I share exclusive tutorials and behind-the-scenes content there. Premium members can also visit the website without ads.
Master your Raspberry Pi in 30 days: If you are looking for the best tips to become an expert on Raspberry Pi, this book is for you. Learn useful Linux skills and practice multiple projects with step-by-step guides.
The Raspberry Pi Bootcamp: Understand everything about the Raspberry Pi, stop searching for help all the time, and finally enjoy completing your projects.
Master Python on Raspberry Pi: Create, understand, and improve any Python script for your Raspberry Pi. Learn the essentials step-by-step without losing time understanding useless concepts.
You can also find all my recommendations for tools and hardware on this page.

There is one big challenge: what if you only have a mouse and a screen? No ssh, no vnc… Start the add/remove programs and find the matchbox on screen keyboard. But wait… the search option does not work without a keyboard… where to find the matchbox installation file… in which category? You can find it in the System catagory, alphabetic under the M…
Click apply and enter your password. Probably the default “raspberry”. But wait… you need a keyboard to enter the password… I am lost!
No you are not: Open the texteditor from the Accessories startmenu. Now find the word “raspberry” (if that is your password) in any of the descriptionfiles from the add/remove program, and copy it. If you have another password, then find the right letters or numbers and copy them to the texteditor in the correct order. When ready, click apply in the add/remove software program and paste your password. After the install you have your virtual keyboard!
Hi Tom,
Ah ah, thanks for your message, it may help other people
If you are in this case, the other idea is to do everything from your computer via SSH
I have a tutorial for the beginning: https://raspberrytips.com/pi-zero-setup-without-keyboard/
Then you can use apt to install the package and find a way to create a shortcut, following tom recommendation or other
My keyboard has only upper and lowercase alphabetic characters, no numbers or punctuation – not a lot of use like that!