How to Set Up Raspberry Pi OS on QEMU (Linux & Windows)
There are different ways to simulate Raspberry Pi and different tools that we can use to virtualize it. This time, it’s the turn of QEMU, a free and open-source solution that will allow you to simulate Raspberry Pi OS even if you don’t have one of these little guys in your hands yet.
To run Raspberry Pi OS Desktop in QEMU, a GUI like virt-manager is recommended for creating and managing Virtual Machines. The virtual machine will need to have the minimum requirements (2 GB, 2 CPUs, and 20 GB storage) to run the system.
QEMU stands out among other hypervisors because it can emulate systems, enabling more efficient hardware/software integration, especially on platforms like Raspberry Pi. In this article, I’ll guide you through the installation and usage of QEMU for running Raspberry OS Desktop.
If you need help getting started on Raspberry Pi, I have an entire course to guide you through your first steps. I’ll help you use the perfect hardware, plug everything in and install your first system. You’ll also do your first projects with me, just to make sure you are ready for the next level. Get all the information on this page if you are interested.
Installing QEMU & virt-manager
Before starting, you will need to install QEMU plus a GUI to use it (which will be virt-manager in my case). Although the installation may be different in each OS, the process is quite similar.
Linux

On GNU/Linux, the installation is a bit simpler, since you can use the package manager to install the main service. The way to install the QEMU package may vary depending on the distribution, but it’s the same idea.
- Ubuntu/Debian:
sudo apt-get install qemu-system - ARCH:
sudo pacman -S qemu systems - RedHat/CentOS:
sudo yum install qemu-kvm
After installing QEMU, you will need to install virt-manager, which is the GUI to use it. In my case, as I have an Ubuntu-based distribution, I will install it using apt:sudo apt-get install virt-manager
Are you a bit lost in the Linux command line? Check this article first for the most important commands to remember and a free downloadable cheat sheet so you can have the commands at your fingertips.
Windows

On Windows, we can use the installation binaries provided by the QEMU site, you can download 32-bit or 64-bit binaries, and choose the one that works on your system. It is an ordinary installation, with nothing complex to highlight.
The next thing to do is to install virt-manager. You’ll need WSL installed because it’s not native in Windows environments. However, virt-manager will work fine with WSL.
It's a free PDF guide containing every Raspberry Pi Linux command you should know!
Download now
WSL is a subsystem of Linux running in Windows, in which you can install GNU/Linux applications natively.
Keep in mind that it is necessary to have the WSL2 version to be able to run it since it works directly with the Windows Kernel and works as a native Windows “virtual machine”.
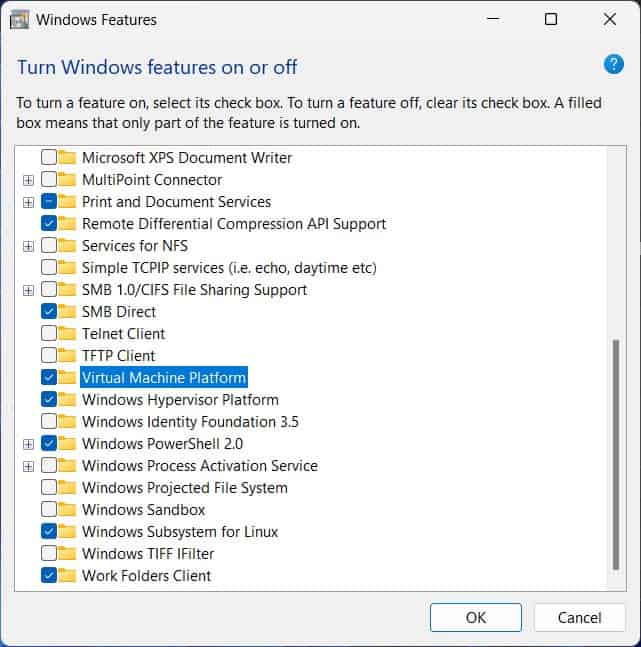
To activate WSL2 within a Windows system. You need to activate a couple of Windows features. “Virtual Machine Platform” and “Windows Subsystem for Linux”, which are necessary to run WSL2. Once you have done this, you can follow the official installation guide for WSL.
This tutorial is based on Ubuntu, which is the default distribution that comes installed on WSL2, but if you use a distribution with another package system, you can follow the instructions for Linux explained in the previous section.
After having WSL installed, you need to run the same Linux command to install virt-manager:sudo apt-get install virt-manager

Join Our Community!
Connect, learn, and grow with other Raspberry Pi enthusiasts. Support RaspberryTips and enjoy an ad-free reading experience. Get exclusive monthly video tutorials and many other benefits.
Learn moreNote: Only virt-manager must be installed through WSL, it is not recommended to install QEMU using WSL, since in the end it would be like installing a virtual machine inside another virtual machine, and its performance would not be optimal.
Mac

Finally, with macOS systems, you need to have homebrew installed. You can see more about how to install and use it on its official web. After that, you can install QEMU using this command:brew install qemu
Similarly, virt-manager can be installed (though libvirt installation is required in this case):brew install libvirt
brew install virt-manager
It's a free PDF guide containing every Raspberry Pi Linux command you should know!
Download now
Setting up the Virtual Machine & Raspberry Pi OS
With QEMU and virt-manager installed on your computer, we are now ready to create the virtual machine that will run Raspberry Pi OS.
Downloading the system ISO
Before creating the virtual machine, it is necessary to have the Raspberry PI OS Desktop ISO downloaded, which you can find on the official website here.
It’s a different file from the one you might have flashed to a microSD card to run on a physical Raspberry Pi. It’s designed for x86 systems, so make sure you choose the right file:
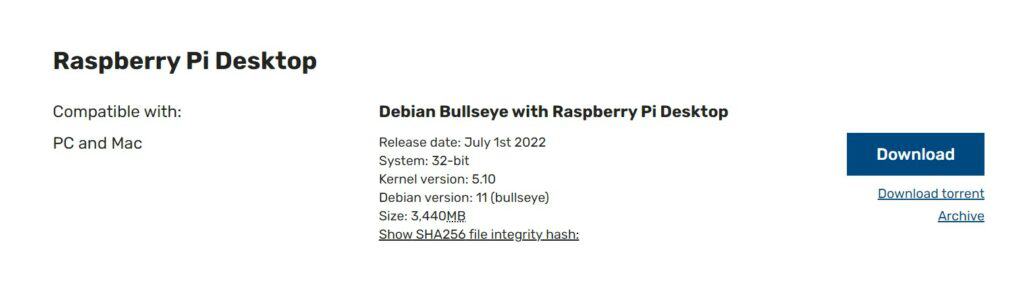
When downloading the ISO, you may notice that it mentions Debian, and this is because Raspberry Pi OS Desktop is based on Debian. Note the version of Debian that it is based on, as this is information that you will use when creating the virtual machine.
You must take into consideration that this ISO runs on x86/x64 systems, which are the most commonly used processors such as Intel or AMD, while the original version uses ARM architecture, so when testing or developing projects you will need to consider the compatibility in both cases.
Using virt-manager
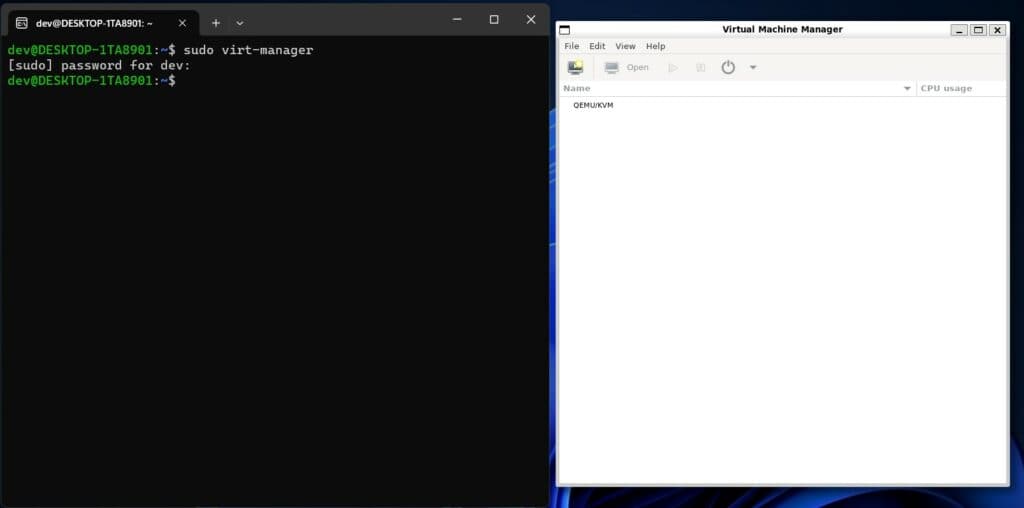
After installing QEMU and virt-manager, it’s time to open it. You can do it using this command on the CLI (it’s the same command for all systems):sudo virt-manager
It's a free PDF guide containing every Raspberry Pi Linux command you should know!
Download now
Note: You need to use sudo, otherwise, you may encounter some errors when opening virt-manager.
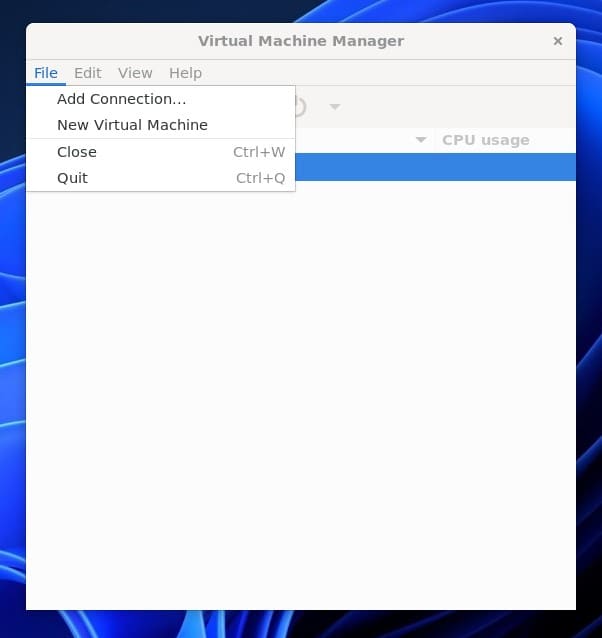
Opening the New VM Window is as simple as pressing the only button available on the menu (just below the file drop-down menu and on the left of the Open Button) or using the file drop-down menu and then choosing the option “New Virtual Machine”.
Creating the Virtual Machine
After opening the VM creation window, there will be several steps you will have to perform to create the virtual machine, some of which you can change later (like the name, network, and memory/cpu specs). Don’t worry if you make a mistake.
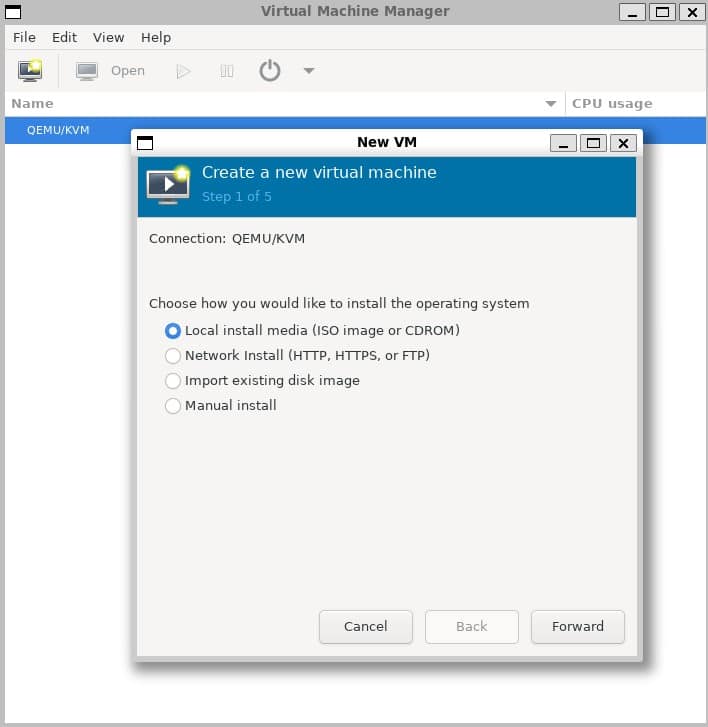
In this first step, you can use different methods to install Raspberry Pi OS Desktop. In my case, I will use “Local Install Media” to install it, mounting the Raspberry Pi ISO that is on my files. But there are other methods like:
- Network Install: This option allows you to install an operating system on your virtual machine over the network. Please note that you must have access to the address you want to access to do the installation.
- Import existing disk image: This option allows you to create a new virtual machine and import an existing disk image (containing a pre-installed, bootable operating system) into it.
This is useful in case you already have a Raspberry PI OS machine previously configured, and you need to make quick tests without having to install it. - Manual Install: This option allows you to be a bit more precise, as you are free to configure the installation as you wish, using the VM’s configuration.
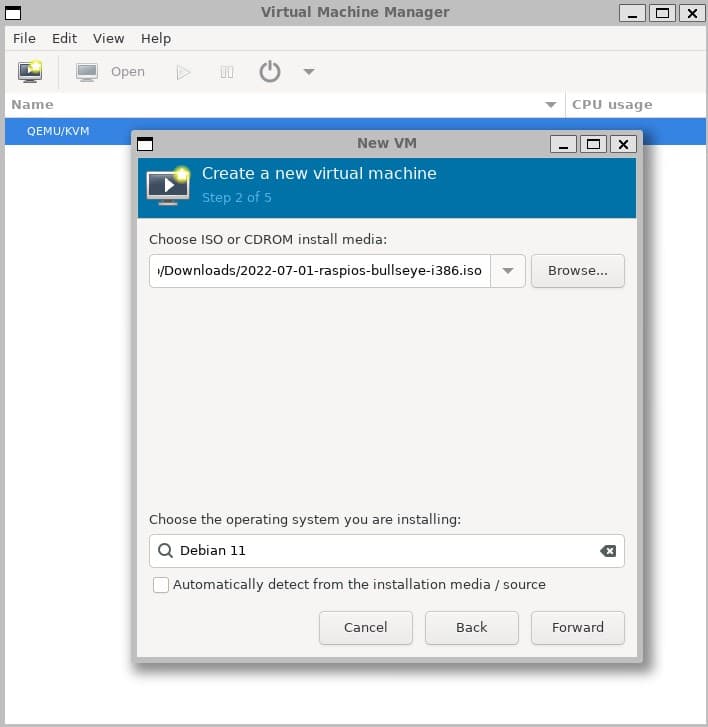
After choosing the local installation option, you will have to find the directory where the ISO is located. In case you are using WSL, and you have it in your downloads folder in Windows, the directory will be something like: /mnt/c/Users/<USERNAME>/Downloads/raspios-debian-example.iso
Once you select the ISO, in some cases virt-manager can automatically detect the system to install. In this case, since Raspberry Pi Desktop is not supported as the main distribution, you will need to choose “Debian 11” (The version may change depending on what the ISO website says).
Note: The reason you should choose Debian is that Raspberry Pi OS is based on it.
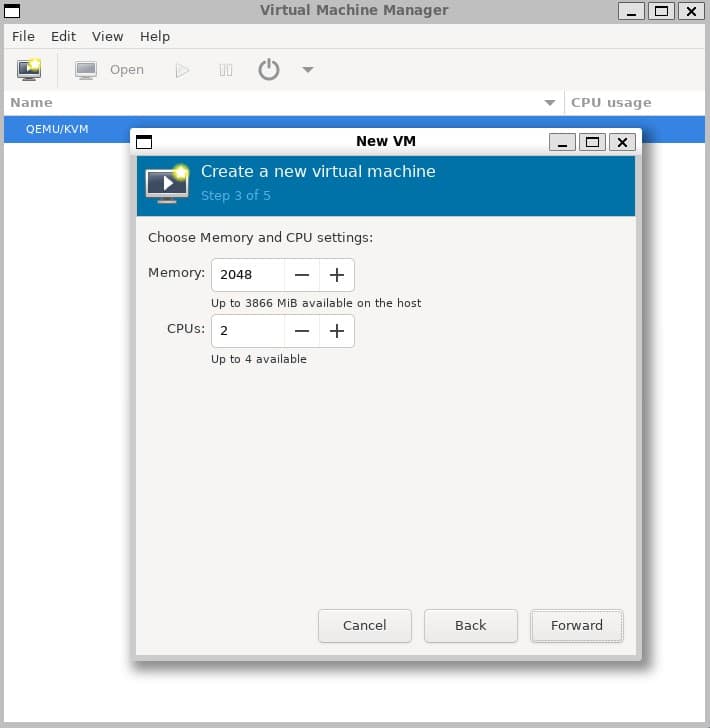
Now, you will have to assign how much memory and CPU cores you want for the virtual machine. For Raspberry PI OS, it is recommended to have at least 2GB and 2 CPU cores. Remember that none of these values can exceed the total amount you have on your main computer.
Note: The memory is represented in bits, so you must multiply it by 1024 the number of memory you want. In my case, since I want 2GB, it will be 2×1024=2048MiB.
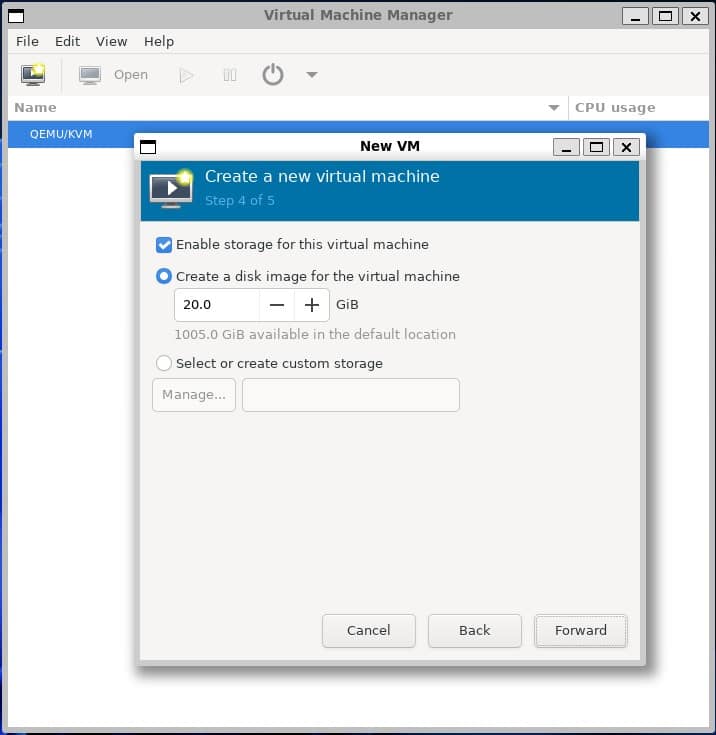
Finally, in this step, you will have two options for setting the virtual machine storage. The first option is to create a virtual disk from scratch for the VM and choose the disk size. This is the most recommended and straight-forward option.
The second option it’s to select an existing disk that could have all the predefined information and installation of a system and if you need something more specific, you can just use the custom storage option.
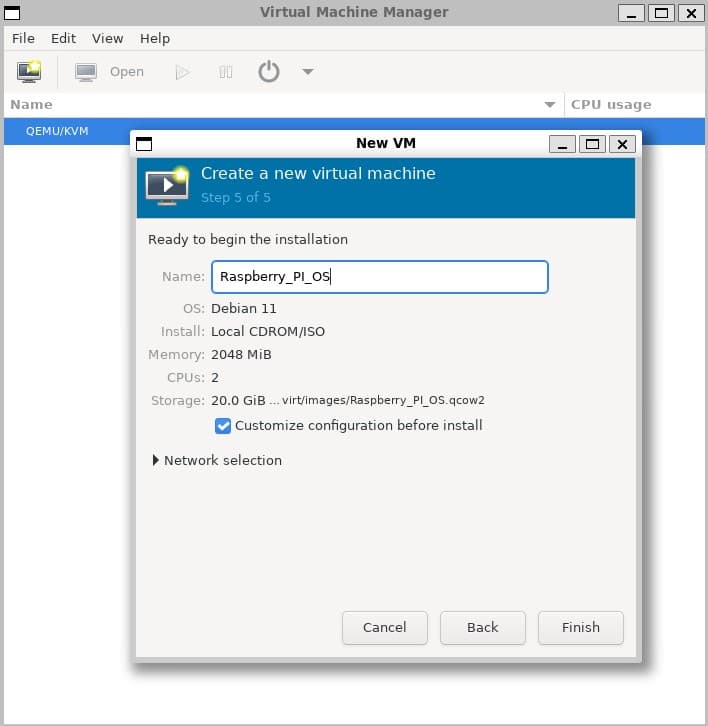
After doing all the previous steps, you have to select the name, and select if you want to customize the configuration, by selecting the option “Customize configuration before install”. In addition, you can choose the type of network you want for the VM.
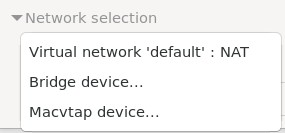
- NAT (Network Address Translation): This option allows you to have a private address for your virtual machine, and have access to the internet and your Host Network
- Bridge: Creating a bridge device allows you to create a bridge or network interface between your virtual machine and your computer. Allowing you to have access to your router’s network and taking the virtual machine as another device in your main network.
- Macvtap: This method is similar to the Bridge and has the same function (It is a modern option used for virtualization). The only disadvantage is that in some cases, you will not have access to the VM from your host computer.
Configuration Settings
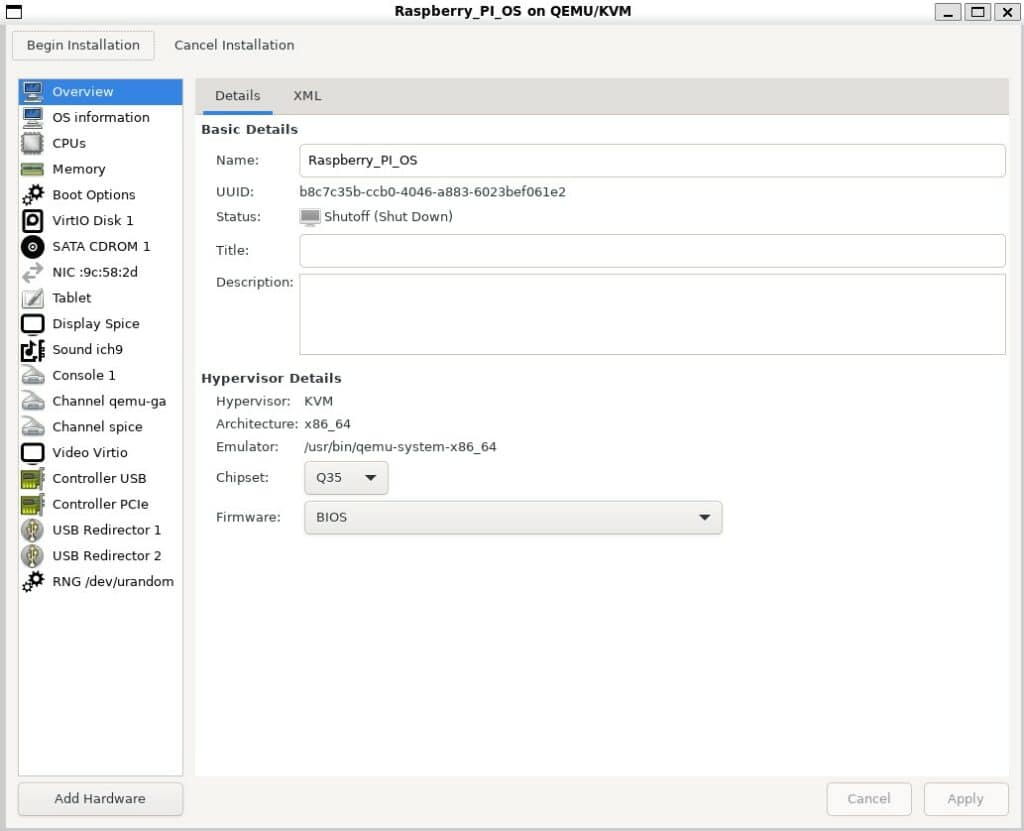
By selecting the “Customize configuration before install” option or by opening the VM details (View>Details in the VM Window) you will have access to the configuration menu, which will allow you to make advanced changes to the system. The most important ones are:
- Overview: Here you can change the name of the virtual machine, add a title or a description.
- OS Information: Allows you to change the operating system (in case you choose the wrong one or if you need to try something different).
- CPUs: Allows you to choose the CPU characteristics of the VM, as well as to manually choose a topology with Sockets, Cores and Threads.
- Memory: Allows you to change the VM memory, as well as enable the “Enable shared memory” option, which allows multiple virtual machines to share memory usage when running similar processes.
- Boot Options: It is used to choose what you want to start first when you start the VM. It is useful in case you want to do another installation through the CDROM with an ISO, or if you want to do specific tests with the network and startup.
- SATA CDROM: Here you can mount any ISO or image file to use when you are using Raspberry Pi OS, or to make a new installation.
- NIC: Here you can configure the network interface, in case you want to change it to Bridge, Macvtap or something more specific.
- Display: This option allows you to select the type of display to be used for the virtual machine. You can use SPICE or VNC as the display protocol. It is useful in case you have problems using the default one (SPICE).
- Video: This option allows you to select the video driver to be used for the virtual machine. Different video drivers can offer you different features, such as 3D acceleration.
Also, by selecting “Add Hardware” you will have the option to add new hard to the virtual machine, which can be a hard disk or network interface.
First Boot & Post-Installation
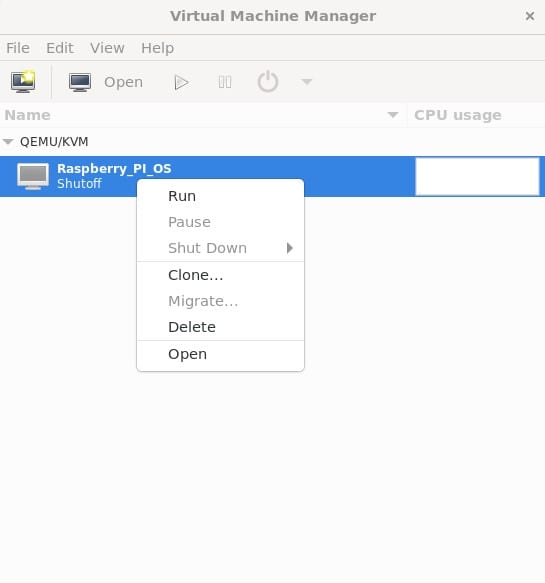
After creating the VM, you can start it by right-clicking on it and then clicking on “Run”. If you don’t see the VM window, you can right-click it and click on “Open”, and the VM window will open.
After running and opening the VM, the first image you will see is the boot image of the Raspberry Pi. You can choose to run the system or install it (In a VM, it is not recommended to run the system directly, because it requires actual storage for persisting files or for running it temporarily).

You can see more about the installation in this article I did on VMware because the process is mostly the same.
After installing the system, it is recommended that you update and install the latest updates, using:sudo apt update
sudo apt upgrade
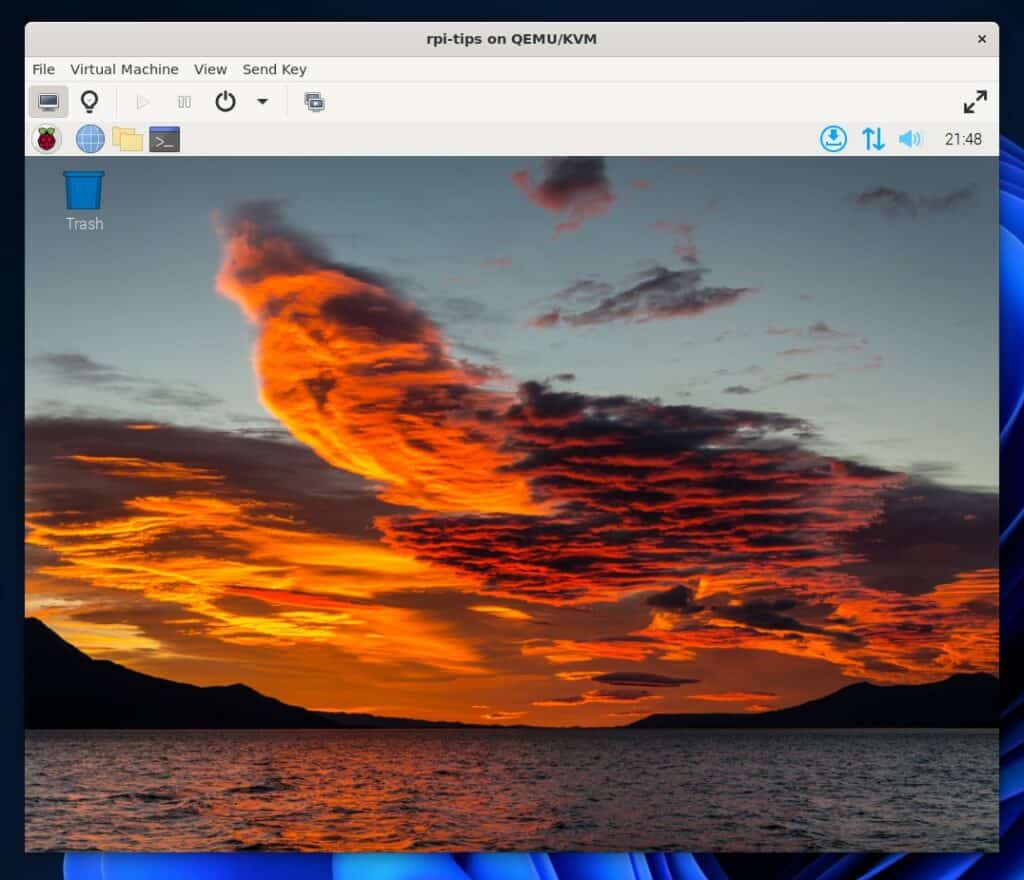
And that’s it! You will have a fully functional Raspberry PI OS system on a virtual machine that you can turn off or start as many times as you want. And best of all, you can test it even without having a Raspberry Pi.
It's a free PDF guide containing every Raspberry Pi Linux command you should know!
Download now
If you are looking for exclusive tutorials, I post a new course each month, available for premium members only. Join the community to get access to all of them right now!
Related Questions
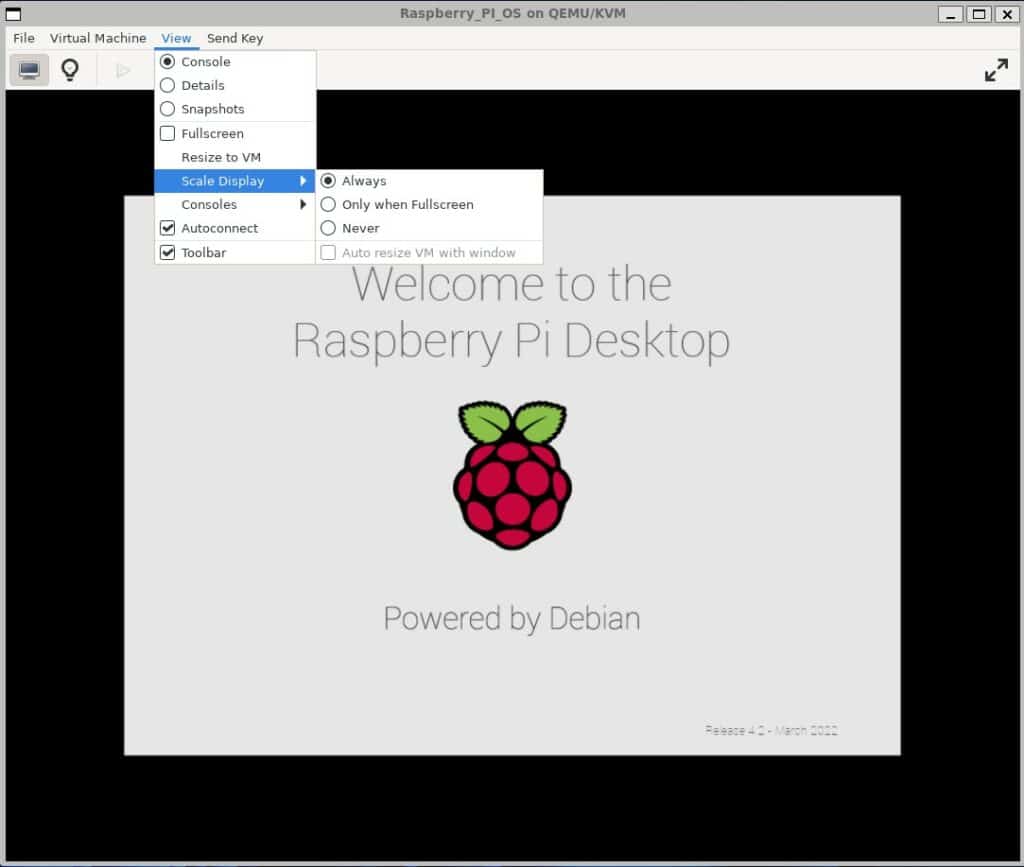
My VM screen looks too small. Is there any way to make it bigger?
You can scale the window by selecting the option “Always” in the dropdown menu View>Scale Display. This will allow the VM image to fit the size of the window, improving the visibility greatly.
How can I copy/paste text between my Host machine and the VM?
To copy text between the Host and the Guest, you need to install spice-guest-tools on the VM and after starting the service, as it will allow copying text between the two systems. This can be done by using these commands:sudo apt install spice-vdagent
sudo systemctl start spice-vdagent
sudo systemctl start spice-vdagent
This is useful for increasing the efficiency of the user experience, as it will allow you to copy and paste CLI commands directly, making the installation or testing process on Raspberry Pi much easier.
How can I transfer files between the two systems (Host-Guest)?
You can assign a shared folder to transfer files between your Host and Guest, in it all the files you add from Raspberry Pi OS or your Host can be displayed on both systems. It is useful if you need to move files constantly when testing on Raspberry Pi.
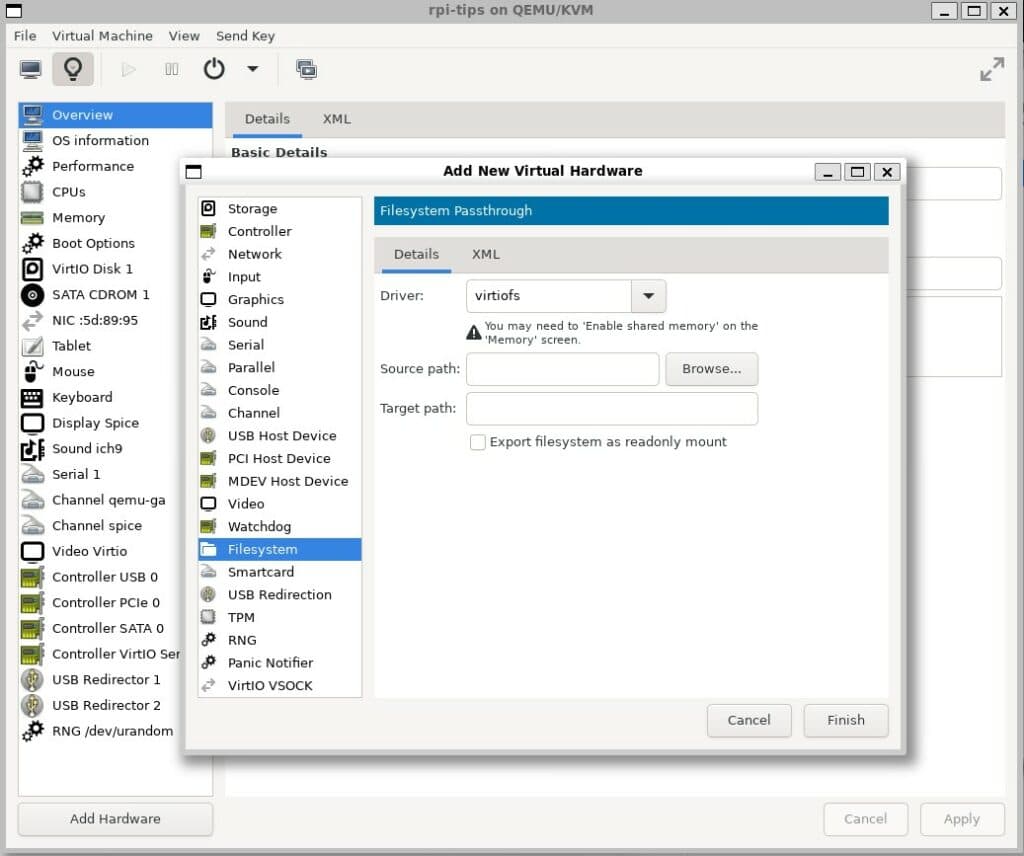
- Driver: You can choose between virtiofs and virt-9p, it is recommended to choose the first one, but if you cannot or do not want to enable the shared memory option, you can choose virt-9p.
- Source Path: Here you must choose the folder that you want to choose from your Host, all the files that are saved here will be able to be visualized in the guest after the configuration.
- Target Path: Here you should choose a name you want in mind for the target folder.
- If you only want the folder and files to be read-only, check the box “Export filesystem as readonly mount”.
After that, you will have to create a directory in the mnt folder with the name you want.mkdir /mnt/<folder-name>
And, finally mount the volume using:sudo -t virtiofs <target-path-name> /mnt/<folder-name>
Whenever you’re ready, here are other ways I can help you:
The RaspberryTips Community: If you want to hang out with me and other Raspberry Pi fans, you can join the community. I share exclusive tutorials and behind-the-scenes content there. Premium members can also visit the website without ads.
Master your Raspberry Pi in 30 days: If you are looking for the best tips to become an expert on Raspberry Pi, this book is for you. Learn useful Linux skills and practice multiple projects with step-by-step guides.
The Raspberry Pi Bootcamp: Understand everything about the Raspberry Pi, stop searching for help all the time, and finally enjoy completing your projects.
Master Python on Raspberry Pi: Create, understand, and improve any Python script for your Raspberry Pi. Learn the essentials step-by-step without losing time understanding useless concepts.
You can also find all my recommendations for tools and hardware on this page.