How to Read and Write RFID Tags With Raspberry Pi
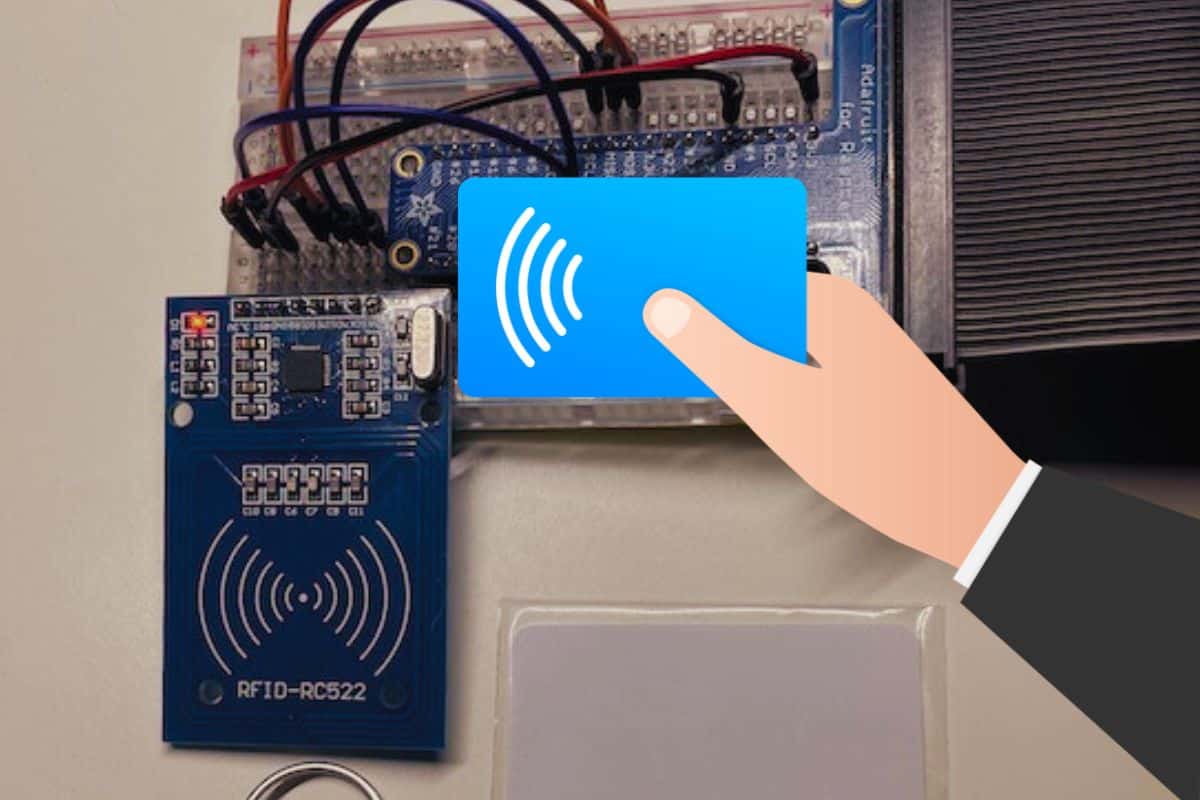
Have you ever wondered how cars pass through toll booths without stopping, or how people enter buildings with a card? That’s thanks to RFID technology. Trying to replicate this on your Raspberry Pi can feel daunting, but I’ve done it and will share all the steps with you in this article.
Reading and writing data to and from RFID tags requires an RFID Reader and RFID Tags. With the help of the RFID Reader, the Raspberry Pi can read data from these RFID tags and at the same time write data into it.
Keep reading below as I explain to you how to use RFID tags with simple Python scripts.
By the way, if you get overwhelmed as soon as Python is required for a project, I recommend checking out my e-book “Master Python on Raspberry Pi“. It will guide you step-by-step to learn the essential concepts (and only the essential concepts) required to achieve any project in the future. Raspberry Pi without Python is like a car without an engine, you miss all the fun parts. Get 10% off by downloading it today!
Prerequisites to use RFID on Raspberry Pi
Before writing your first line of code, just make sure you have everything you need to get started.
Hardware Prerequisites
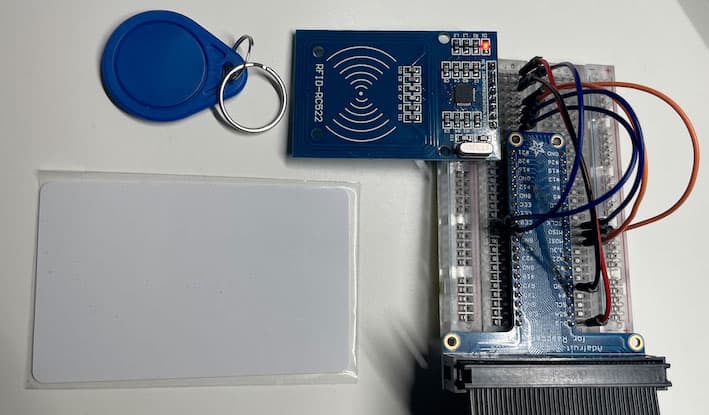
- RFID Module: This module is responsible for reading and writing on an RFID Tag.
There are different types of RFID modules that can function one way (either for reading or writing) and also function at different frequencies. But for this guide, we will be focusing on the RC-522 which is a widely known module where the compatible tags are mostly used in any application. - RFID Tags: The tags depend on the RFID Module you have. There are also different types of RFID tags that operate on different frequencies, you’ll have to make sure that the Tag you want to use is compatible with the RFID Module you have. The tags linked are compatible with the RFID module we chose for this guide.
- Any Raspberry Pi model: You can use any Raspberry Pi model for this. All Raspberry Pi models come with the GPIO pins we need. If you use a Zero, just make sure the male pin headers are soldered on, as we will need them to connect wires to it.
- Breadboard & Jumper Wires: You’ll also need to have a breadboard and a couple of jumper wires, so we can connect everything together.
Software Prerequisites
- Raspberry Pi OS: Any Raspberry Pi OS (formerly Raspbian) is okay for this example. For now, we only need Raspberry Pi OS, as the packages we need to interact with the GPIO are already preinstalled. You can view my article, to guide you in installing the Raspberry Pi OS.
- Python: The programming language we will use is Python, if you use Raspberry Pi OS, everything is installed, so there isn’t anything special to do at this point.
How does RFID work?
It’s essential to understand the core principles of how RFID systems work before starting to use them on your Raspberry Pi. Let’s briefly summarize what you should know before moving further.
Introduction about RFID
RFID stands for Radio Frequency IDentification.
An RFID requires 2 components:
- A receiver (module): contains an antenna and a transceiver.
- A tag: contains an antenna and transponder that sends back a signal upon receiving a signal.
The way an RFID system works is that when a module sends out a high-frequency signal, it gets picked up by a nearby tag and in return sends back the signal that is stored in the transponder.
Passive vs active tags
There are 2 types of RFID tags:
- Active tags require a power supply, usually a battery, to send out a signal to the module.
- Passive tags don’t require an external power source and use the signal that comes from the module to power up the transponder and send back the signal.
Most RFID systems use Passive tags in their setup as they cost way less than Active tags.
Aside from their low cost, Passive tags also have a small form factor, usually in the form of credit card size cards or even in the form of stickers. But a downside to Passive tags is without any external power source, its range is usually limited to 3–6 meters.
When to use RFID?
RFID Systems are mostly known as an upgrade to a barcode system.
Barcode systems require the reader to point at the barcode in “line of sight” and it decodes what it has scanned based on this. The data that the barcode can store is limited to what the code is as this is what its reader would decode.
This is why the RFID system has an advantage over the barcode system. For RFID systems, it is only required that the tag be within its detection range and that would already be enough to obtain the required data.
If like me, you always mix the languages syntax, download my cheat sheet for Python here!
Download now
Also, aside from the Unique ID that RFID tags store, they can also store other information on top of this which can make the whole system more informational.
How to use RFID Module with the Raspberry Pi
Here are the main steps to start using RFID tags with a Raspberry Pi:
- Enabling SPI to access the RFID module.
- Connecting it to the Raspberry Pi GPIO pins.
- Installing the Python library to handle the module.
- Write a simple script to test everything works as expected.
Let’s see how to do everything in detail.
Enabling SPI
In order to connect the RFID Module RC522 to the Raspberry Pi, we will need to use the SPI connections. Before we are able to use the SPI pins we will need to enable it in the raspi-config tool.
- Open a terminal. If you are using the Raspberry Pi Desktop you can open a terminal by pressing CTRL+ALT+T at the same to open a terminal. But if you are using headless mode, you can connect via SSH and go from there.
- Open the raspi-config tool:
sudo raspi-config - Go to “Interface option” > “SPI”.
- “Would you like the SPI interface to be enabled? Yes!
- Exit raspi-config and accept to reboot the device.
That’s it. You have SPI enabled. To know what SPI is, you can check my article regarding Serial Peripheral Interface (SPI).
Are you a bit lost in the Linux command line? Check this article first for the most important commands to remember and a free downloadable cheat sheet so you can have the commands at your fingertips.
Wiring
Now that we have the SPI enabled on the Raspberry Pi, we can proceed with connecting the RFID Module RC-522. For SPI it utilizes 4 pins:

Join Our Community!
Connect, learn, and grow with other Raspberry Pi enthusiasts. Support RaspberryTips and enjoy an ad-free reading experience. Get exclusive monthly video tutorials and many other benefits.
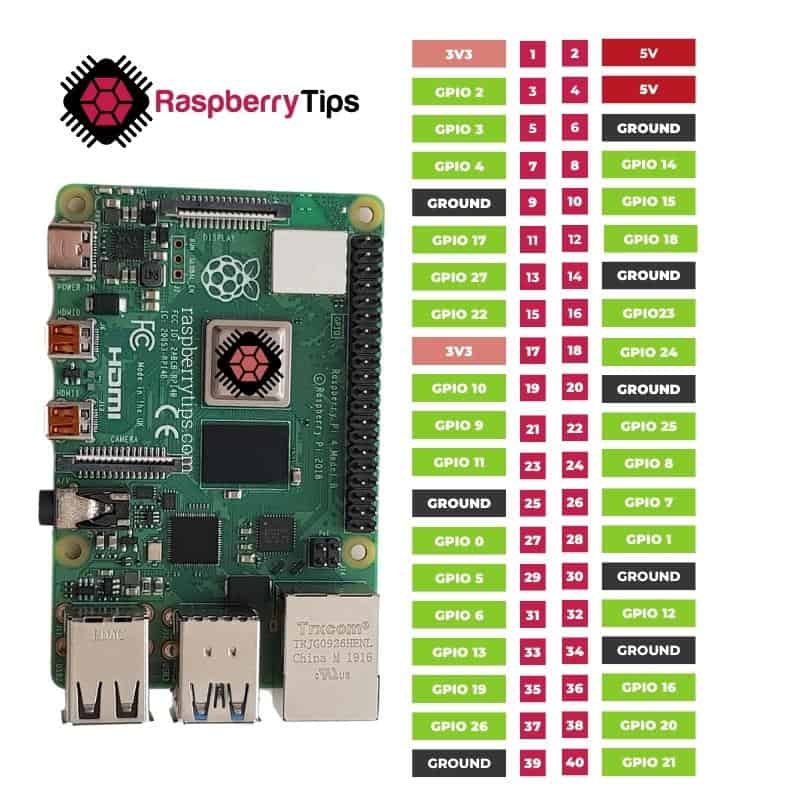
Learn more- SDA (Any GPIO) – Serial DAta Pin
- SCK (GPIO #8) – Serial ClocK
- MOSI (GPIO #10) – Master Out Slave In
- MISO (GPIO #9) – Master In Slave Out
The SDA pin is used to select which SPI device is currently being used, which is why we can use any GPIO Pin for this (you can find the pinout of the Raspberry Pi here).
SCK, MOSI and MISO pins are dedicated SPI pins on the Raspberry Pi which are GPIO #8, #10, and #9 respectively. These SPI pins are used to communicate with the RFID Module and can’t be connected to any other pin.
The other remaining pins are the following:
- GND – Power Pin
- 3.3v – Power Pin
- IRQ (Any GPIO Pin) – Interrupt Pin
- RST (Any GPIO Pin) – Reset Pin
GND and 3.3v are what supply power to the RFID Module. IRQ is used to send an interrupt signal from the module to the Raspberry Pi to interrupt its current process in order to listen to the RFID Module. While the RST pin is used to reset the RFID Module.
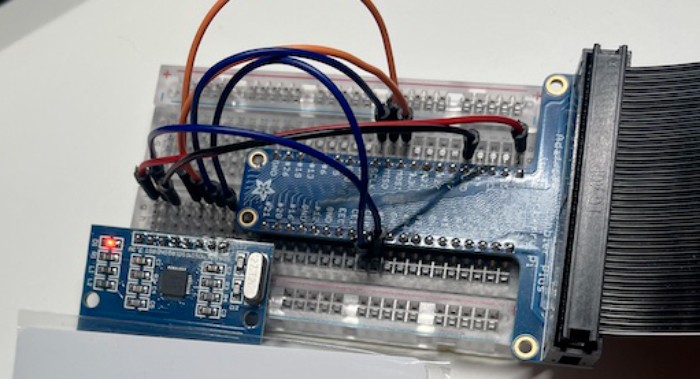
To connect the RC-522 module with Raspberry Pi, please follow the following connections:
- SDA to GPIO #8
- SCK to GPIO #11
- MOSI to GPIO #10
- MISO to GPIO #9
- GND to GND
- RST to GPIO #25
- 3.3V to 3.3V
Once connected, you can proceed with creating the script to communicate with the RFID Module.
Setting up virtual environments
Since the release of Raspberry Pi OS Bookworm, it is now mandatory to run virtual environments when working with Python packages. The reason for this is to prevent any changes to the system-level Python packages and to have a separate area to work on.
Execute this command to create a virtual environment:python3 -m venv foobar
Let me explain this command:
- -m – Command tells Python that you’ll be running a module.
- venv – This module is what we’ll be running to create a virtual environment.
- foobar – This is the name we will give to our virtual environment. You can also specify the path here where you want to store this virtual environment.
To run the virtual environment, execute the following command: source foobar/bin/activate
Now let me explain each part of the command:
- source – Tells Python that we will be running a virtual environment.
- foobar/bin/activate – This tells where our virtual environment is and where to find the ‘activate’ script to run the environment.
Once you run this, you should see (foobar) before in your terminal. This indicates that you are in your “foobar” virtual environment.

Now that you are working in a virtual environment, you can now proceed with installing the necessary Python libraries.
Install Python libraries
In order to use the SPI in our Python scripts, we need to install the spi-dev library.
If like me, you always mix the languages syntax, download my cheat sheet for Python here!
Download now
Execute this command in the terminal to install the spi-dev library:sudo apt-get install python3-spidev
Another library that we also need to install is the MFRC522. This will be used to interact with the RC522 Module.
To install this, run the following command:sudo pip3 install mfrc522-python
Now that we have the Python libraries, we can proceed with reading and writing RFID tags.
Reading RFID Tags
First test
Open Thonny, Nano or your favorite text editor, and create a new Python script (with the .py extension).
The first simple script you can try to read RFID tags is this one:
#!/usr/bin/env python

import RPi.GPIO as GPIO
from mfrc522 import SimpleMFRC522

reader = SimpleMFRC522()

try:
        id = reader.read()
        print(id)
finally:
        GPIO.cleanup()
Save the script first and try running it.
In Thonny, you can run it directly via the GUI.
In the command line, it will be something like this:python rfid.py
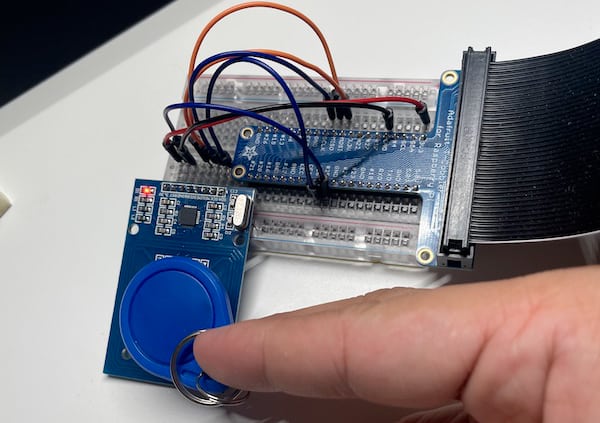
Unless you place a compatible RFID tag in front of the module, it will not print anything. But once you do place an RFID tag in front, it will try to read the RFID tag and print out its Unique ID of the RFID.
Here is an example of the output:
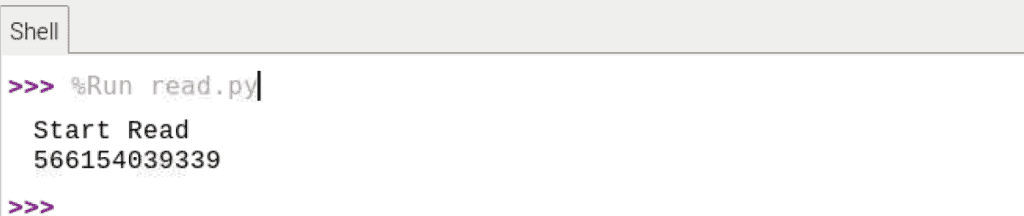
The value you see in the example output 566154039339 is the unique ID that was stored on the RFID ID. This shows that we were able to read from the RFID tag on the reader.
Explanations
Let’s begin with the first line of code:#!/usr/bin/env python
This line of code tells the terminal how to execute the file. Indicating to use Python here tells that this is a Python script.
Next, we have:import RPi.GPIO as GPIO
from mfrc522 import SimpleMFRC522
In order for us to use the GPIO pins we need to import the RPi.GPIO library which contains all the functions to communicate with the GPIO pins. To interact with the RC 522 module we will need to import the MFRC522 library which we installed earlier and use the SimpleMFRC522 class, which is a simplified class of the MFRC522 library.
We then use this command to instantiate the SimpleMFRC522 for us to use in our script:reader = SimpleMFRC522()
After that, we have this block of code that executes the command id.reader.read() first by waiting until an RFID tag is detected on the module. Once it detects the RFID module it reads the ID and prints out the ID to the console.
try:
id = reader.read()
print(id)
finally:
GPIO.cleanup()The finally block will then execute whatever command it has, in this case, the GPIO.cleanup(). This cleanup command is used to clear up any connection with the GPIO Pins to ensure that all states are back to their default state. The finally command ensures that if the code inside the try block encounters any error, the GPIO cleanup command will always be executed.
Going further
Now that we can read RFID tags, let’s play a bit more and use the read command to only grant access if the accepted tag is scanned and deny access if the wrong tag is scanned.
For this example, you’ll need at least 2 RFID tags on hand.
Full script
Create another script in your favorite editor, and copy/paste these lines:
#!/usr/bin/env python
import RPi.GPIO as GPIO
from mfrc522 import SimpleMFRC522
import time
reader = SimpleMFRC522()
GPIO.setwarnings(False)
access_rfid = "837634989748"
try:
print('Start Read')
while(True):
            id, text = reader.read()
            print(id)
            if str(id) == access_rfid:
                print('Access Granted')
            else:
                print('Access Denied')
            time.sleep(1)
finally:
GPIO.cleanup()Explanations
Using the first RFID tag, get its ID by using the read script. We shall get this ID and store it as the tag that can only be used to grant access. access_rfid = "837634989748"
Now that we have our designated tag. We will need to place a condition into our script which will grant access if this tag is seen.
while(True):
id, text = reader.read()
print(id)
if str(id) == access_rfid:
print('Access Granted')
else:
print('Access Denied')
time.sleep(1)This block of codes checks if the RFID tag that was scanned matches the tag that we stored earlier. if str(id) == access_rfid:
If it is the correct RFID the script will output “Access Granted” if not it will print “Access Denied”.
Here is an example of the output for this script:

Writing RFID Tags
It’s also possible to write data on your tags.
Here is a script you can copy to write to the RFID Tags:
#!/usr/bin/env python
import RPi.GPIO as GPIO
from mfrc522 import SimpleMFRC522
reader = SimpleMFRC522()
try:
        text = "Hello"
        print("Now place your tag to write")
        reader.write(text)
        print("Written")
finally:
        GPIO.cleanup()
Save the script in a file. If you are using Thonny you can run the script from Thonny. But if you are using a terminal, you can run using this command.python yourscript.py
I have discussed most of the code in the “Reading RFID Tags”, I’ll only be explaining the new syntax we used which is the reader.write(text). This code sets the module into write mode, where the contents of the text parameter will be sent to the RFID tags for writing.
Here is an example of the output when running this script:

Seeing that it has successfully written to the tag. We can run the read script again to check if the text has been written.
Running the read script should have an output like this:
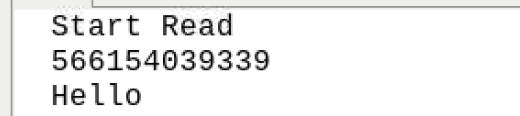
The 2nd line of the output shows the ID of the Tag that was scanned. While the 3rd line shows the content of the RFID tag. This verifies that our write script was able to successfully write to the tag.
It's a free PDF guide containing every Raspberry Pi Linux command you should know!
Download now
Conclusion
With the addition of RFID tag reading and writing to Raspberry Pi, you can now do more exciting projects, build smarter systems to grant access to a certain function by only allowing certain tags or limit the use of a certain area based on the remaining uses it has that is stored on the RFID tags.
Again, the possibilities are endless as we keep adding more capabilities to the Raspberry Pi.
Check out my list of project ideas for the Raspberry Pi, and check where you can add RFID tags to improve the project.
It's a free PDF guide containing every Raspberry Pi Linux command you should know!
Download now
Reminder: Remember that all the members of my community get access to this website without ads, exclusive courses and much more. You can become part of this community for as little as $5 per month & get all the benefits immediately.
Related Questions
What’s the difference between RFID and NFC?
NFC stands for Near-Field Communication and is a subset of RFID designed for close-range communication, often used in mobile devices (like for contactless payment).
The unique functionality of an NFC is that an NFC device is capable of both an NFC reader and NFC Tag, which makes it possible to do peer-to-peer communication.
So, with this, there really is no major difference between the two as NFC still follows the main function of an RFID but combines all its components into one device.
Whenever you’re ready, here are other ways I can help you:
The RaspberryTips Community: If you want to hang out with me and other Raspberry Pi fans, you can join the community. I share exclusive tutorials and behind-the-scenes content there. Premium members can also visit the website without ads.
Master your Raspberry Pi in 30 days: If you are looking for the best tips to become an expert on Raspberry Pi, this book is for you. Learn useful Linux skills and practice multiple projects with step-by-step guides.
The Raspberry Pi Bootcamp: Understand everything about the Raspberry Pi, stop searching for help all the time, and finally enjoy completing your projects.
Master Python on Raspberry Pi: Create, understand, and improve any Python script for your Raspberry Pi. Learn the essentials step-by-step without losing time understanding useless concepts.
You can also find all my recommendations for tools and hardware on this page.