Installing Alma Linux on Raspberry Pi (CentOS Alternative)
With RedHat dropping support for CentOS, choosing a good alternative operating system is challenging. Fortunately, the Linux community is strong and brings us Alma Linux, a forever free enterprise-grade Linux OS focused on stability and long-term support. Even better news, it’s now available on Raspberry Pi!
Alma Linux has been tested for Raspberry Pi 3, 4 and 400. A minimal image can be downloaded from the official GitHub Repository and flashed to a micro SD card to use on a Raspberry Pi.
In this tutorial, I will walk you through the process of installing and flashing Alma Linux on your Raspberry Pi, then we will go through some basic commands together and finally conclude by adding a desktop environment.
If you’re looking to quickly progress on Raspberry Pi, you can check out my e-book here. It’s a 30-day challenge where you learn one new thing every day until you become a Raspberry Pi expert. The first third of the book teaches you the basics, but the following chapters include projects you can try on your own.
Getting ready to install Alma Linux
Before starting with the tutorial, I will list the requirements (both hardware and software) for following this tutorial. As this is a Linux distribution, the process is similar to any other Linux distro installation.
The main difference is that not all Raspberry Pi models are supported, but aside from that, here is what you need:
- A Raspberry Pi 3B+, 4 or 400 is recommended: Although it has not been mentioned that this OS doesn’t support a particular Pi model, I would suggest using at least a Raspberry Pi 3 or higher. For context, I’m testing on my Raspberry Pi 4 (4GB).
Note: As of March 2024, Alma Linux does not work for the latest Raspberry Pi 5 model. - A micro-SD card or USB stick: You can pick whichever you have available. If you need a new SD card for this test, find our current recommendations here.
- The latest image from the official website: You can find the image for the Raspberry Pi on this page. You can find details about this in the next section.
- Raspberry Pi Imager or Balena Etcher: Alma Linux is not available in Raspberry Pi Imager for now, but you can flash a custom image with those tools, so pick the one you prefer.
I have a complete guide for Raspberry Pi Imager here if you need it.
This is all for the requirements. Of course, you will need a power source for your Raspberry Pi and a monitor is always recommended, although it won’t be required as SSH is enabled by default as we will see later.
Installing Alma Linux on Raspberry Pi
I will take you through the process of installing the Alma Linux OS in three easy steps:
- Getting the Latest Alma Linux Image for your Raspberry Pi
- Flashing this Image onto an SD Card
- Raspberry Pi First Boot
Let’s dive deep into each step now.
Step 1: Getting the Latest OS Image from Alma Linux Website
It is easy to obtain the latest image of Alma Linux from its website. Remember that we want the image for our Raspberry Pi. First, go to the official downloads page for Alma Linux by going to this page.
Next, you will see 4 sections on the top of the page for different hardware architecture the OS supports (Intel/AMD, ARM64, IBM Z and Power LE). Select the ARM64 option as the Raspberry Pi’s CPU is based on the aarch64 architecture.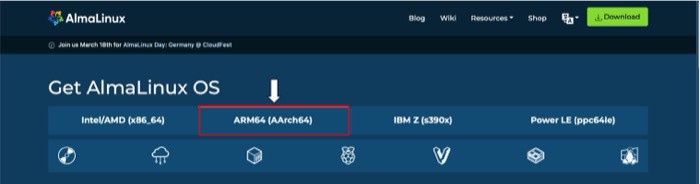
Now, scroll down to the Raspberry Pi section on the screen and download the latest available version of Alma Linux. For context, the latest version was Alma Linux 9 at the time of writing this article.
This will start the download process for the image which will be a .raw.xz file. The image size is just over 500 MB so it may take some time depending on the speed of your internet so please be patient.
Step 2: Flashing the Downloaded Image onto an SD Card/USB Drive
Great! You now have the latest Alma Linux image on your system. Let’s flash this image onto an SD Card or USB Drive. You can use any flashing software you like (Raspberry Pi Imager, Balena Etcher, etc).
It's a free PDF guide containing every Raspberry Pi Linux command you should know!
Download now
For Raspberry Pi Imager, follow the steps given below:
- Start Raspberry Pi Imager.
- Click on the “Choose Device” button and select the Raspberry Pi device you own.
- Click on “Choose OS”, scroll down to the bottom of the list, and click on “Use custom”:
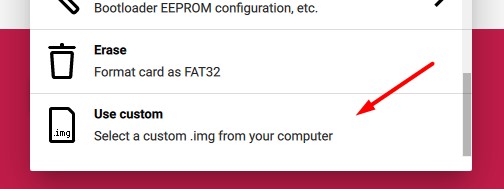
- Pick the image file you downloaded from the official website. You can use the compressed image directly when using Raspberry Pi Imager so you don’t need to extract the file.
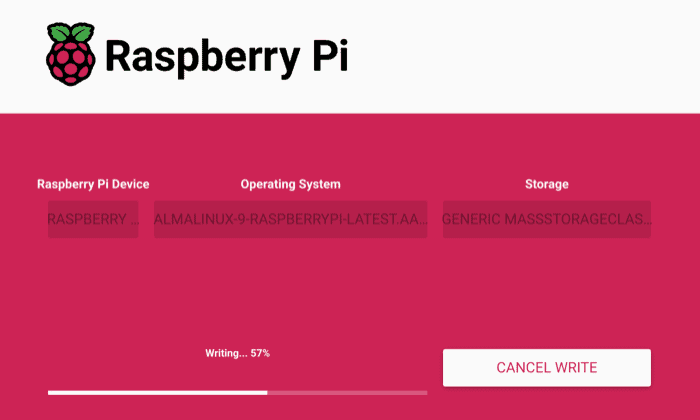
- Click “Choose Storage” and pick your SD card or USB drive. Ensure they are plugged in correctly, and you don’t choose the wrong device as Imager will format the selected drive.
- Then click on “Write” to start the installation. Note: setting the Advanced Options will not help as they do not work with Alma Linux OS so it doesn’t matter if you apply customized OS settings or not. So, press the NO button.

Once you press the button, the write process will start. The system may ask for your password to start the installation so don’t panic if it does that. Now wait for a few minutes for the process to complete.
Once the writing process is completed, you can remove the SD card (or USB drive) from your computer, and plug it into your Raspberry Pi.
Step 3: First Boot
Once you turn on the Raspberry Pi after inserting the SD card, we will boot into Alma Linux for the first time. I recommend connecting your Pi to a keyboard and mouse, at least for the first boot. (Root Access is disabled by default for SSH).

Join Our Community!
Connect, learn, and grow with other Raspberry Pi enthusiasts. Support RaspberryTips and enjoy an ad-free reading experience. Get exclusive monthly video tutorials and many other benefits.
Learn moreWe have a lite image of Alma Linux on the Pi, which comes without a desktop environment. So, we will access our Pi through a terminal interface.
The default credentials to connect are:
- Username: almalinux
- Password: almalinux
Congratulations! You have successfully booted into your Alma Linux system. You should be fine if you’re used to any Red Hat distribution (Fedora, CentOS or even Rocky Linux on PC).
After the initial installation, using any Linux distribution on a Raspberry Pi is not that different.
But I guess most of you are, like me, more familiar with Debian-based distributions or desktop environment tools. I will give you the first steps to complete the initial setup and add a desktop environment.
Getting Started with Alma Linux
Now that you have the operating system installed and running on your Raspberry Pi, we will go through some basic commands specific to Alma Linux and then set up a desktop environment as the image we’re using is a lite version.
Alternatively, you can get the latest Desktop image version of Alma Linux from its website, but keep in mind that adding the desktop environment on our own gives us customization options.
Post Installation Guide for Alma Linux
Once you have access to your Pi via the terminal, here are a series of steps that I recommend you perform after your first boot:
Connecting to Internet
- First, connect your Pi to the internet. For that, you can either establish a wired Ethernet connection or wirelessly to a WiFi network. Connecting to a WiFi network is very easy when using a Linux distribution. Just type the following command:
sudo nmtui - This will open the network manager user interface for you. We will select “Activate a connection” to connect to a new WiFi network.
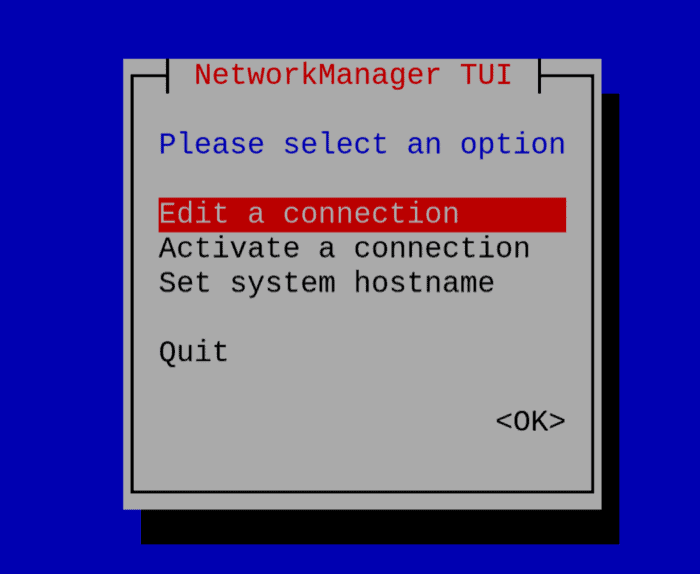
- This will open a list of available networks for you. Select the network you would like to connect to, enter the password for that network and then press Enter.
- If everything goes well, you should now be connected to your WiFi Network. To verify, just type in the following command:
ip a
This should show the wlan0 option listed with an inet option, which means that your Pi is now connected to the Internet.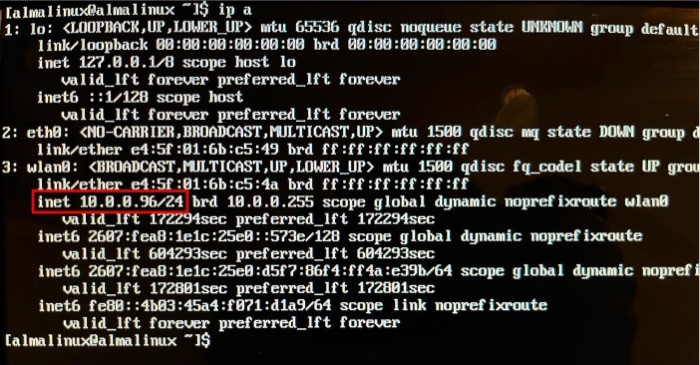
Are you a bit lost in the Linux command line? Check this article first for the most important commands to remember and a free downloadable cheat sheet so you can have the commands at your fingertips.
It's a free PDF guide containing every Raspberry Pi Linux command you should know!
Download now
Checking for Updates
The first step after installing any operating system is to check for updates: both in terms of packages and security updates. You can easily check for and install both in Alma Linux using this single command:sudo dnf update -y
This will perform both package and security upgrades on your system. You should see a table of packages that will be updated and the update process will automatically start.
The process will take some time so be patient and let it end. Once it does, your Raspberry Pi’s OS now has the latest and the greatest of all the essential packages.
Change the default password
Before moving any further, change the default password. It’s not good to have default users and passwords, and even less to keep them forever. That’s why this has been changed recently on Raspberry Pi OS.
Like with any distribution, you can easily set a new password with the command:passwd
Enter the current password (“almalinux”), and type the new password twice.
Select a password that is non-obvious and difficult to guess.
If you lack inspiration, you can use this password generator that gives you a password that is easy to remember but hard to crack.
And if you’ll be hosting critical applications or data on your system, it’s probably better to create a new user, delete this one, and follow the best practices in terms of security (link to my checklist). Keeping a default username is never a good idea.
Packages management on Alma Linux
If you use a Raspberry Pi, you’re probably used to Debian-based distributions and APT for the package manager. However, Alma Linux does not use it, as it belongs to the Red Hat Family of distributions.
The package manager in this case will be DNF, handling RPM packages.
It works the same way with slight differences:sudo dnf <action> <parameters>
With these actions, you’ll use most of the time:
- search: Search packages available and their details for a given string.
dnf search python - upgrade: Will do the repository sync + suggest the installation of available upgrades (including security upgrades).
In a nutshell, it is a combo of “apt update” and “apt upgrade” commands used in Debian distros.sudo dnf upgrade - install: Install a specific package.
sudo dnf install python3 - group: Pre-packaged groups of packages are available in Alma Linux. When you install a group using the “groupinstall” command, all the packages belonging to that group are installed.
sudo dnf group listsudo dnf group install <group>
Next, we will see how to install and set up a Desktop Environment in Alma Linux.
How to Set up a Desktop Environment
There are several required packages to install a desktop environment for an OS like Alma Linux.
Fortunately, pre-existing groups (discussed in the last section) can be used to make our task easier. First, list the available packages using the following command:sudo dnf group list
You will see the group Server with GUI in the “Available Environment Groups” section.

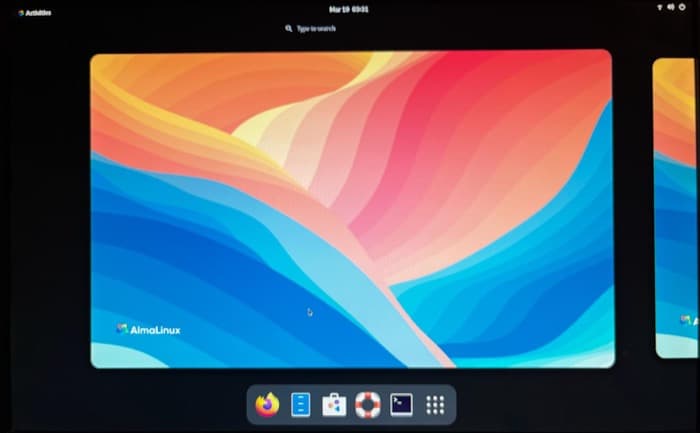
Installing this group will get you the GNOME desktop environment on Alma Linux for Raspberry Pi, with all the accessories and default applications.
So, the command to use to install everything is:sudo dnf group install "Server with GUI" -y
It will need to download around 1 GB of packages (consuming 2.7 GB space after installation), so it’s not the best idea to install it on an old model or if you want to keep things “lite”. It’s the easiest, perhaps not the smartest.
You can always go for an alternative Desktop Environment (yes, there are multiple! The power of open source OS’s).
It’s a good idea to get a coffee as this will take some time to complete depending on the Raspberry Pi model and the SD card or USB drive you are using (it took 30–40 minutes for me on a Raspberry Pi 4 running on a 32 GB Class 10 SD Card).
When the desktop environment is installed, run the following command to change the boot target to graphical:systemctl set-default graphical
Finally, a system reboot will be required for the changes to take effect:sudo reboot
And you should get the full desktop environment on the next boot. Login with the default user (or the new one if you changed it), and the new password (fingers crossed on this one hoping that you changed it!).
It's a free PDF guide containing every Raspberry Pi Linux command you should know!
Download now
Related Questions
In this section, we will go through some questions regarding Alma Linux that would be useful to know.
Why can I not connect to Wi-Fi with Raspberry Pi 400?
If you are using an older version of Alma Linux (older than V8.8/V9.2), it does not come with the linux-firmware-raspberrypi package, which is essential for Raspberry Pi 400 Wi-Fi support.
If you have something critical running on your Pi 400 which stops you from updating your OS, follow this workaround guide to get Wi-Fi working on your Pi 400.
Is it possible to install Alma Linux on Raspberry Pi 5?
As mentioned in this GitHub Issue post, there aren’t any images available for Alma Linux that support the latest Raspberry Pi 5 hardware. So, stay tuned and keep an eye on the official GitHub Repo page for updates on this.
It's a free PDF guide containing every Raspberry Pi Linux command you should know!
Download now
Reminder: Remember that all the members of my community get access to this website without ads, exclusive courses and much more. You can become part of this community for as little as $5 per month & get all the benefits immediately.
Conclusion
Great! You now know how to install and set up Alma Linux on your Raspberry Pi. Let’s go through the things we covered in this tutorial:
- First, we learned how to install the Alma Linux OS package for the Pi and then flash it onto an SD Card or USB drive.
- Next, we took a crash course on the basic post-installation steps for Alma Linux.
- Finally, we learnt how to set up a Desktop Environment for our OS.
- As a bonus, we also went through some questions you might have regarding Alma Linux Installation.
This is just a start. You have a lot more that you can do with your Raspberry Pi. For instance, you can try other Red Hat Family Linux Operating Systems. Here are some articles you will find helpful:
- How To Install And Use Fedora On Your Raspberry Pi?
- How to Start Using CentOS on your Raspberry Pi?
- How to Install Rocky Linux on your Raspberry Pi?
Whenever you’re ready, here are other ways I can help you:
The RaspberryTips Community: If you want to hang out with me and other Raspberry Pi fans, you can join the community. I share exclusive tutorials and behind-the-scenes content there. Premium members can also visit the website without ads.
Master your Raspberry Pi in 30 days: If you are looking for the best tips to become an expert on Raspberry Pi, this book is for you. Learn useful Linux skills and practice multiple projects with step-by-step guides.
The Raspberry Pi Bootcamp: Understand everything about the Raspberry Pi, stop searching for help all the time, and finally enjoy completing your projects.
Master Python on Raspberry Pi: Create, understand, and improve any Python script for your Raspberry Pi. Learn the essentials step-by-step without losing time understanding useless concepts.
You can also find all my recommendations for tools and hardware on this page.