How to Boot from SSD on Raspberry Pi: A Detailed Walkthrough
Raspberry Pi devices use SD cards by default, but a USB boot is now an option. Using an SSD drive with a USB adapter can then drastically increase the performance of your Raspberry Pi at a relatively low cost. Here is how to try this on your setup.
As a whole, the process of booting a Raspberry Pi from an SSD is not very different from using an SD card. The SSD can be flashed from a computer using Raspberry Pi Imager and plugged into a free USB port. It should boot automatically on recent Raspberry Pi models.
But if it’s your first time trying this, you probably need more step-by-step instructions, especially about the hardware required. So, let me walk you through from understanding the prerequisites to installing and optimizing the setup.
If you’re looking to quickly progress on Raspberry Pi, you can check out my e-book here. It’s a 30-day challenge where you learn one new thing every day until you become a Raspberry Pi expert. The first third of the book teaches you the basics, but the following chapters include projects you can try on your own.
Prerequisites to use SSD on Raspberry Pi
Before jumping into the technical steps, there are a few things you need to know, do, and own. Let’s talk about this first, and please don’t hesitate to skip this part if you have already done it once and just want the tutorial part.
Hardware recommendations
A recent Raspberry Pi model
First off, it’s worth mentioning that not all Raspberry Pi models can use the USB boot procedure explained in this tutorial. Only recent models are compatible.
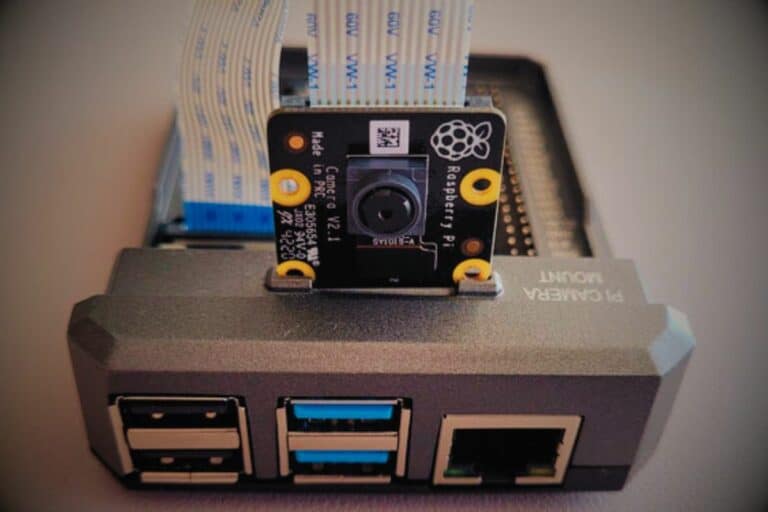
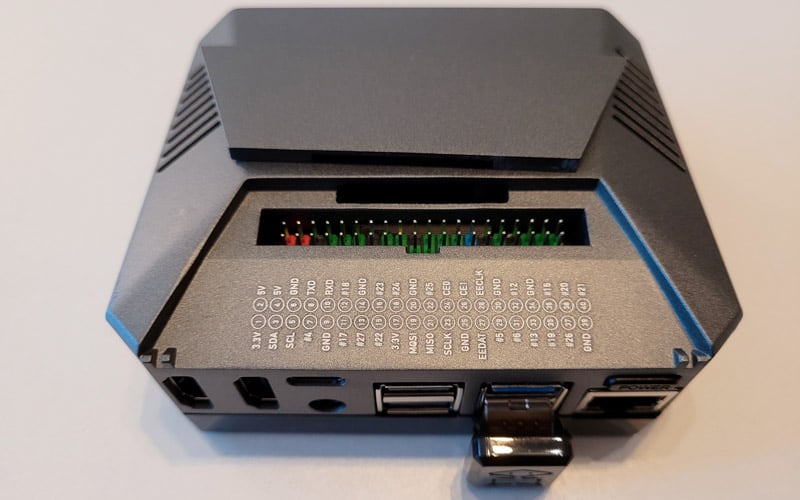
Raspberry Pi 4 and 400 are the best suited to do this as they come with USB 3 ports (the blue ones, which are faster than the traditional black ports). For your information, I’m using my Raspberry Pi 4 to test this for you.
I didn’t test older models, but in theory, Raspberry Pi 2B and 3 also support USB boot.
Which SSD format? Adapter?
Many options are available to plug an SSD drive into a Raspberry Pi. There is not really one setup better than another. I guess you can start with what you already have to avoid buying too many things.
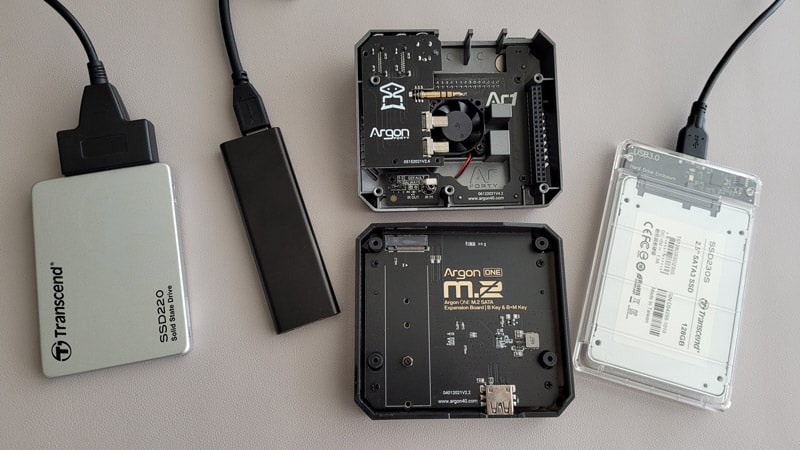
I have tested all kinds of formats and adapters over the years:
If you are interested in one of these, here is the list with all the links to get them:
- On the left, I have a USB to SATA Adapter (something like this on Amazon). The USB cable has 2 USB plugs and is simply connected to a traditional 2.5″ SSD drive.
- The next one is my current favorite. It’s a Sabrent USB adapter, with an M.2 SSD inside (this model). It doesn’t take up much space and there is only one USB cable to plug in, so it’s convenient to switch from the Raspberry Pi to the computer when I need to reinstall.
- Then, you have the Argon One M.2 case (review here), where you can hide an M.2 SSD in the case itself. It’s a nice compact setup if you want to use it.
- And finally, a traditional external case I used with a SATA drive back in the day, which also works great with a 2.5″ SSD. I prefer this model unlike the first one which has only one USB cable as it protects the drive a bit inside the case.
It’s not in the picture but my Pironman case from Sunfounder (review here) has also an SSD drive inside. It’s running 24/7, so I didn’t even unplug it to take this picture :-).
Find what works best for you, the installation process is the same anyway. Just make sure you have one SSD drive and one accessory to plug it into your Pi and move on!
It's a free PDF guide containing every Raspberry Pi Linux command you should know!
Download now
Optional: A powered USB hub
Depending on your setup, especially your power supply and other USB accessories you use, you may get some low voltage warnings more often with an SSD plugged in.
The only way I have found to reduce these warnings when already using a proper power supply is to plug the SSD into a power USB hub, which will help the Raspberry Pi to bring enough power to run everything.
It’s not 100% perfect, but I get fewer errors overall. Here is the model I use just so you know, but I guess there are not many differences with other models.
System and firmware updates
In most cases, if you have been using your Raspberry Pi regularly in recent months, you don’t have to worry about this part.
But for your information, the USB boot is a software feature that has been added lately, so old Raspberry Pi boards don’t support it by default. A firmware upgrade is required.

Join Our Community!
Connect, learn, and grow with other Raspberry Pi enthusiasts. Support RaspberryTips and enjoy an ad-free reading experience. Get exclusive monthly video tutorials and many other benefits.
Learn moreI’ll give you the short version here, but I have a full tutorial on how to update the Raspberry Pi firmware if you want a more step-by-step approach.
System updates
Firmware updates are delivered via APT, the package manager on Raspberry Pi OS, so it’s likely that you already have a recent version without having to worry about it.
But just in case, if you currently have a way to run Raspberry Pi OS on your device, just run these two commands to make sure everything is up-to-date:sudo apt update
sudo apt full-upgrade
Firmware updates
It’s possible to force a firmware update, but it’s not recommended unless you have a real reason to do it.
Caution: My recommendation would be to skip this, try the entire tutorial (next section of this article), and if it looks like it doesn’t work on your Pi, come back here and try these commands with the system on your SD card:
sudo rpi-update
sudo rpi-eeprom-update -d -a
sudo reboot
Setting up your SSD for a Raspberry Pi
Now that you have all the hardware and accessories you need and have updated your current Raspberry Pi OS system, let’s start installing a new one on the SSD.
Overall, the steps to install Raspberry Pi OS on an SSD are the same as with an SD card:
- Plug the SSD into your computer.
- Use Raspberry Pi Imager to flash the system on the SSD.
- Plug the SSD into the Raspberry Pi.
- Remove the SD card to boot it with the SSD.
Let’s see all these steps in detail now.
Note: If you want to transfer all your data from the SD card to the SSD instead of starting from scratch again, I explain how to do this at the end of this article.
Plug the SSD into your computer
The first step is to connect your SSD to your computer. Plug it into a USB 3 port if possible, it’s the blue one, they offer a faster write speed.
It's a free PDF guide containing every Raspberry Pi Linux command you should know!
Download now
It will be slightly different depending on your setup, but in general, it’s just one or two USB cables to plug into your computer.
Even if you use a case like the Argon One or the Pironman, you don’t have to disassemble everything. You can simply have a USB-to-USB cable between the case and your computer.
Just make sure your system detects something before moving forward. You don’t have to initialize or format the drive. You can ignore all system warnings (for example, Windows will suggest initializing or formatting the drive if there is no Microsoft partition on it, but you don’t need to do that).
Installing an operating system on your SSD
If you use Raspberry Pi Imager (or Balena Etcher), flashing an SSD from your computer is the exact same process as with an SD card:
- Make sure your SSD is connected.
- Start Raspberry Pi Imager.
- Click on “Choose OS” to select an operating system to install.
- Click on “Choose Storage”. There, your USB drive should be listed:
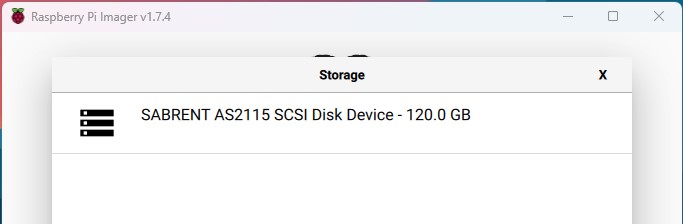
It’s often the name of the adapter that shows up, with the total size of the drive.
Make sure to pick the right one if you have several options listed (I don’t want you to format your computer or backup drive here!). - Then click on “Write” to start the copy.
A few minutes later, the SSD should be ready to use: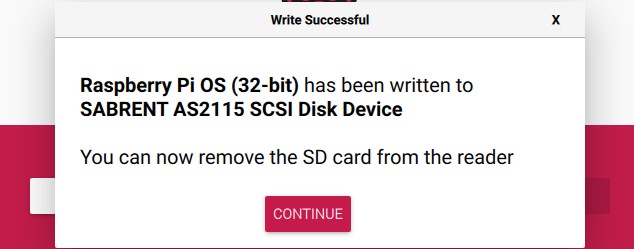
If it’s your first time using Raspberry Pi Imager, you can click on this link to read my full guide about it. I gave you the short version here, but you might need more guidance for the first installation.
It's a free PDF guide containing every Raspberry Pi Linux command you should know!
Download now
Booting Up the Raspberry Pi from SSD
Now that the SSD is ready, the last step is to plug it into the Raspberry Pi to boot on it. It shouldn’t be a big deal, but in order to do this carefully, let me explain all the steps and potential issues.
Connecting the SSD to the Raspberry Pi
First, make sure to remove any SD card from the Raspberry Pi slot. Also, disconnect any USB drive you may have on it, it will boot faster and avoid errors if the Raspberry Pi has only one USB drive to boot from.
Then, connect your SSD to the Raspberry Pi depending on your setup:
- If you have blue ports on your Raspberry Pi model, make sure to use one of these for better performance.
The mouse and keyboard can be plugged into another port, it doesn’t matter. - If you use a case like the Pironman or Argon One, you probably have a small jumper to plug between the Raspberry Pi and the SSD. You removed it for the installation, just put it back.
- If it’s an external case, plug all the ports into the Raspberry Pi and you’re set.
- Do you have a USB-powered hub? What I do is that I only plug the USB hub into the Raspberry Pi (on a blue port) and put everything else on the hub.
First boot with your SSD
If the firmware supports the USB boot and the SSD is the only option available, it should boot on it automatically, you have nothing else to do.
Just power on your Raspberry Pi and wait a few minutes, as you would do for a new SD card. It will probably reboot a few times before showing you the welcome wizard or opening your session.
If you are not familiar with a first boot on Raspberry Pi OS, I recommend reading my full guide about Raspberry Pi OS here, I won’t repeat everything here, it’s the same process.
You may also find these other tutorials useful for the next steps after this first boot:
- 17 Best Apps to Use a Raspberry Pi as a Desktop PC
- 15 Easy Projects for Raspberry Pi Beginners (With Links)
- 8 Easy Tips & Tricks to Increase Your Raspberry Pi’s Speed
And if for any reason it doesn’t work on your system, I would recommend two things:
- Check the related questions below to see if I didn’t cover the issue or error message you get.
- Go back to the “Firmware update” section at the beginning of this article. Boot on your SD card and try to do it. Then try to boot on the SSD again.
It's a free PDF guide containing every Raspberry Pi Linux command you should know!
Download now
Want to chat with other Raspberry Pi enthusiasts? Join the community, share your current projects and ask for help directly in the forums.
Related questions
Can all Raspberry Pi models boot from SSD?
USB boot is only supported on Raspberry Pi 2B, 3 (A and B version), 4 and 400. Older models and Raspberry Pi Zero can’t boot from SSD.
Remember that the USB boot is a new software feature added to the firmware after the device release. So if you have a model that is compatible according to this list but doesn’t boot with the USB drive, you may try to update the firmware first (instructions at the beginning of this article).
Why is my Raspberry Pi trying to boot on the SD card while the SSD is plugged in?
The default boot sequence on a Raspberry Pi is to try the SD card slot first, and then USB drives.
To change the boot order, follow these steps:
- Open a terminal on Raspberry Pi OS.
- Start raspi-config:
sudo raspi-config - Go to “Advanced options” and then “Boot Order”.
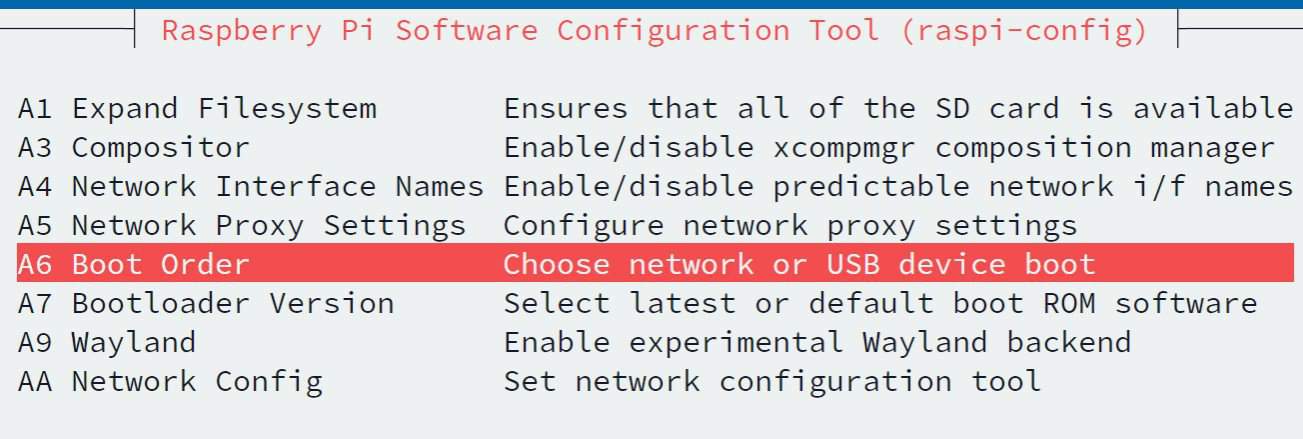
- On the next screen, choose “USB boot” and press Enter.

On the next reboot, your Raspberry Pi will try to boot on the USB first. If it’s your main storage, you’ll save a few seconds at each boot after doing this.
Why do I get the error: “Controller never released inhibit bits”?
I’m not sure what this error means exactly, it’s probably a bug. It doesn’t block the boot process but I fixed it by leaving an empty SD card in my SD card slot on the Raspberry Pi.
Or at least I don’t have it anymore after doing this, I shouldn’t say I have “fixed” it :-).
Why do I get a “Low voltage warning” all the time when using an SSD?
As a general rule, it’s recommended to use the official power supply to avoid “Low voltage” warnings on a Raspberry Pi.
Booting on a USB drive requires more power than an SD card, and you’re likely to lack the juice to make it run perfectly well if you don’t use the official power supply.
But even when you use it, it’s not necessarily perfect. That is why I recommended a USB powered hub previously. Raspberry Pi devices are not built for this, so you might get this error from time to time.
It’s just a warning, don’t worry too much about it, but there are a few things you can try in order to reduce their frequency as listed here: How To Avoid “Under-voltage Detected” Errors On Raspberry Pi.
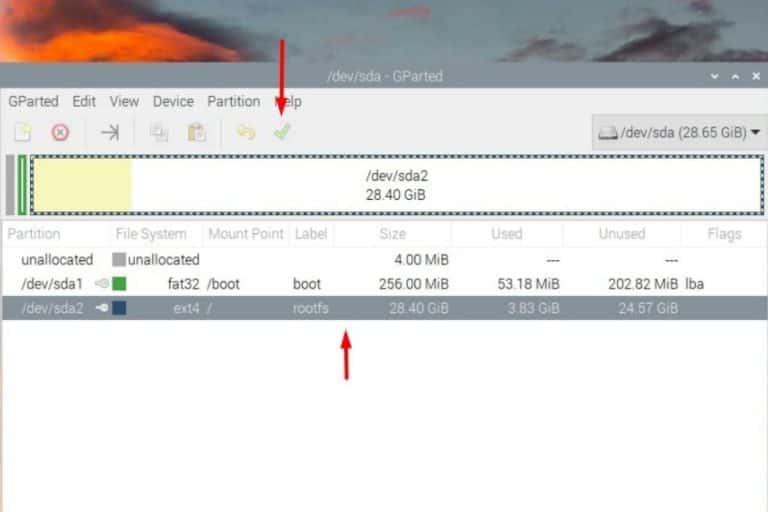
Would it be possible to copy all my data from an SD card to the SSD?
If the SSD is bigger than the SD card, it’s possible to copy all the data (including system partitions) from the SD card to the SSD and keep using the same system settings, applications, and files.
There is the perfect tool to do this on Raspberry Pi OS, here is the step-by-step procedure:
- Start your Raspberry Pi with the SD card you want to copy to the SSD drive.
- Plug in the SSD drive (on the blue USB ports if possible).
Ignore the popup message by clicking “Cancel” to close it. - In the main menu, find the “SD card copier” tool under “Accessories”.
This tool allows you to duplicate an SD card and you can also use it with an external USB drive.
It looks like this:
- You will copy from the SD card to the USB drive, so pick the corresponding devices accordingly. In my case, it’s:
Copy From Device: SC32GB (/dev/mmcblk0)
Copy To Device: Mass Storage Device (/dev/sda)
But I guess it could be a little different depending on your setup. - Then click on “Start” to copy the system.
- Confirm to erase the USB drive.
The copy might take a few minutes, depending on the SD card size and USB drive speed, so be patient.
Once the tool has completed its job, you can shut down your Raspberry Pi, remove the SD card, and boot on the USB drive only.
Whenever you’re ready, here are other ways I can help you:
The RaspberryTips Community: If you want to hang out with me and other Raspberry Pi fans, you can join the community. I share exclusive tutorials and behind-the-scenes content there. Premium members can also visit the website without ads.
Master your Raspberry Pi in 30 days: If you are looking for the best tips to become an expert on Raspberry Pi, this book is for you. Learn useful Linux skills and practice multiple projects with step-by-step guides.
The Raspberry Pi Bootcamp: Understand everything about the Raspberry Pi, stop searching for help all the time, and finally enjoy completing your projects.
Master Python on Raspberry Pi: Create, understand, and improve any Python script for your Raspberry Pi. Learn the essentials step-by-step without losing time understanding useless concepts.
You can also find all my recommendations for tools and hardware on this page.