Getting Started With Docker On Raspberry Pi (Full Guide)
I noticed that more and more projects have an option to install the main software parts with Docker, but I guess it’s not always clear for everyone what we are talking about. I was a system administrator, and containers weren’t used at all when I started, so that’s pretty new too. If you are a bit lost with this technology, you are at the perfect place to learn everything you need to know about Docker.
Docker is a piece of software that allows you to install and run software in separate containers, by virtualizing the running operating system. The main benefits of Docker are the ease of deployment, security, and scalability.
I will start with a brief introduction to Docker, and then show you how to install and use it on a Raspberry Pi. I’ll use Raspberry Pi OS, but the idea is the same with any operating system.
If you’re looking to quickly progress on Raspberry Pi, you can check out my e-book here. It’s a 30-day challenge where you learn one new thing every day until you become a Raspberry Pi expert. The first third of the book teaches you the basics, but the following chapters include projects you can try on your own.
What is Docker?
In simple words, Docker is like the next generation of the Debian package manager (APT).
Instead of installing each piece of software individually on your system, with many dependencies and regular headaches when you install a complex application, Docker will create a container, a separate sub-system on your system, with everything required for the application.
The developer will basically create an image of its own system, including everything needed for the main application to run, and share it with the end-user.
The user will download the image, and create a container from it, making sure everything will be installed and will run as expected by the developer.
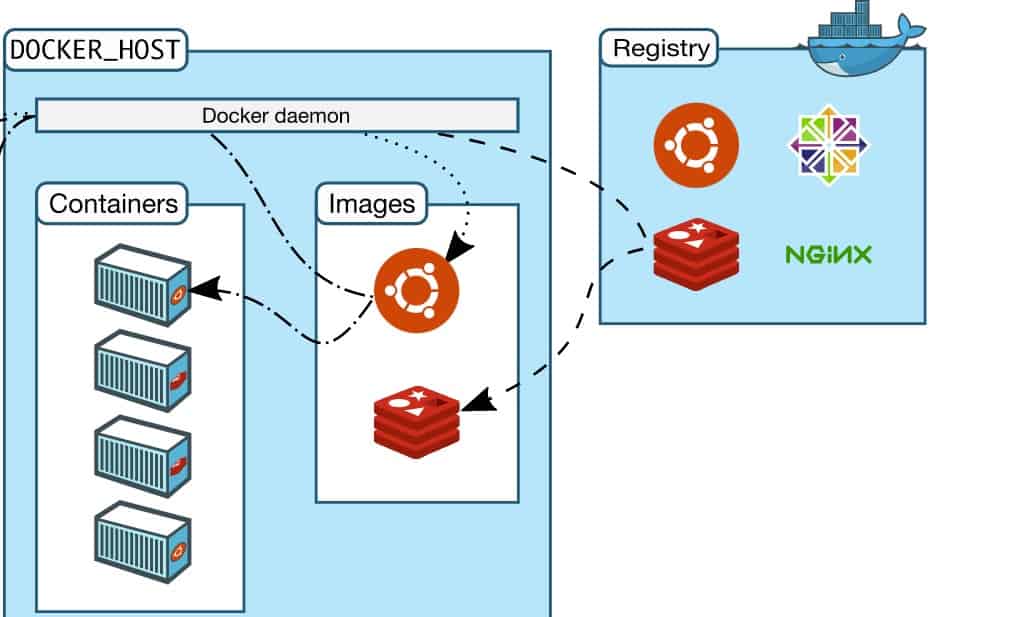
I will show you a concrete example at the end of this article, but basically, when you want to create a project on your Raspberry that requires several apps, you may have some conflict issues or spend time configuring everything. If a developer already did this project and shared its container, you can simply download it and get it running on your system almost instantly.
At least that’s the promise. We’ll see that it’s not always that simple, but you get the idea.
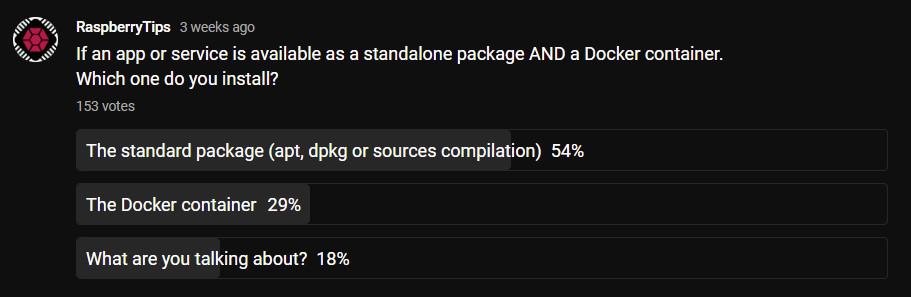
I did a survey on my YouTube channel, and most of you are still using the traditional way, but let’s discuss how to install and use Docker for the first time.
Equipment list
Here is the recommended hardware to follow this tutorial:
- A Raspberry Pi 4: Or at least the most powerful model you can get your hands on. Docker is optimized for convenience, not necessarily for speed. A decent Raspberry Pi model, with enough RAM, is recommended.
- A fast SD card: This is my favorite. Same reason, don’t use a slow an unreliable SD card for a server. A USB stick is also an option (this one for example).
And as for most projects, adding these optional accessories can make your life easier:
- A good keyboard and mouse: I use this one, but other options are available (I tested most of them in this comparison).
- A decent monitor: always easier to follow the instructions when you can see what’s going on with the Raspberry Pi, not switching from your computer to the Pi all the time.
- The best Raspberry Pi case: it’s the one I use all the time. It keeps my Pi protected and cool, a must-have (tested here).
How to install Docker on Raspberry Pi?
In short, Docker can be installed on Raspberry Pi with only two commands:curl -sSL https://get.docker.com | sh
sudo usermod -aG docker $USER
It's a free PDF guide containing every Raspberry Pi Linux command you should know!
Download now
This will download and run the installation script on your device, and allow your current user to use Docker.
But let me rewind a bit and explain all the steps in more details. Indeed, before using Docker on your Raspberry Pi, there are a few things to install first. Docker runs as a service, so we need to install it before creating any container.
Note: If you want to see all these steps in action, I have a video lesson available for the community members. You can join here and watch it directly if you are interested (with 20+ other lessons for Raspberry Pi and many other benefits).
Install an operating system
Docker can work on most Linux distributions.
On their website, they mention that Ubuntu, Debian, and Fedora are officially supported, so I guess it should work on any variation of these systems. Arch Linux has an experimental version available too.

Join Our Community!
Connect, learn, and grow with other Raspberry Pi enthusiasts. Support RaspberryTips and enjoy an ad-free reading experience. Get exclusive monthly video tutorials and many other benefits.
Learn moreI’m testing this tutorial for you on a Raspberry Pi 4 with Raspberry Pi OS Bullseye, but it should be the same steps for whatever system you use.
So if it’s not done already, follow one of these tutorials to get your system ready:
- Install Raspberry Pi OS on Raspberry Pi.
- Install Ubuntu on your Raspberry Pi.
- Or try Fedora on Raspberry Pi.
Then, make sure your system is connected to the Internet, and tweak the basic configuration if needed (keyboard layout, language, etc.).
As always, I recommend setting up SSH on the Raspberry Pi and connecting to it from your computer. This way, you can just copy and paste all the commands I’ll give you here.
Do the system updates
As for any type of project, the first step is to apply the system updates to avoid any issues or conflict.
On Raspberry Pi OS and Debian-based distributions (Ubuntu, etc.) you can do this with these commands:sudo apt update
sudo apt upgrade -y
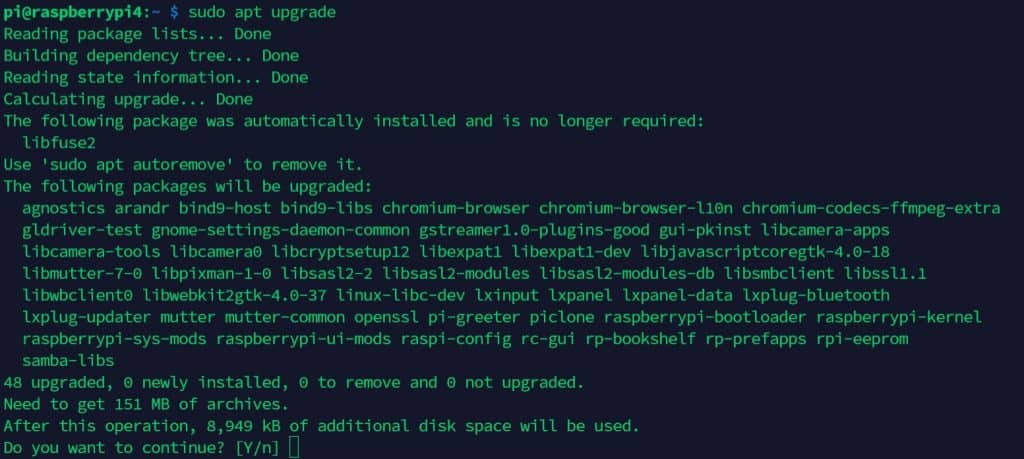
After a few minutes, your system is up-to-date and will be ready to install Docker on it.
If there were many package updates, a system restart might be a good idea:sudo reboot
Are you a bit lost in the Linux command line? Check this article first for the most important commands to remember and a free downloadable cheat sheet so you can have the commands at your fingertips.
Install Docker on Raspberry Pi
Installing Docker on a Raspberry Pi is straightforward. There is a simple script to run, that will detect your system and architecture, and install everything for you.
Here is the command:curl -sSL https://get.docker.com | sh
You’ll see the installation progress on your screen, and it should end with something like:
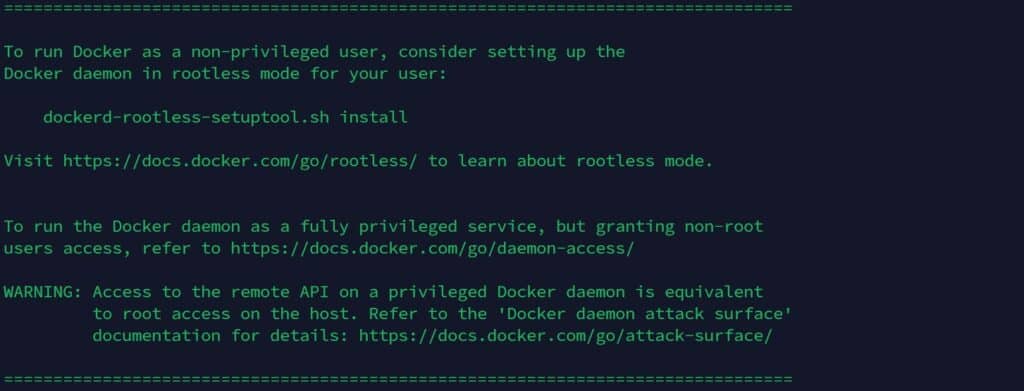
In theory, we are not using root on Raspberry Pi OS, so there is an extra step to allow us to use Docker directly (without sudo).
Run Docker commands with your current user
The only thing I did to allow the main user to use Docker without sudo was to add it to the docker group. I don’t know exactly why they give other instructions, but it wasn’t necessary in my case.
It's a free PDF guide containing every Raspberry Pi Linux command you should know!
Download now
So, here is the command to add the current user to the docker group:sudo usermod -aG docker $USER
You need to log out and login back again to apply the changes. So, depending on your situation, close your GUI session, exit your SSH session, or simply restart the Raspberry Pi, and you should then be able to run any docker command without sudo.
You can try it with:docker ps

If it works, you are ready to move forward. If received a message such as “Got permission denied while trying to connect to the Docker daemon socket”, there is something missing on your system. In this case, try to follow their instructions.
Test your Docker setup
Once Docker is installed, we can directly start using it. There is a tiny container you can try to download and run to make sure everything is working properly.
Here is the command:docker run hello-world
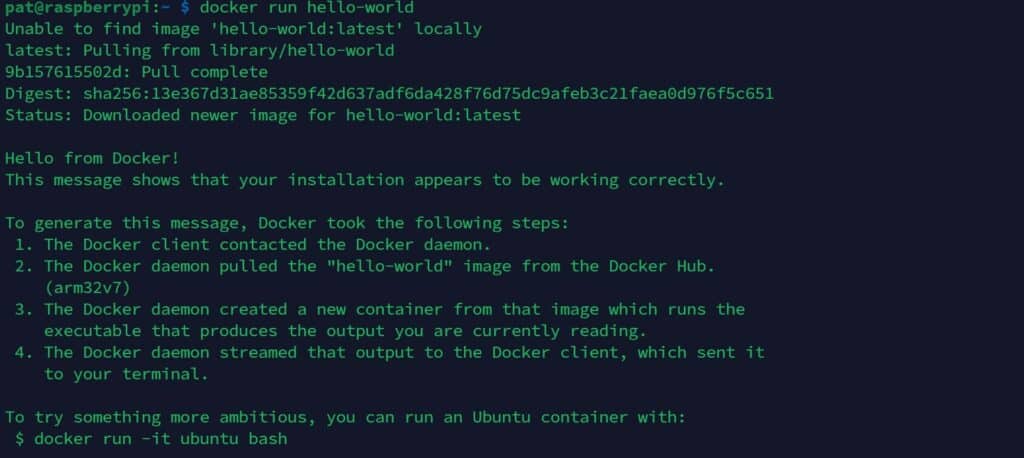
As you can see in the screenshot, you try to run an image that is not installed on your system. Docker will then download it first (“pull”), and then run it.
This is just a dumb example saying “Hello”, but you get the idea, you can now start using Docker on any machine.
It's a free PDF guide containing every Raspberry Pi Linux command you should know!
Download now
How to use Docker on Raspberry Pi?
Using Docker on Raspberry Pi is not different from any other computer, but if it’s your first time trying it, you’ll need some guidance.
Once the service is installed, a bunch of commands can be used to monitor, install and run Docker containers.
Docker commands you need to know
Let’s start with the main commands you can use now that Docker is installed on your system:
- Monitor the running containers:
docker ps - Display the current version of Docker:
docker version - Download a new image:
docker pull [IMAGE] - Run an image (and download it if not existing on your local system):
docker run [IMAGE] - Search for an image in the Docker repository:
docker search [X]
You can also use the web version of this search engine, which will be easier to use and will give you more details (here is the link). One thing to consider is that some images are not compatible with the ARM architecture. On the website, you can filter them out, but I don’t think you can do it with the command line. - Show the usage statistics:
docker stats
- Display the list of all the Docker commands:
docker help
There are a lot of commands and parameters, but basically, if you know how to install, run and monitor your containers, it should be enough in most cases.
Let’s take an example
Now that Docker is installed and working properly, you’ll probably jump to a specific tutorial about a project you are interested in (maybe it’s Plex, Home Assistant, or any of the multiple guides I have on this website).
But let’s do a quick recap before trying something more complicated.
Let’s say you want to install Nginx (a web server) in a Docker container. How would you do that?
Well, here are the steps you need to follow once Docker is installed:
- Use the website or the “search” command to check the corresponding images available:
docker search nginx
- There are many results, but the first one is generally the best. And on the website, you can see that the first one is compatible with ARM and ARM64. So let’s install and run it with:
docker run nginx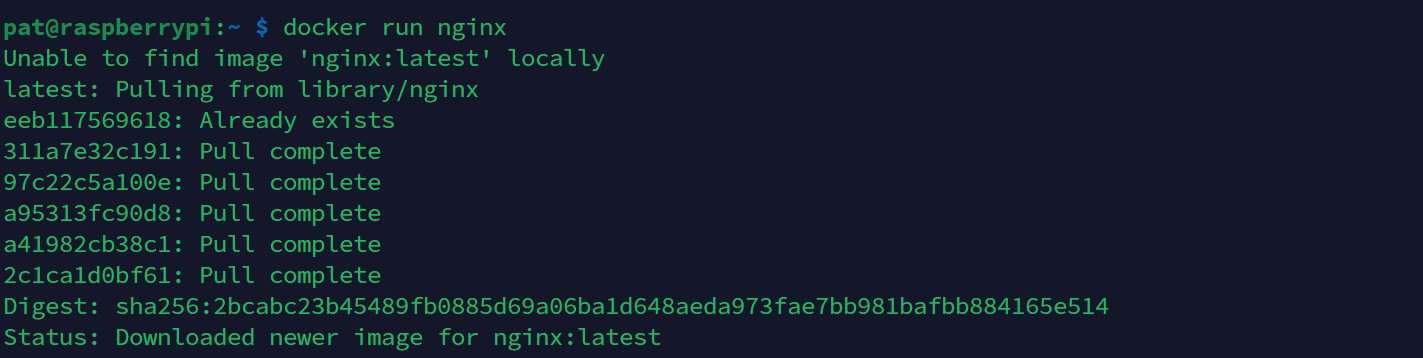
As for the hello-world example, it will check if it’s already installed, and if not, download it.
Then, it will start the container.
You can use “docker ps” or “docker stats” to check if it’s running. - One thing I didn’t tell you, is that “docker run [X]” will start the container in the current session. If you close your SSH connection or terminal, the application will stop.
To run it in the background, you need to use the “-d” option:docker run -d nginx
That’s it, from there you can start using your application. Depending on which image you try, there might be additional steps, refer to the corresponding documentation for more details.
For example, if you open the corresponding page for the Nginx build, they will give you additional parameters and configuration options for your web server.
I hope this is clearer to you now, but you’ll probably need a bit more practice to make things even clearer. Try following a Docker tutorial for a Raspberry Pi project after that, to make sure you understand everything while it’s still fresh.
If you want to try a Docker project for a complete example, I have a tutorial on how to install Bitwarden on your Raspberry Pi. It’s a password manager, using a Docker container, so it’s a perfect example (you can probably skip the first half of the tutorial as you already have Docker installed).
It's a free PDF guide containing every Raspberry Pi Linux command you should know!
Download now
Reminder: Remember that all the members of my community get access to this website without ads, exclusive courses and much more. You can become part of this community for as little as $5 per month & get all the benefits immediately.
FAQ about Docker on Raspberry Pi
Here are a few frequently asked questions about Docker on Raspberry Pi I want to answer in this guide.
How many containers can you run on a Raspberry Pi?
A Raspberry Pi can run multiple Docker containers at the same time, but there is no hard limit to it. It all depends on the applications installed, the number of users for these applications, and how they are optimized for this platform.
It also depends a lot on the Raspberry Pi model you use and the performances you are willing to accept. I don’t have a great answer for this question, but you can absolutely run several services in different containers simultaneously on a Raspberry Pi and see how it goes.
How to uninstall Docker from the Raspberry Pi?
Even if Docker is installed via a script that did everything in the background, it’s nothing more than system packages that are installed with APT. You can see the installed packages with:sudo dpkg -l | grep dockerAnd uninstall them with something like:sudo apt remove docker-ce docker-ce-cli
The script also adds a new file under /etc/apt/sources.list.d that you can remove if you no longer use Docker:sudo rm /etc/apt/sources.list.d/docker.list
sudo apt update
Where are the containers’ configuration files stored?
Most Docker files are stored under /var/lib/docker on your main system. But the best practice to edit configuration files is to open a bash session inside the container directly. You can do this with:docker exec -ti [CONTAINER-ID] /bin/bash
The container ID is displayed on your screen when you start the application with “docker run”. Here is an example with my Nginx container:

From there, it’s the same files as with a traditional Nginx setup. You can read my full tutorial about Nginx here if you want to know more (even if it’s just an example here).
How to uninstall a Docker application?
Uninstalling a Docker application is done in two main steps: stopping the running container and then removing it.
- Stop the container. First, make sure the container is not running, by using this command:
docker stop [container_name] - Remove the container. You can then remove the container to clean up space:
docker rm [container_name]
How to update a Docker container?
When new versions are released, it’s possible to update a Docker application. Updating a Docker container generally requires pulling the latest image and replacing the existing container with a new one.
Warning: This method, while straightforward, does not preserve the data stored in the container. Users are advised to use Docker volumes for important data.
Here are the steps to update a Docker container that doesn’t store important data:
- Pull the latest image:
docker pull [app_name] - Stop the container:
docker stop [container] - Remove the container:
docker rm [container] - Start the new version:
docker run --name [new_container_name] -d [app_name]
By doing this, you’re basically starting from scratch again. So, it might work for simple applications with no data, it’s a bit more complicated than that in most cases. Check the Docker documentation for more details.
Whenever you’re ready, here are other ways I can help you:
The RaspberryTips Community: If you want to hang out with me and other Raspberry Pi fans, you can join the community. I share exclusive tutorials and behind-the-scenes content there. Premium members can also visit the website without ads.
Master your Raspberry Pi in 30 days: If you are looking for the best tips to become an expert on Raspberry Pi, this book is for you. Learn useful Linux skills and practice multiple projects with step-by-step guides.
The Raspberry Pi Bootcamp: Understand everything about the Raspberry Pi, stop searching for help all the time, and finally enjoy completing your projects.
Master Python on Raspberry Pi: Create, understand, and improve any Python script for your Raspberry Pi. Learn the essentials step-by-step without losing time understanding useless concepts.
You can also find all my recommendations for tools and hardware on this page.