Getting Started with CasaOS on Raspberry Pi (Full Guide)
CasaOS is an open-source and easy-to-use cloud system that has the potential to make your home truly smart. Using CasaOS on Raspberry Pi you can integrate all your smart devices making home automation easy. Let’s learn how to install CasaOS on your Raspberry Pi and familiarize ourselves with its dashboard.
CasaOS can be installed using the bash script available on the official website using “curl -fsSL https://get.casaos.io | sudo bash”. Subsequently, apps can be added using the app store built into the dashboard.
In this guide, I shall give you a step-by-step tutorial on installing CasaOS on your Raspberry Pi. I will also guide you through its interface and how to set up your home automation setup to turn your home into a smart home.
What is CasaOS?
If you’re looking to quickly progress on Raspberry Pi, you can check out my e-book here. It’s a 30-day challenge where you learn one new thing every day until you become a Raspberry Pi expert. The first third of the book teaches you the basics, but the following chapters include projects you can try on your own.
Introducing CasaOS
Casa is a Spanish word that translates to “Home”. CasaOS is a community-based, open-source cloud OS based on the docker ecosystem. It is a service/application that runs on a Linux-based OS.
Once installed its dashboard can be accessed from a web browser using the hostname or IP of your device. Then, you can install different applications from the dashboard, like Home Assistant, Jellyfin, and PhotoPrism.
All users on your home network can access and use the personal cloud hosted by CasaOS.
It's a free PDF guide containing every Raspberry Pi Linux command you should know!
Download now
Before installation, if you want to get a feel for the CasaOS dashboard you can visit their website and try the live demo (username = casaos, password = casaos).
What to do with my CasaOS
If you just learned about CasaOS and are intrigued about having a personal cloud. Here are a few scenarios that CasaOS is commonly used for:

Join Our Community!
Connect, learn, and grow with other Raspberry Pi enthusiasts. Support RaspberryTips and enjoy an ad-free reading experience. Get exclusive monthly video tutorials and many other benefits.
Learn more- Home Security Enhancement: CasaOS integrates with smart security cameras and motion sensors to create a comprehensive home security system. You can receive real-time alerts, monitor your home remotely, and even trigger automated responses.
- Energy Management: CasaOS enables you to optimize energy usage by integrating with smart thermostats and energy monitoring devices. You can regulate temperature settings, control appliances, and track energy consumption to reduce waste.
- Convenience and Comfort: With CasaOS, you can enhance your daily routines by automating repetitive tasks and customizing your smart home environment. For instance, you can set up automated lighting scenes to create ambiance, schedule heating/cooling systems, and even automate morning routines such as turning on a coffee maker and adjusting blinds.
- Entertainment and Media Control: CasaOS offers seamless integration with smart entertainment devices such as smart TVs, streaming devices, and audio systems.
- Remote Property Management: For users with vacation homes or rental properties, CasaOS provides the ability to remotely monitor and manage the property to ensure that your property remains secure and well-maintained.
However, these are just a few examples. With a personal cloud, the possibilities are limitless.
Installing CasaOS
Installation of CasaOS is as simple as copying a command from the internet and executing it. However, before running that command, there are a few preparatory steps that we need to take.
Installing Raspberry Pi OS
Before going ahead with the installation of CasaOS you need to follow the following steps:
- Install Raspberry Pi OS on your Raspberry Pi using Raspberry Pi Imager.
- Ensure you have internet connectivity and SSH enabled during the installation using the configuration settings shown in the screenshots below.
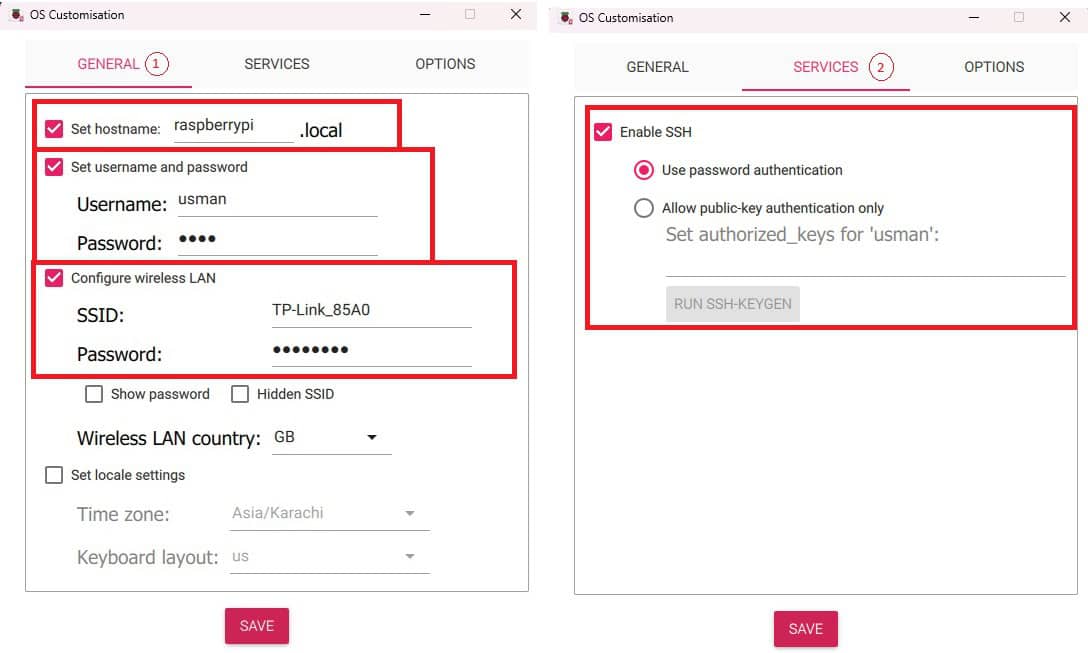
- Alternatively, you can follow this tutorial to connect to the internet and enable SSH on your device.
- Make sure your device is up-to-date using the commands:
sudo apt update
sudo apt full-upgrade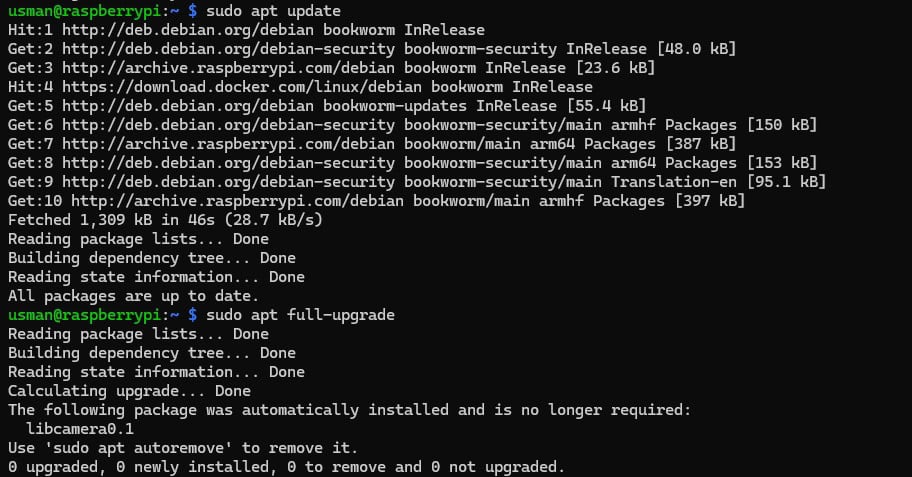
That is it, now you are ready to install CasaOS on your Raspberry Pi.
Install CasaOS
To install CasaOS on your Raspberry Pi, you need to execute the bash script available on the CasaOS official website and execute it on your Raspberry Pi:
- First, SSH into your Raspberry Pi using the command:
ssh <username>@<hostname>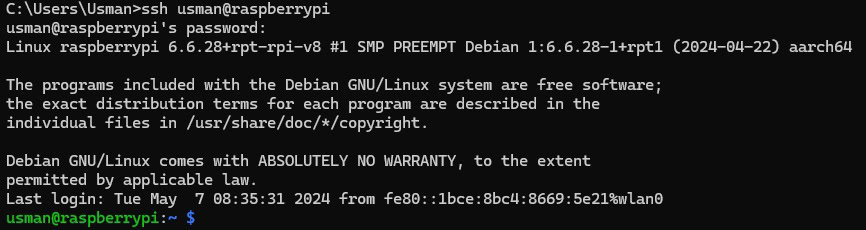
- Now visit CasaOS’s official website and copy the curl command from the website.
curl -fsSL https://get.casaos.io | sudo bash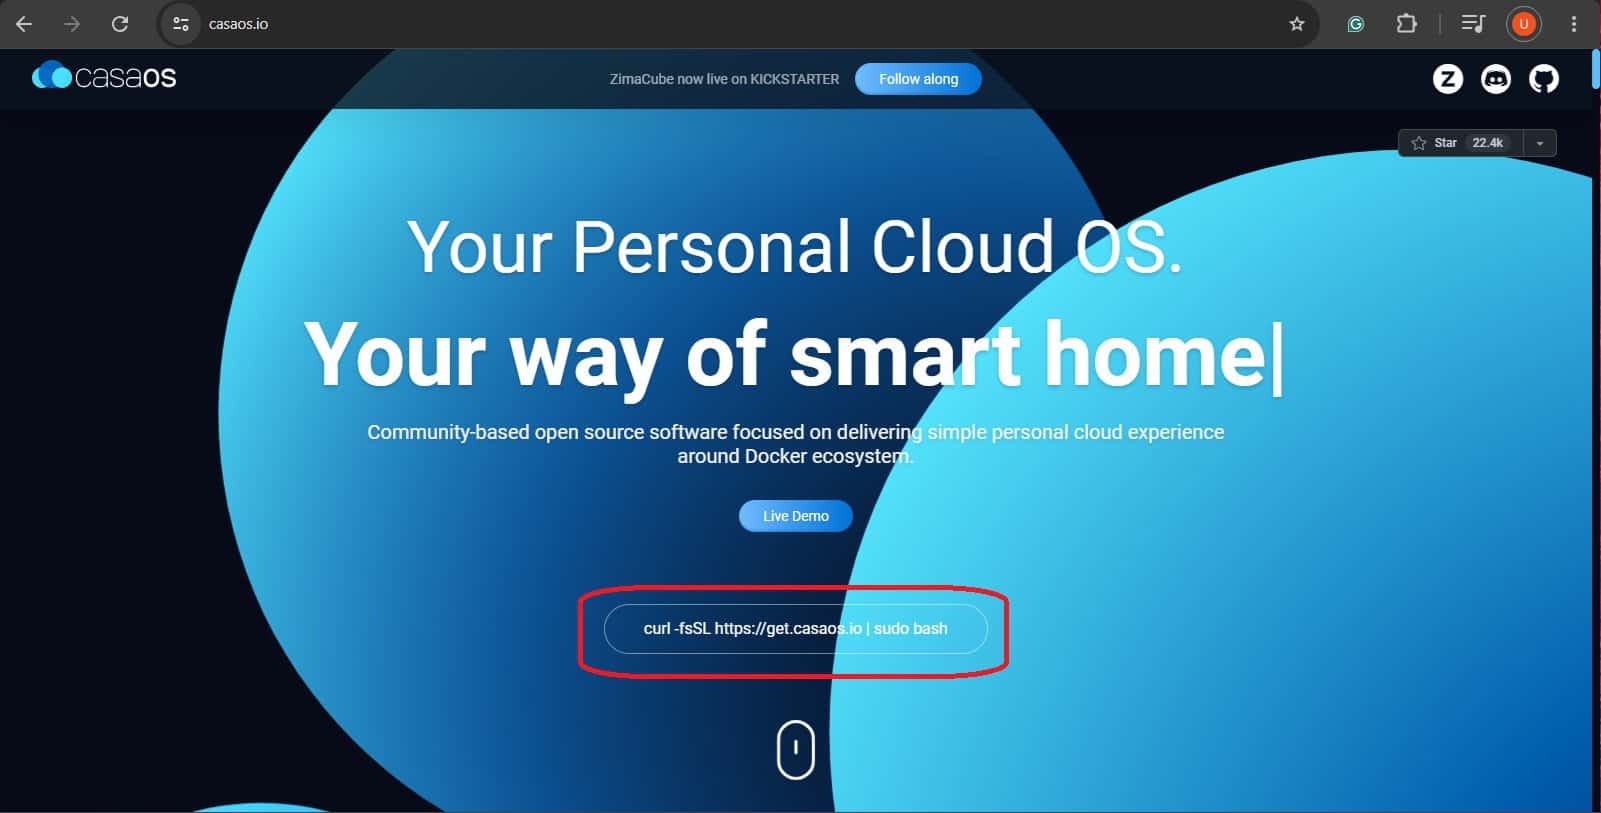
- Paste this command in your terminal.

- The CasaOS installation bash script will now execute.
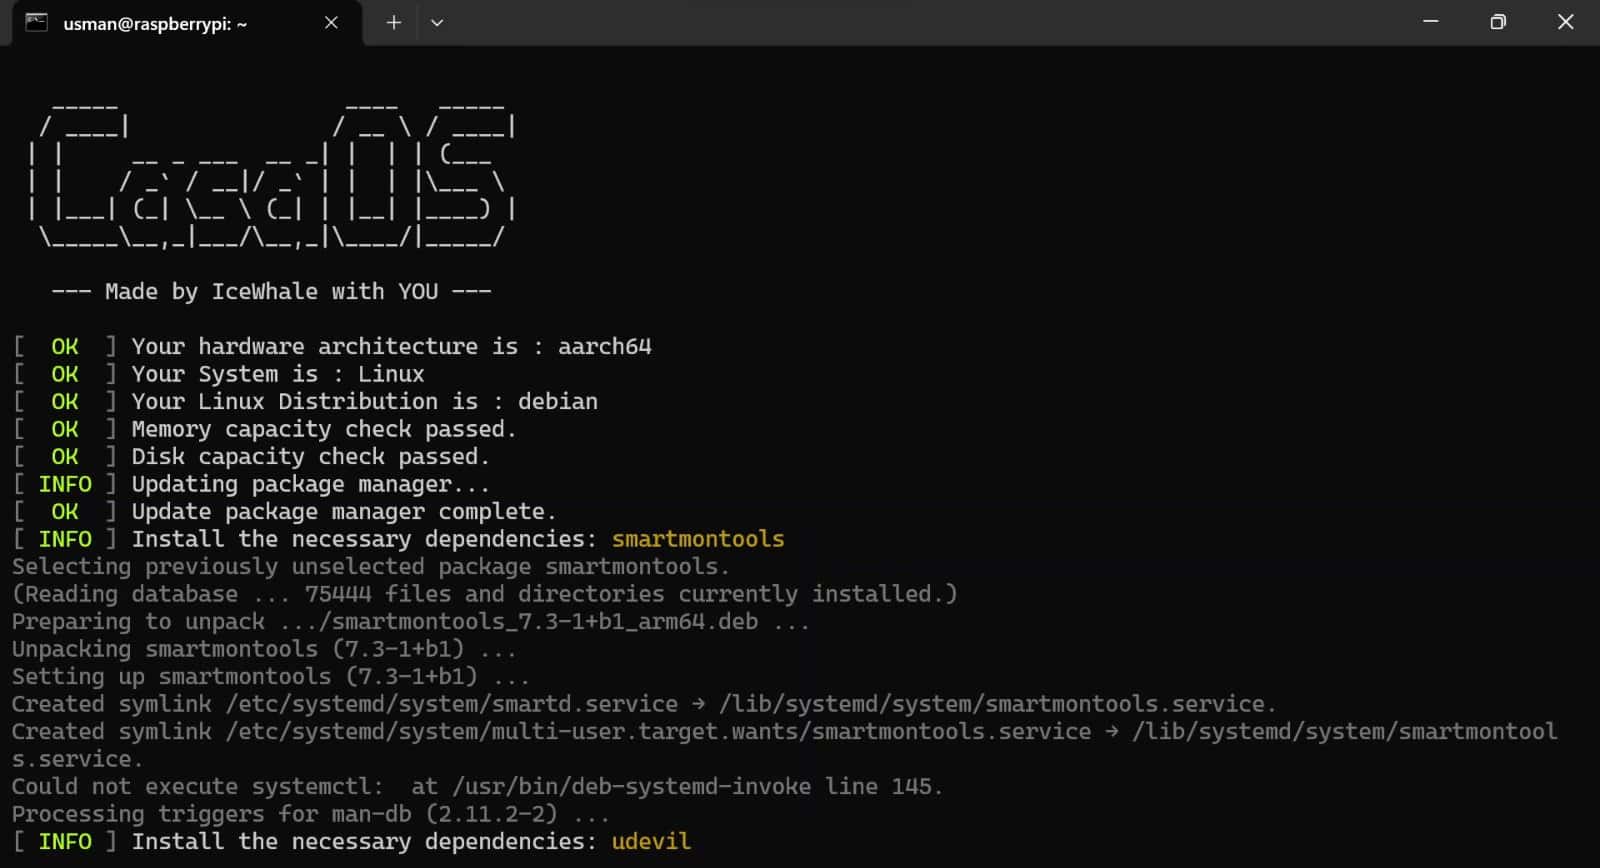
- The setup will take time based on your system and network connectivity speed.
- Once completed, it will show display as shown in the screenshot below:
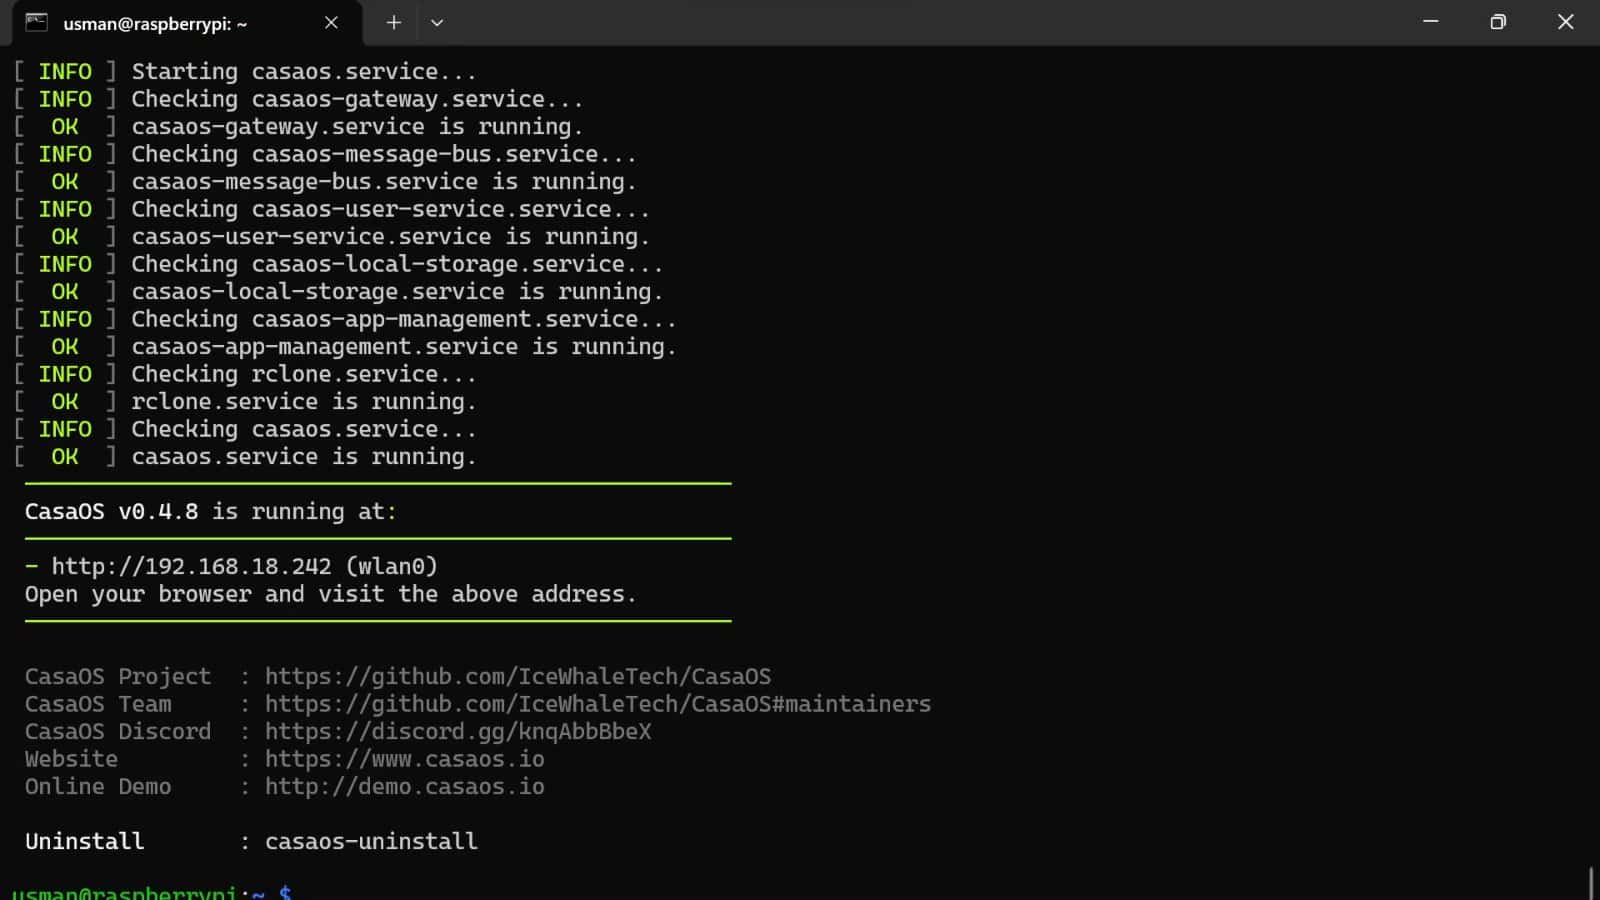
- Notice the HTTP address given by the installation script. This address will be used to access the CasaOS dashboard in the following steps.
Following the above steps, you have successfully installed CasaOS on your Raspberry Pi. Read on as I guide you on accessing the CasaOS Dashboard for initial setup.
It's a free PDF guide containing every Raspberry Pi Linux command you should know!
Download now
If you’re new to the Linux command line, this article will give you the most important Linux commands to know, plus a free downloadable cheat sheet to keep handy.
It's a free PDF guide containing every Raspberry Pi Linux command you should know!
Download now
Exploring CasaOS
The CasaOS dashboard can be accessed from any computer connected to the same network as your Raspberry Pi.
Initial Setup
- Open the web browser on your computer and enter the HTTP address of your CasaOS (as given during the execution of your CasaOS installation script).
- Alternatively, if you forgot to note down the address, you can access the CasaOS Dashboard using the following address:
http://<raspberrypi-hostname> - For example, in my case since my hostname is “raspberrypi” therefore I can enter the following address in my web browser:
http://raspberrypi - Upon initial launch, you will be greeted by the welcome/initial setup menu as shown below:
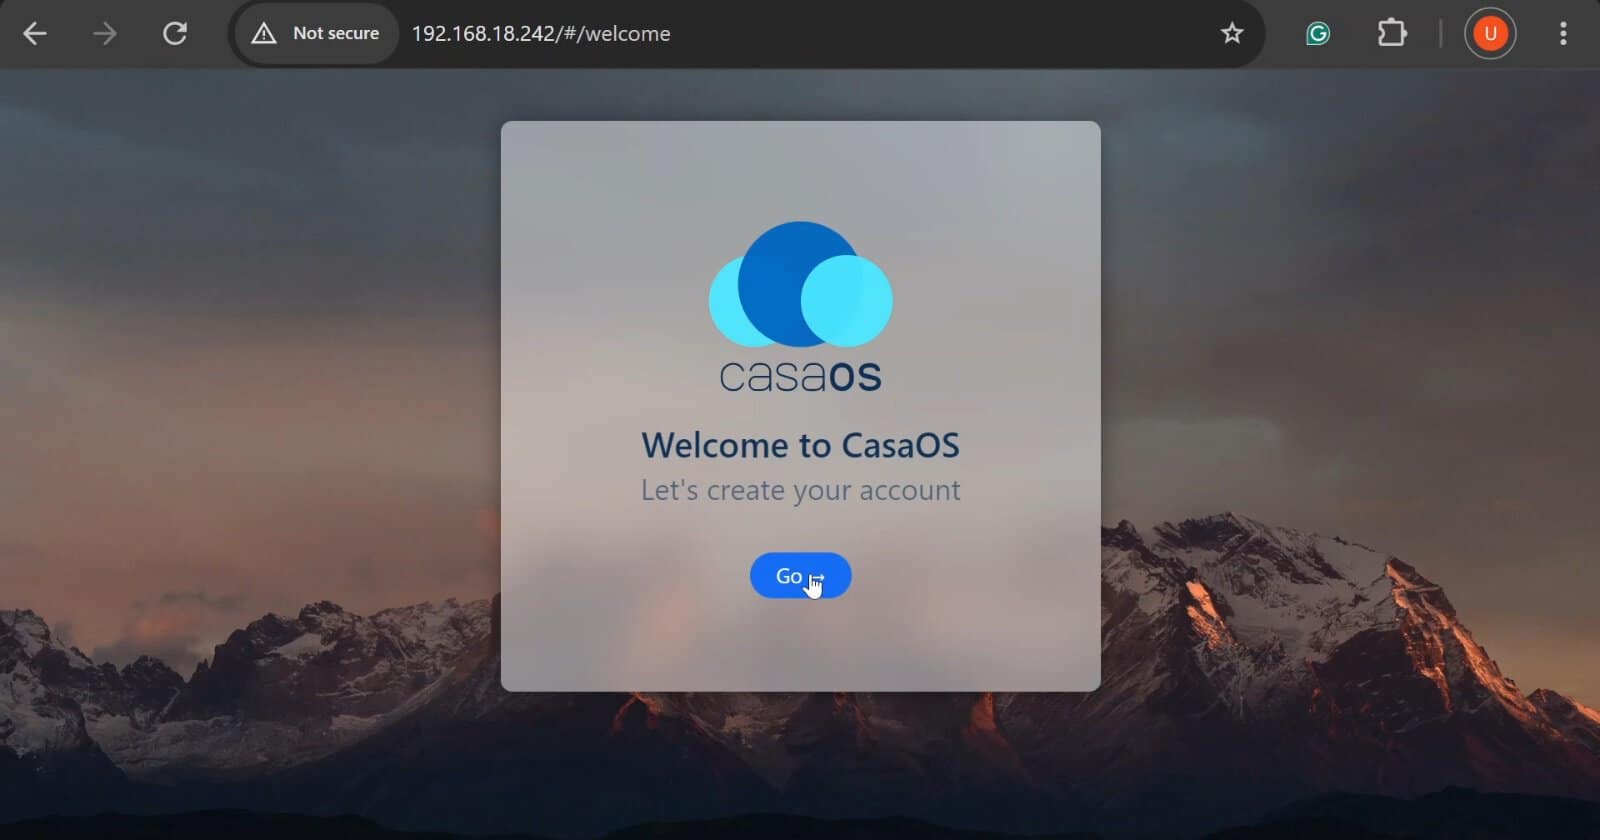
- Click on ‘Go’ and create your user for CasaOS.
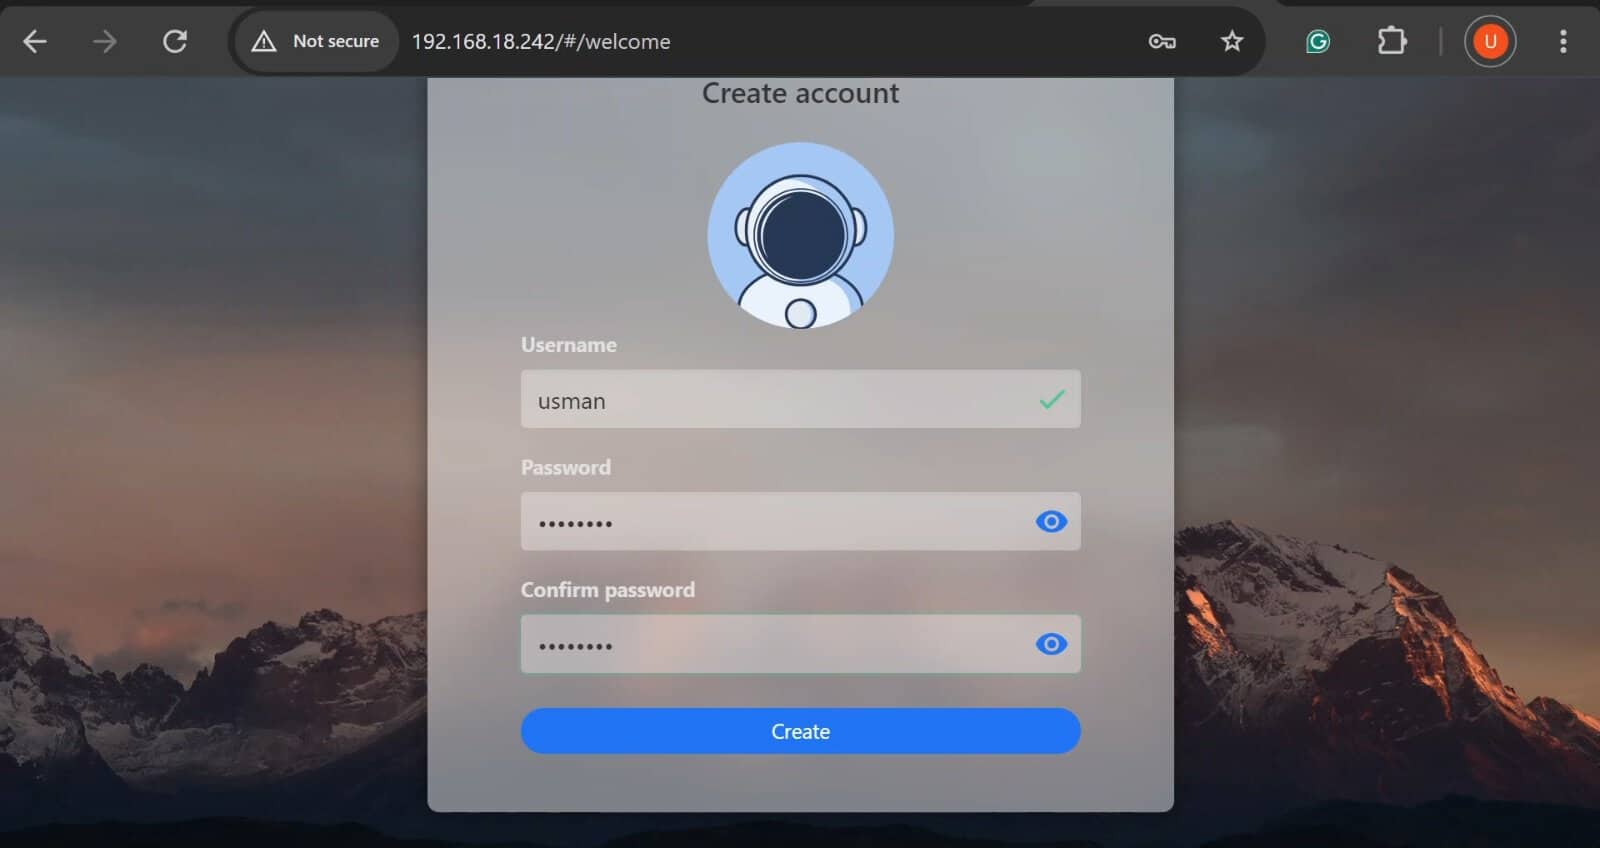
- Enter your username and password which will be used to access your CasaOS dashboard in the future.
- You will be redirected to your CasaOS Dashboard:
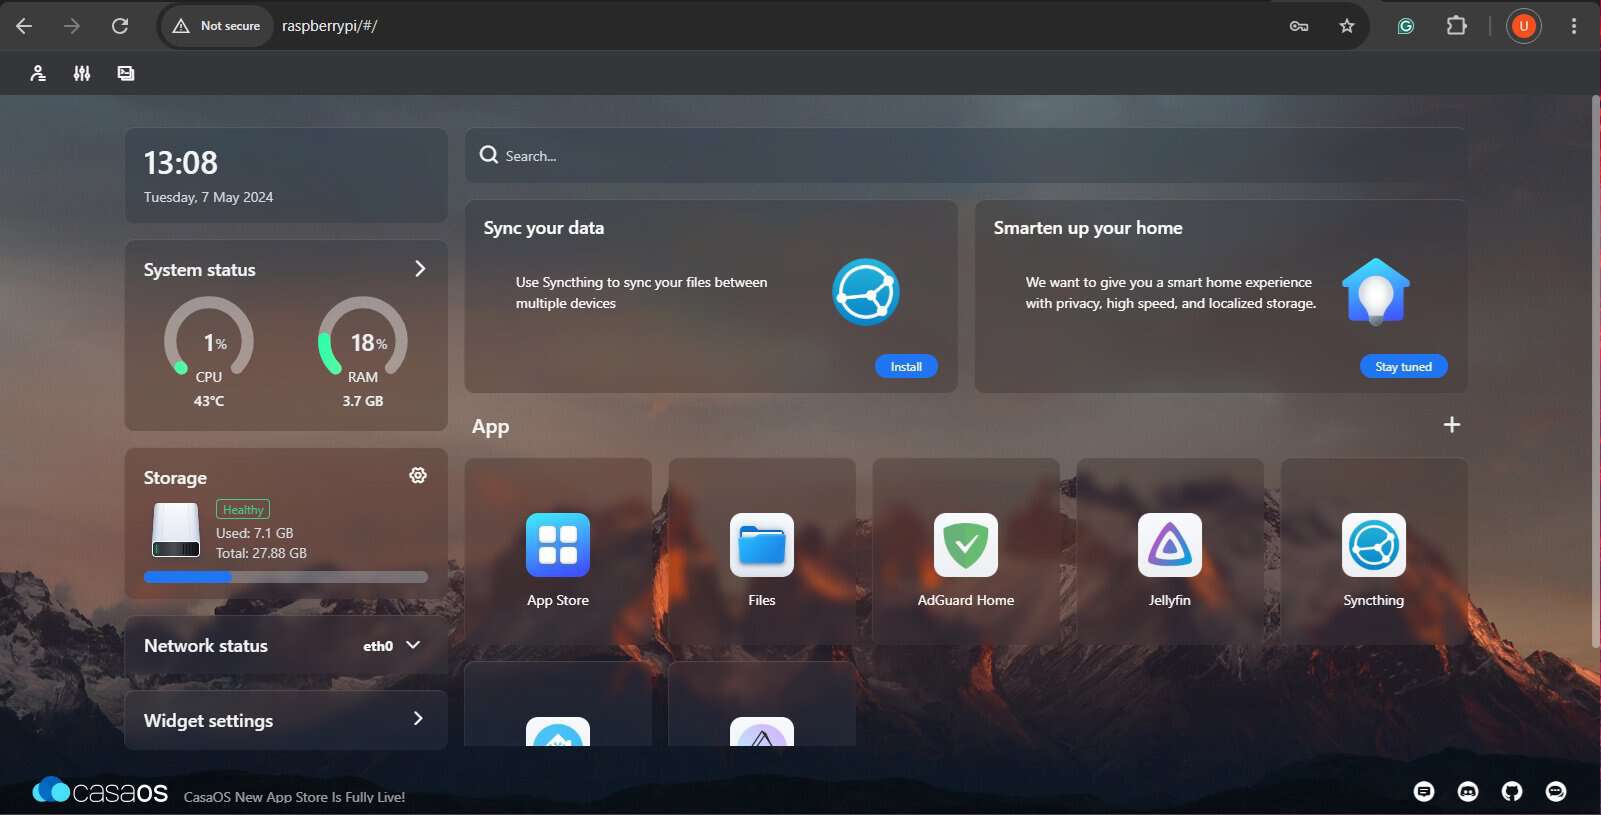
That is it, you have gone through the initial setup and accessed your CasaOS dashboard on your PC.
The CasaOS Dashboard
Before listing the different applications available in the CasaOS App Store, let’s tour the Dashboard. A breakdown of the components of the CasaOS Dashboard is shown below: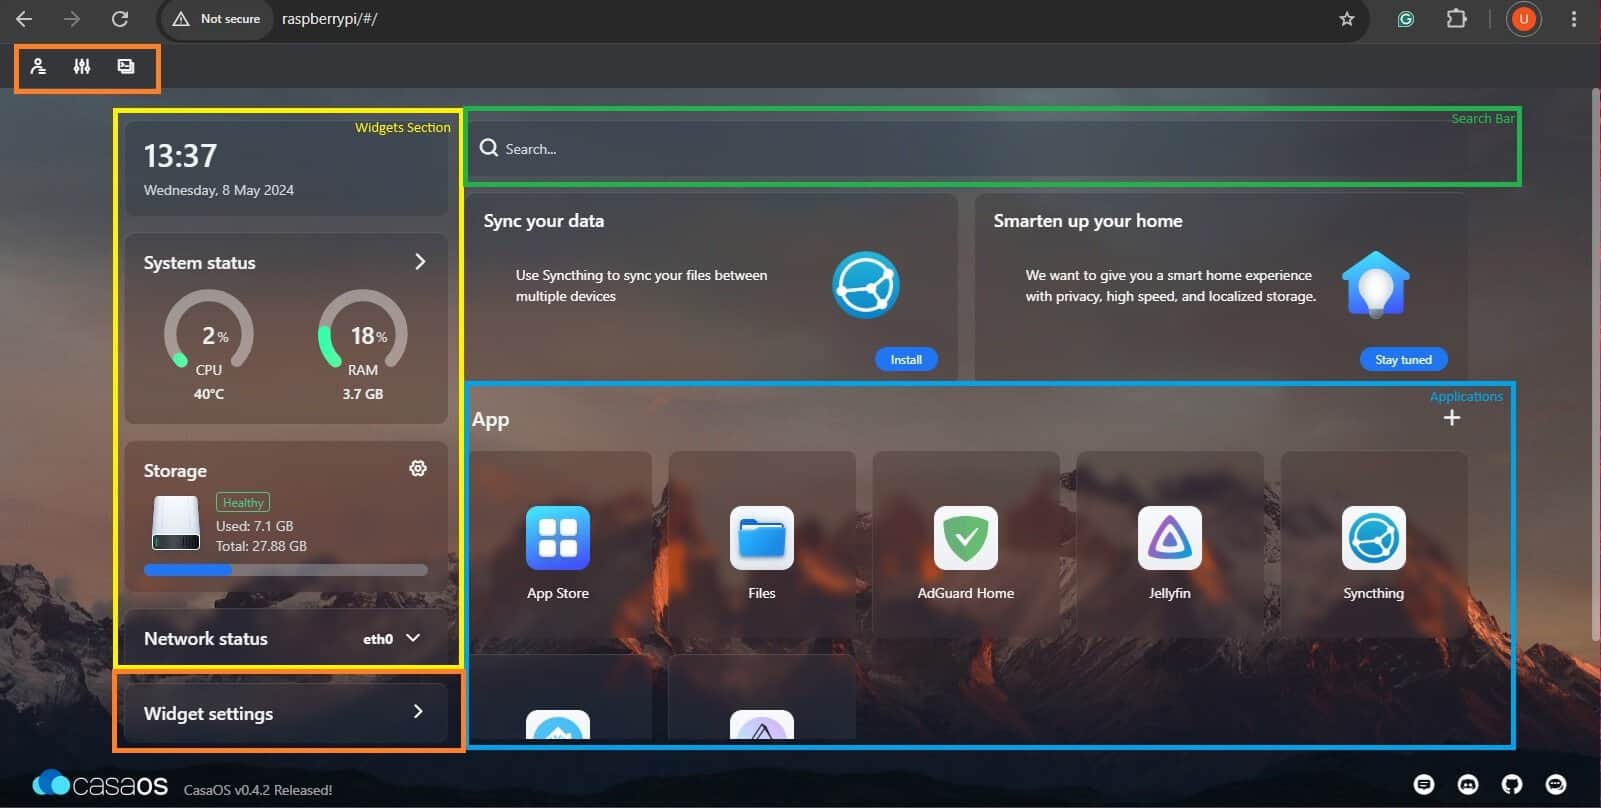
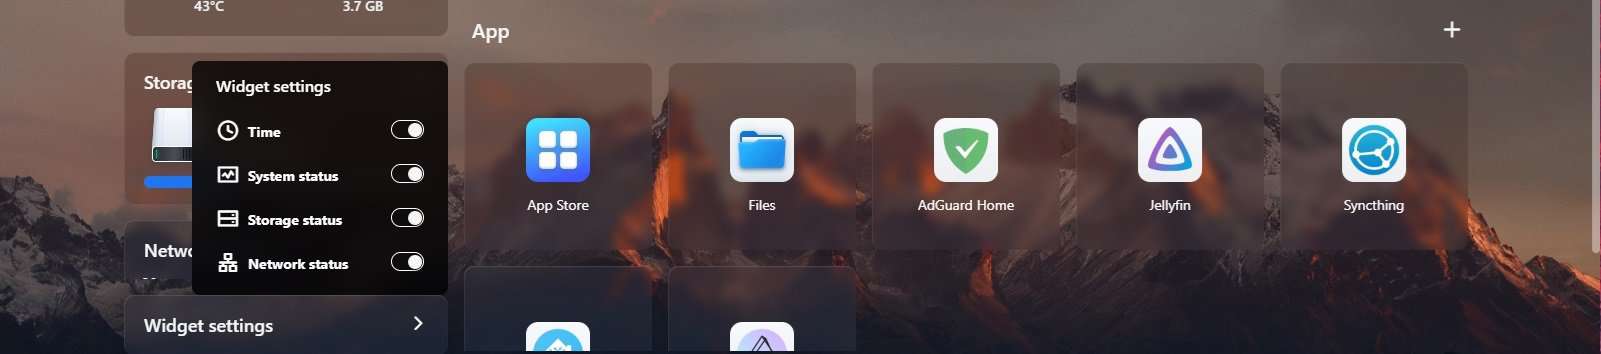
- Widgets Menu (Yellow): Widgets are shown on the left side of the dashboard. Widgets show the current health of your Raspberry Pi.
- Search Bar (Green): The search bar is shown at the top of the dashboard. The search bar can be used to search online via any search engine (default is DuckDuckGo).
- Applications (Blue): All applications available on your CasaOS are shown below the search bar. All newly installed applications automatically appear over here.
- Configuration Menus (Orange): The CasaOS interface can be configured using the configuration options available in the Widget settings and interface settings on the top left.

The App Store
CasaOS by default only comes with two applications, the App Store and Files. Presently 80 applications are available in the App Store which can be directly downloaded.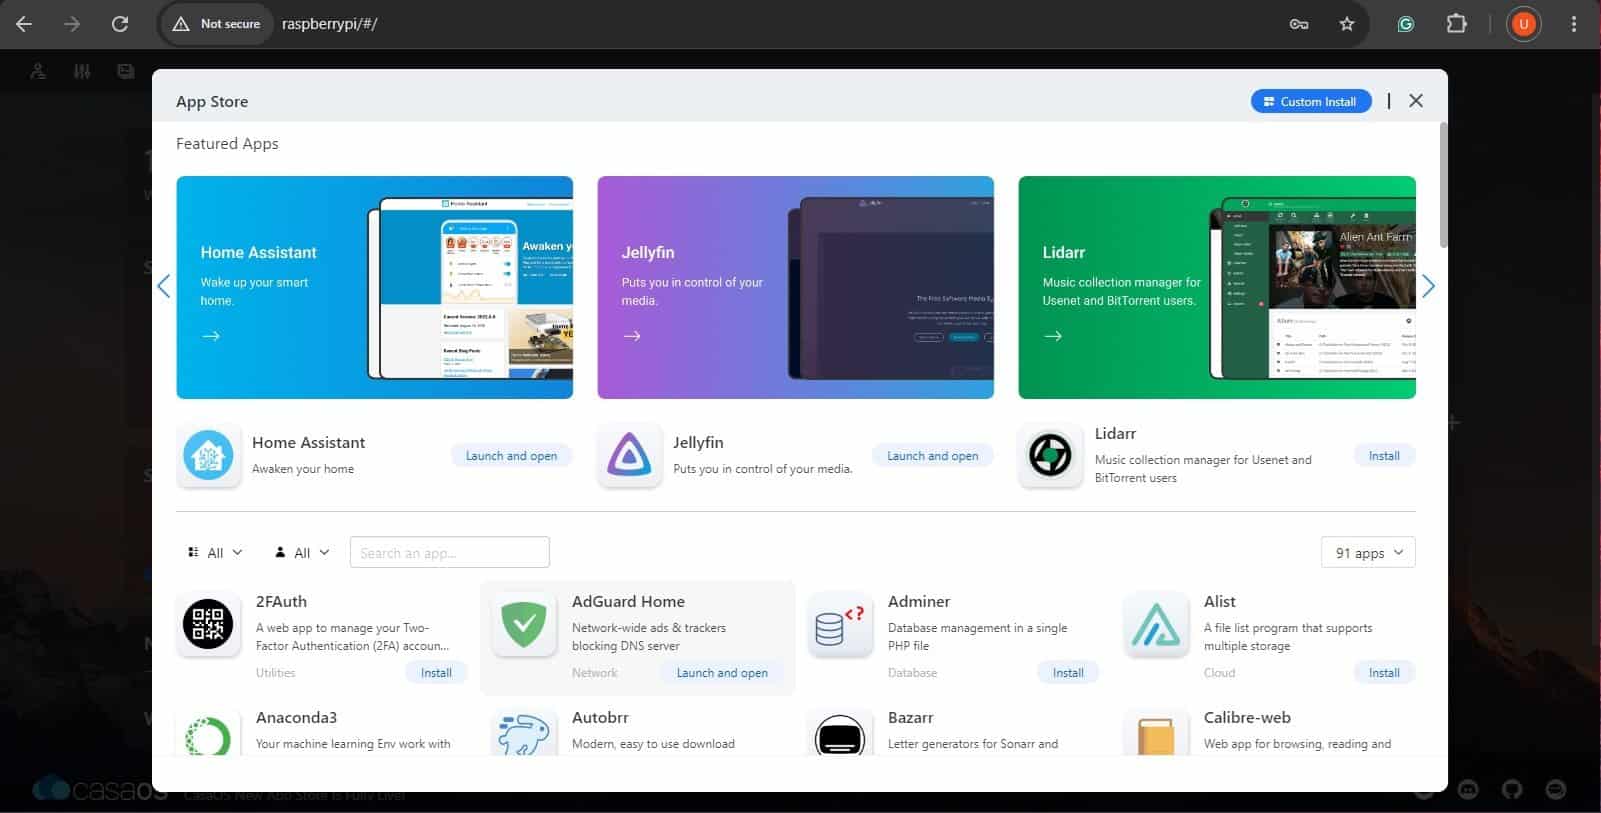
Additionally, CasaOS provides the option to manually deploy Docker Containers. To do so, click the “Custom Install” button on the top right of your App Store.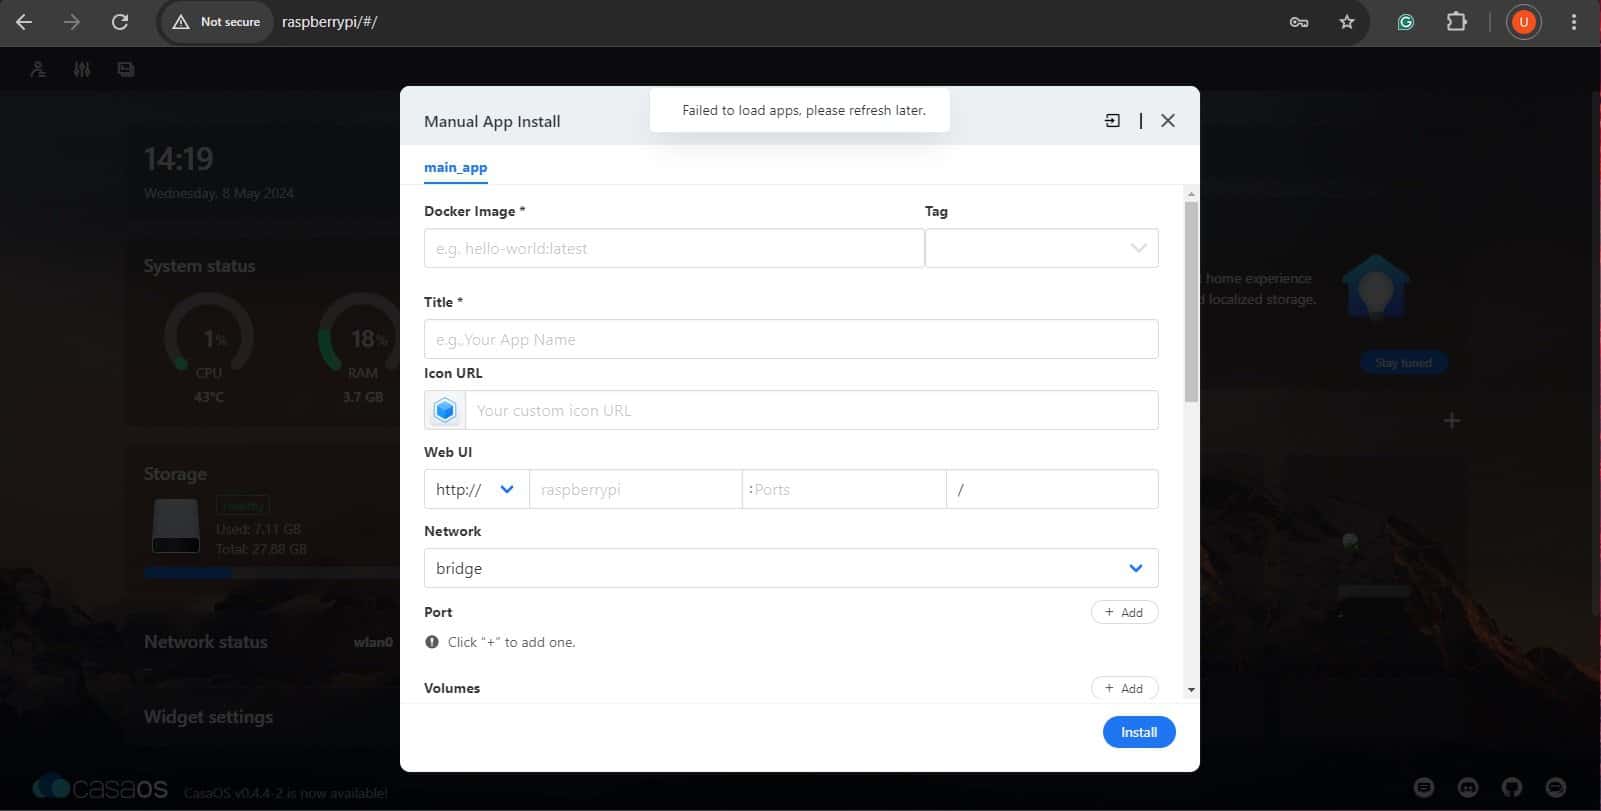
You can fill in the manual installation dialog with information regarding your Docker Container and click “Install” for manual installation.
What Applications are Available
Having understood the Dashboard interface and the App Store of CasaOS, let’s dive into a few applications available on CasaOS.
Files
Files come pre-installed on CasaOS. It is a file explorer which can be used to access the local storage of your Raspberry Pi.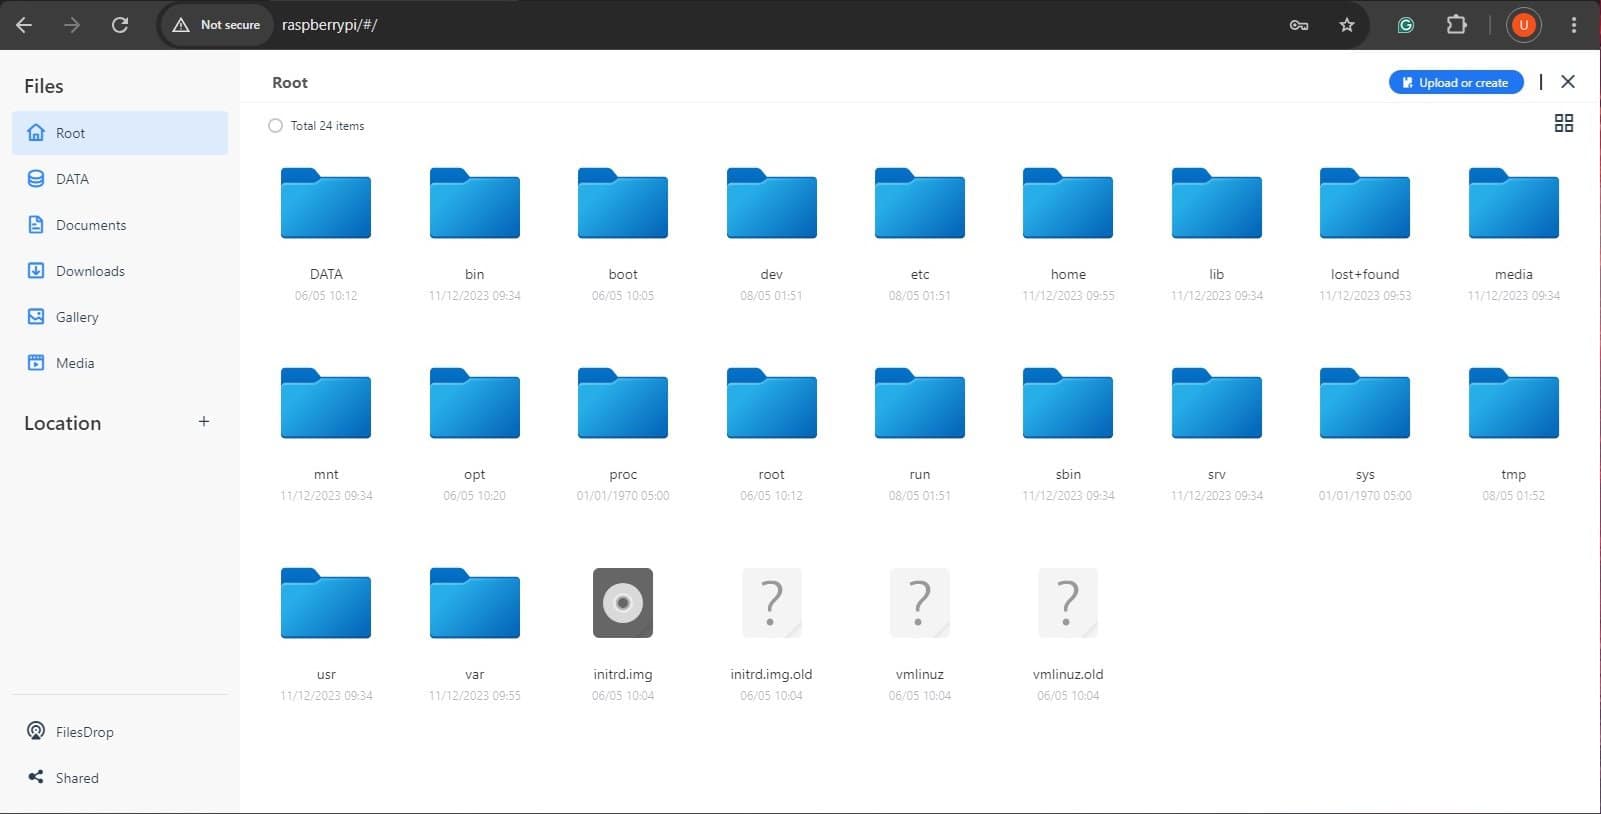
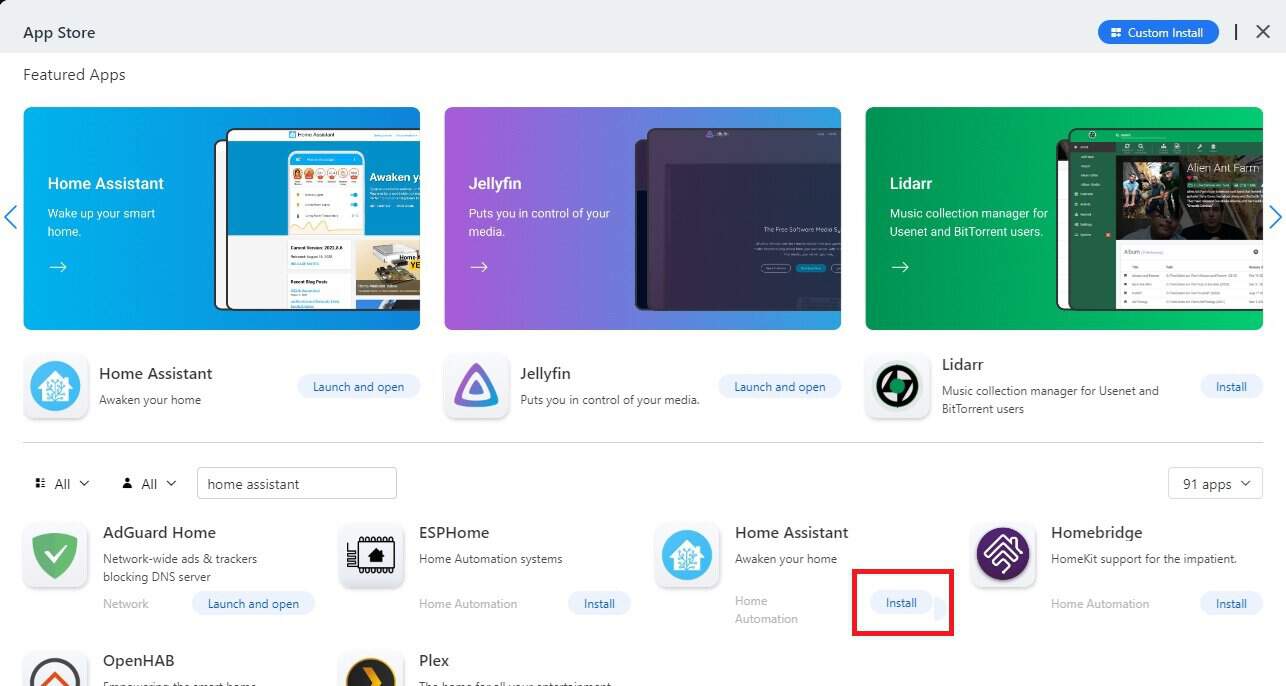
Home Assistant
Home Assistant is another popular app available on the CasaOS App Store. Home Assistant is an open-source home automation tool that can be integrated with available smart devices at your home.
- To install Home Assistant, open the App Store and search for Home Assistant.
- Click on the Install button to begin the installation.
- Once installed the application will appear on your CasaOS Dashboard.
- Click on Home Assistant to launch the application in a new tab.
- On the first launch, you shall be greeted with the Welcome Screen.
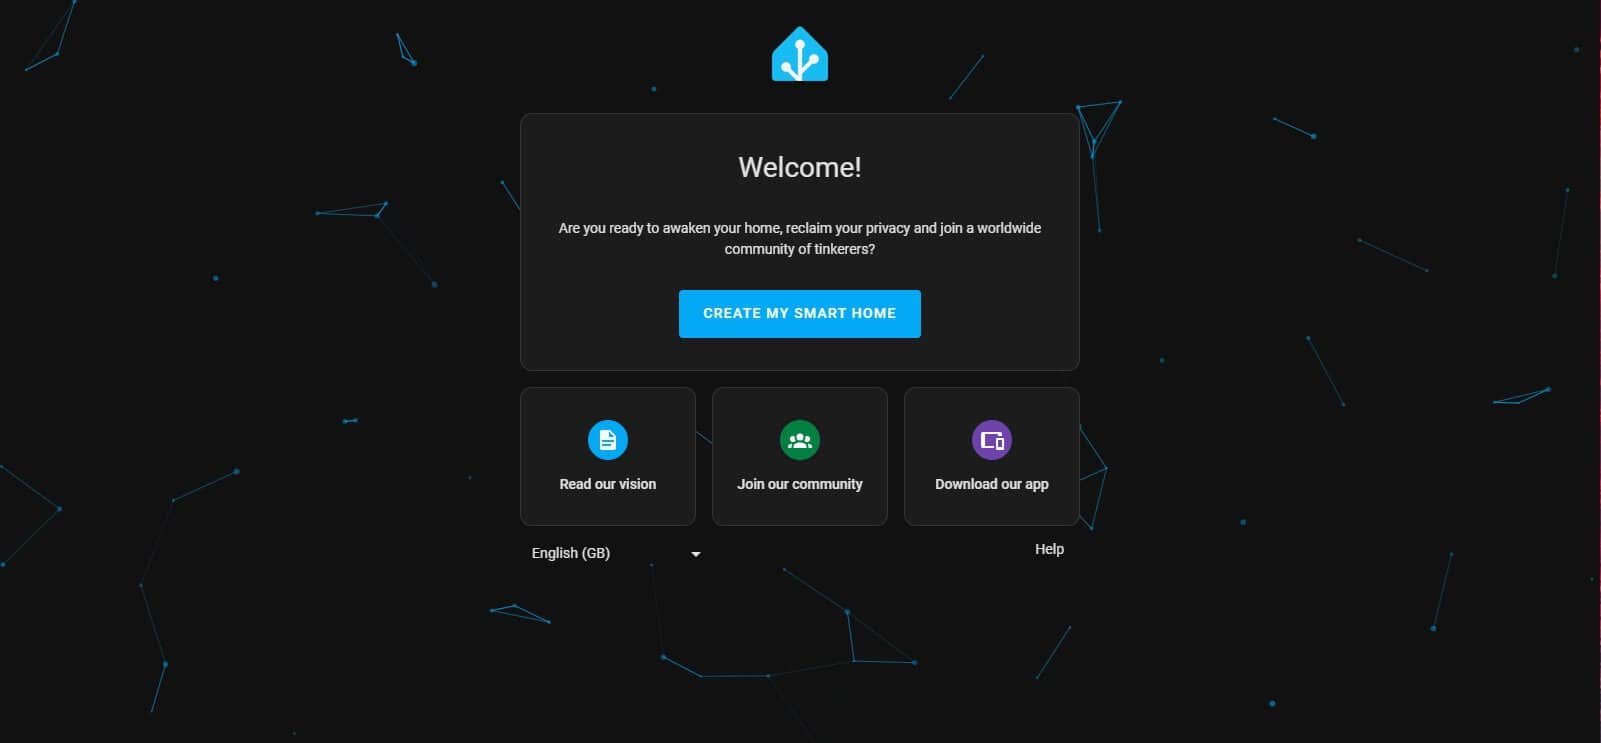
- Click on “Create My Smart Home” to create user.
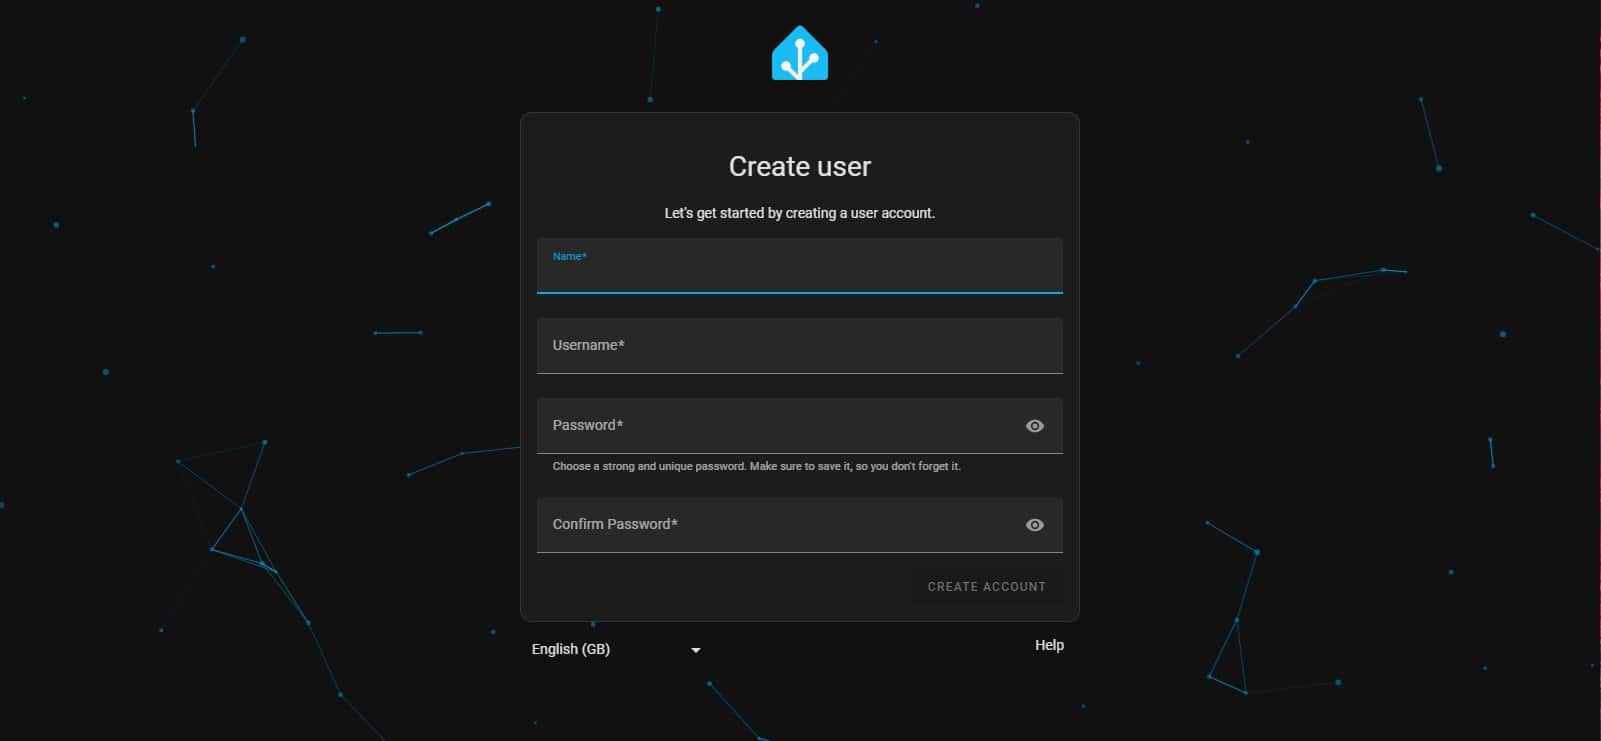
- Enter your desired credentials and click “Create Account”
- You will then be prompted to enter your location.
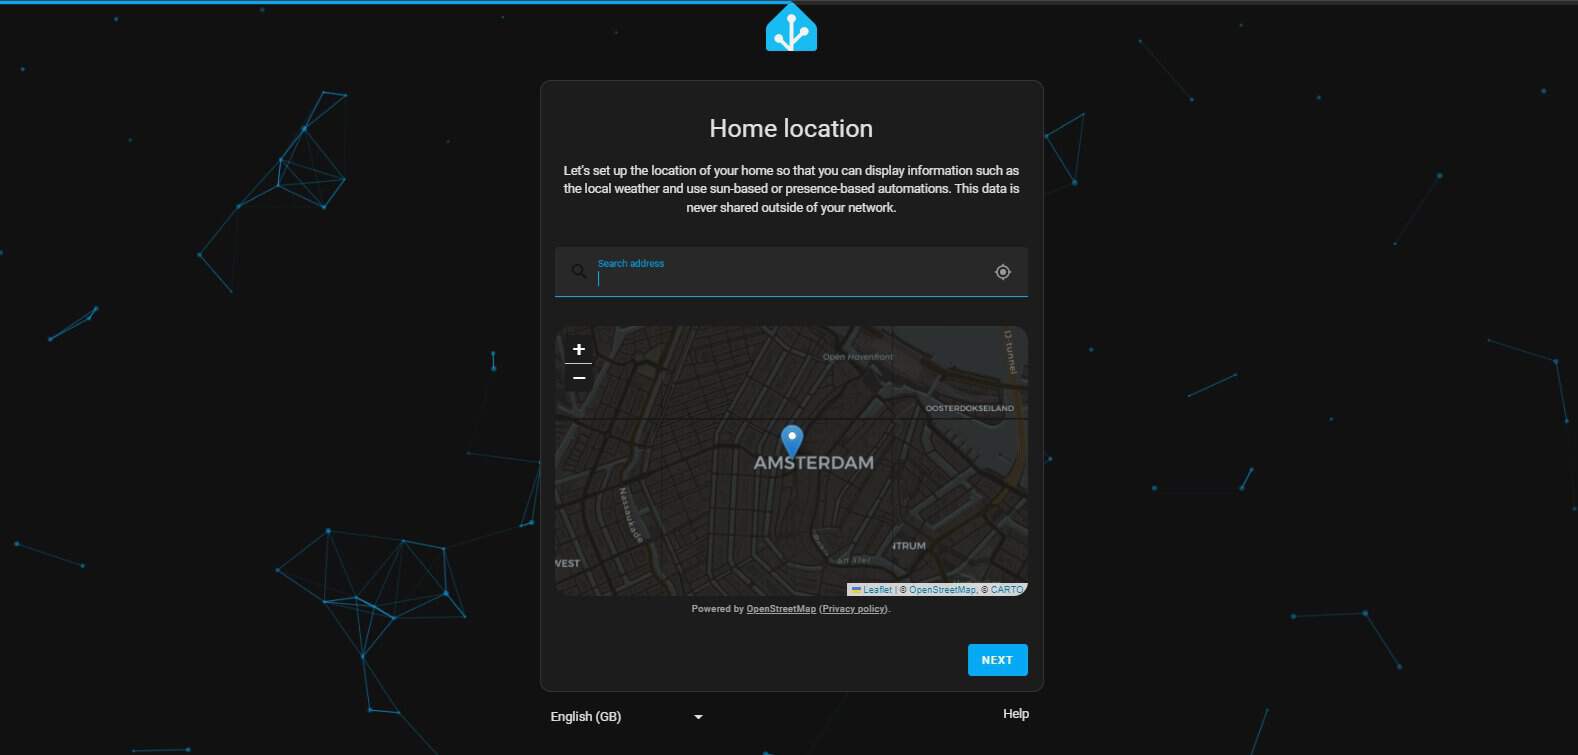
- Enter your location and click “Next”.
- Configure data-sharing settings in the follow-up prompt.
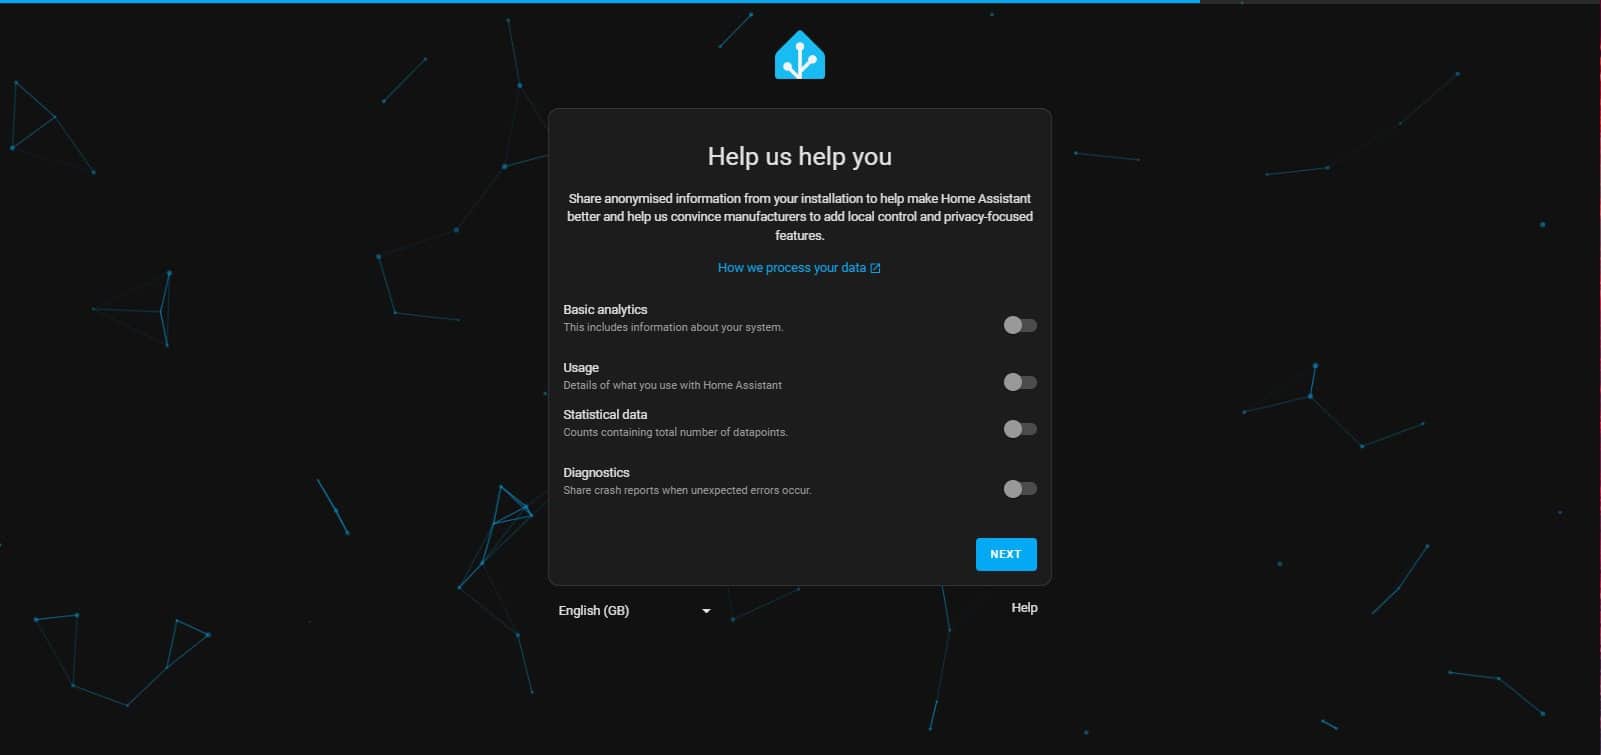
- Click “Next”
- The screen will now display a list of devices the Home Assistant App has discovered on your network.
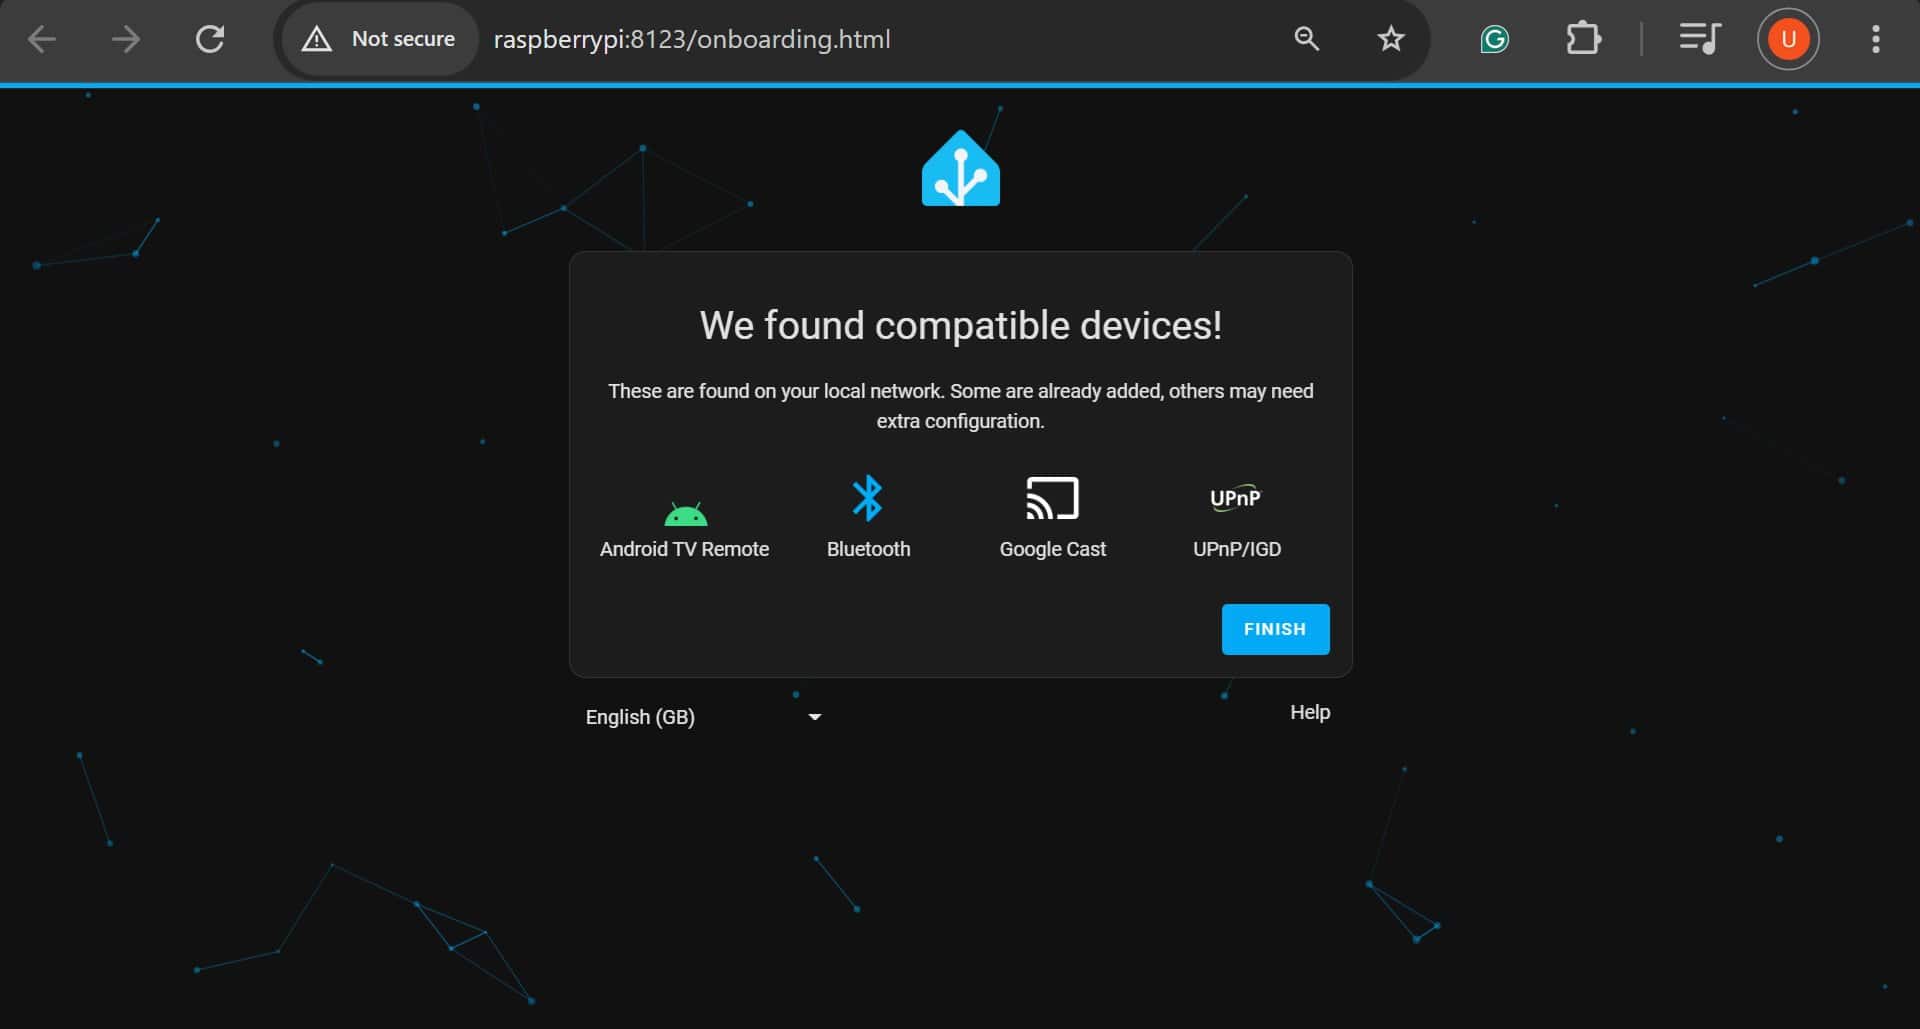
- A list of all available integrations can be found on the Home Assistant website.
- Click “Finish”.
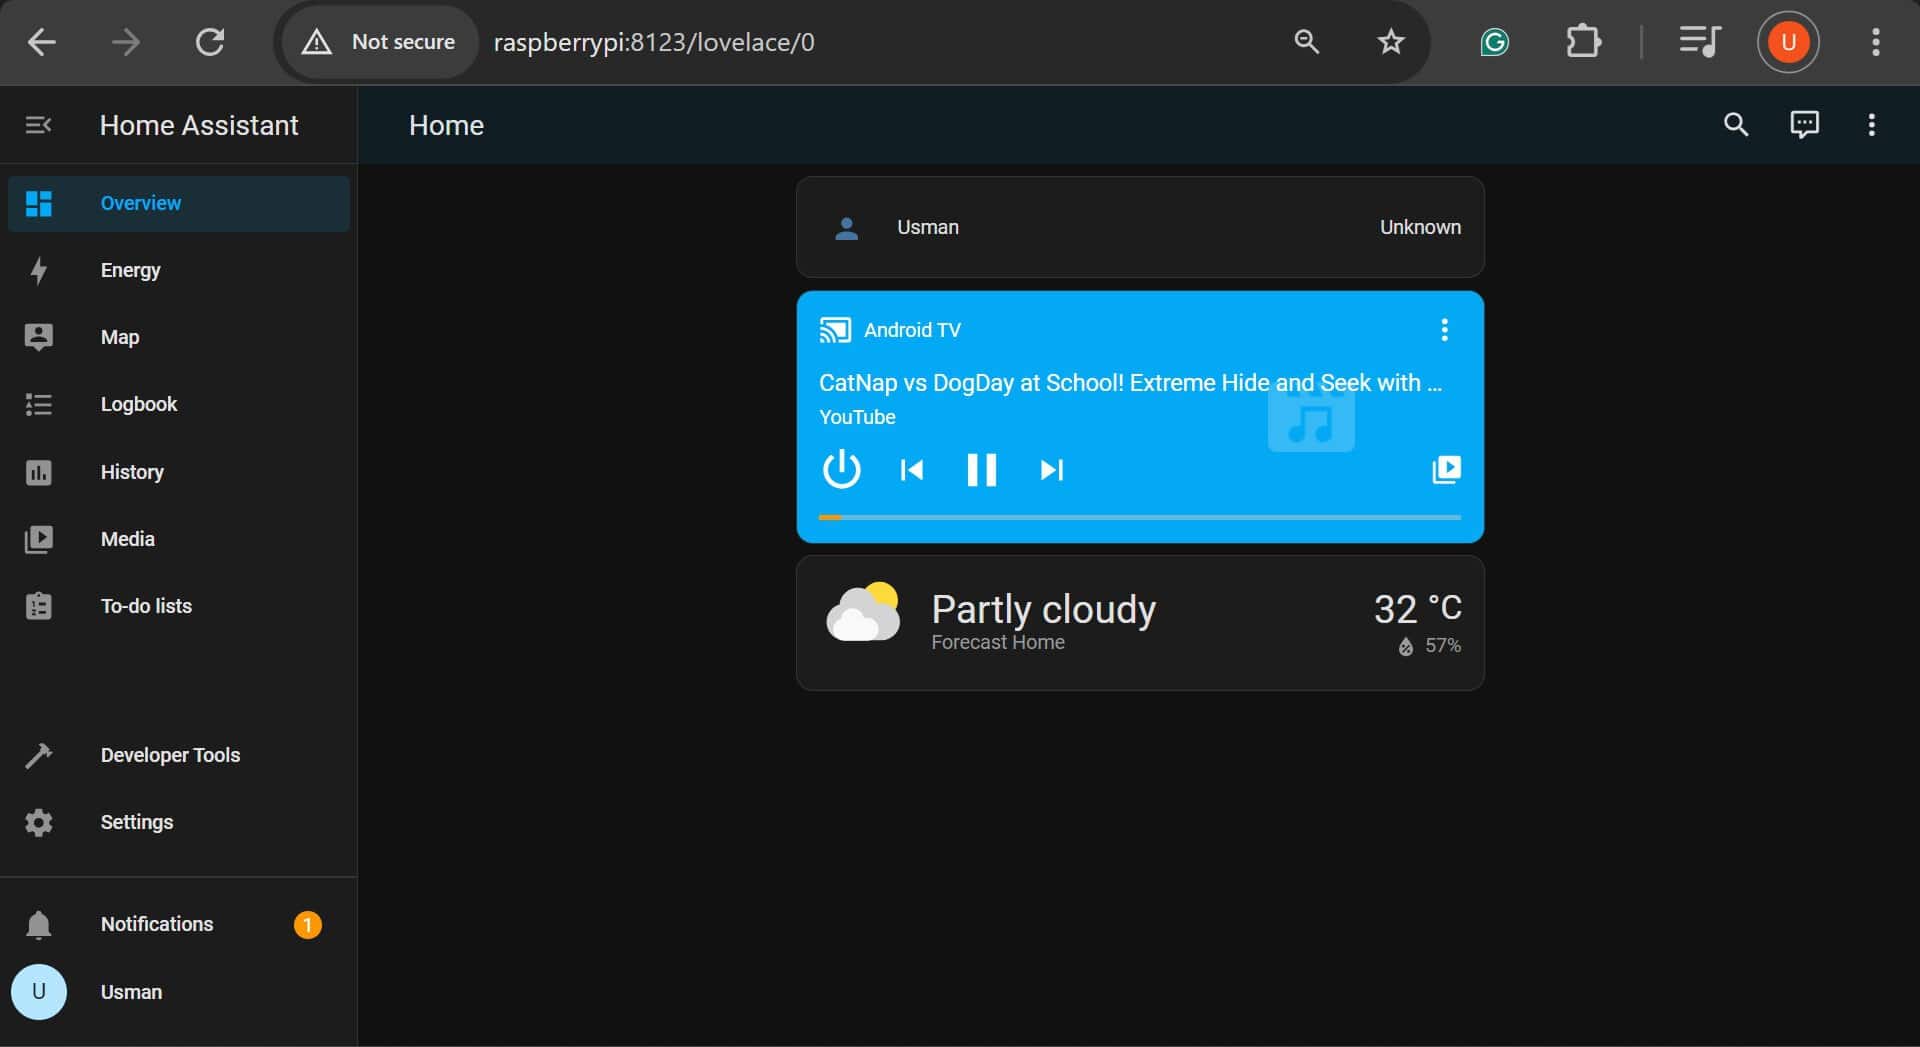
And that’s it, you have completed the initial setup of Home Assistant on your Raspberry Pi. To familiarize yourself with the Home Assistant interface and to add more integrations/ smart devices you can follow the getting started guide on their website.
It's a free PDF guide containing every Raspberry Pi Linux command you should know!
Download now
If you are looking for exclusive tutorials, I post a new course each month, available for premium members only. Join the community to get access to all of them right now!
Conclusion
Following this tutorial, you have successfully installed CasaOS on your Raspberry Pi and turned it into your cloud. The App Store of CasaOS, although limited in the number of available applications, comes with many useful applications to run on your cloud e.g. AdGuard Home, Jellyfin, and Plex.
Furthermore, owing to its open-source nature, you can easily find help online on different forums for anything you plan to do with CasaOS.
Whenever you’re ready, here are other ways I can help you:
The RaspberryTips Community: If you want to hang out with me and other Raspberry Pi fans, you can join the community. I share exclusive tutorials and behind-the-scenes content there. Premium members can also visit the website without ads.
Master your Raspberry Pi in 30 days: If you are looking for the best tips to become an expert on Raspberry Pi, this book is for you. Learn useful Linux skills and practice multiple projects with step-by-step guides.
The Raspberry Pi Bootcamp: Understand everything about the Raspberry Pi, stop searching for help all the time, and finally enjoy completing your projects.
Master Python on Raspberry Pi: Create, understand, and improve any Python script for your Raspberry Pi. Learn the essentials step-by-step without losing time understanding useless concepts.
You can also find all my recommendations for tools and hardware on this page.