OpenWrt on Raspberry Pi: Use your Pi as a router (Tutorial)
Recent Raspberry Pi models are more powerful than traditional routers, so using one in this role could be interesting. But it’s not perfect, as they are not supported by most router software (or only in command lines). Fortunately, OpenWrt might be the solution. It’s available on Raspberry Pi with a web interface to configure everything. Let’s learn how to use it.
OpenWrt has a custom release available on its website for all Raspberry Pi models. It can be flashed on an SD card like any other operating system. A few commands are required to configure the network on the first boot, but after that, everything can be done from the web interface.
Even if you are used to OpenWrt on a PC or traditional router, the installation process and initial configuration are quite different. So, let me guide you through the first steps until you get access to the web interface to do everything as usual.
If you’re looking to quickly progress on Raspberry Pi, you can check out my e-book here. It’s a 30-day challenge where you learn one new thing every day until you become a Raspberry Pi expert. The first third of the book teaches you the basics, but the following chapters include projects you can try on your own.
Prerequisites: Before installing OpenWrt
Before installing OpenWrt on your Raspberry Pi, there are a few prerequisites to keep in mind. Let me explain.
Update your bootloader
All Raspberry Pi models have a piece of code directly on the main board (not on the SD card) to handle the boot process. It has been frequently updated since the initial release (for example for USB and network boot support, bug fixes, etc.).
OpenWrt requires that your bootloader (the EEPROM package) is up-to-date.
This update is done automatically on Raspberry Pi OS, so if you’ve already used it (and have done the updates) on your Raspberry Pi, it’s probably already OK.
But, if you just bought the Raspberry Pi, they recommend installing Raspberry Pi OS first, updating the EEPROM, and only then installing OpenWrt.
Here is how to check if the bootloader is up-to-date on Raspberry Pi OS:
- In a terminal, run this command:
sudo rpi-eeprom-update - It will tell you which version you have and if an update is available.
- If needed, you can then install the update with:
sudo rpi-eeprom-update -a
sudo reboot
Once done (after a full restart), you can stop the Raspberry Pi, and follow the next steps to install OpenWrt on it.
Are you a bit lost in the Linux command line? Check this article first for the most important commands to remember and a free downloadable cheat sheet so you can have the commands at your fingertips.
Warning: avoid network conflicts
As with most routers, OpenWrt will be set up with the IP address 192.168.1.1 by default on the first boot. There is a high probability that your current router is already using this IP address, which can create conflicts on your network.
If you don’t want to break anything, it’s probably better to unplug the Ethernet cable on the first boot or to create a different physical network while following this tutorial.
You can for example use a small network switch (I use this one on Amazon), plug the Raspberry Pi and your PC into it, and manually set your computer to use any IP starting with 192.168.1.X.
Hardware requirements
If you aren’t creating a separate network (especially if your main network is on the same range), you’ll need a keyboard and monitor plugged into the Raspberry Pi.
In my case, my home network starts with 192.168.222.X, so it won’t create any conflict. But I won’t be able to connect to 192.168.1.1 from my computer. So, I will change the Raspberry Pi IP address manually, with a few command lines, a keyboard and monitor are required for this.
It's a free PDF guide containing every Raspberry Pi Linux command you should know!
Download now
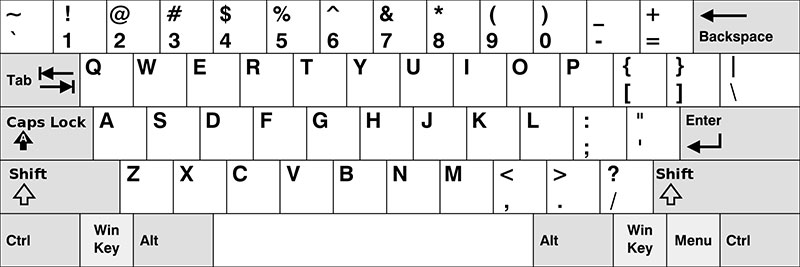
For your information, OpenWrt starts with a QWERTY configuration (US default) and doesn’t support any other layout. If, like me, you use something else, you might need this for the first boot:
Aside from that, you don’t need anything special. Here is what I’m using while testing this tutorial for you:
- A Raspberry Pi 4 (4 GB).
- A good SD card (you don’t need anything fancy, the image is tiny, and the archive is less than 100 MB!).
- My Raspberry Pi monitor (link to my review) with a micro-HDMI cable.
- My new favorite keyboard from Rii.
- An Ethernet cable.
That’s it, let’s see how to install OpenWrt on it now.
Install OpenWrt on Raspberry Pi
Here are the required steps to install OpenWrt on Raspberry Pi:
- Download the latest image from the official Wiki.
- Flash it on an SD card.
- Boot the Raspberry Pi.
- Configure the network interface.
- Access the web interface.
Let’s discuss how to do each of these in detail.
Download OpenWrt from the official website
The first step is to download the latest image available from the official Wiki.
Click on the link and find this table:
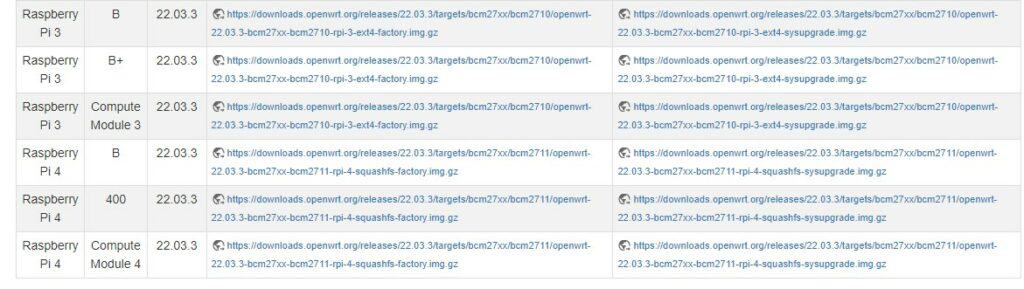
From there, find the line corresponding to your Raspberry Pi model, and click on the link in the first column. The last column is just the firmware upgrade, you need the installation image for now.

Join Our Community!
Connect, learn, and grow with other Raspberry Pi enthusiasts. Support RaspberryTips and enjoy an ad-free reading experience. Get exclusive monthly video tutorials and many other benefits.
Learn moreFlash the downloaded image
Once the image is downloaded, you can flash it on your SD card with any tool you like. I use Balena Etcher in general when I already have the image on my PC (it’s slightly faster than imager), but any other tool is fine.
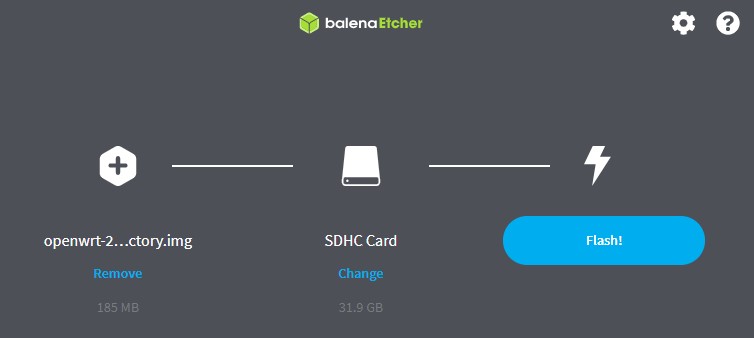
- Start Balena Etcher (or your favorite tool).
Etcher is free and can be downloaded here if you don’t have it yet. - Insert your SD card into your computer.
- Click on the first button to select the image on your computer.
- Select the SD card if needed (most of the time it’s selected automatically).
- Click on “Flash!” to start the installation.
As you can see, the image is tiny (185 MB in this example), so copying the files will only take a few seconds.
First boot
Once the SD card creation is complete, insert it into your Raspberry Pi and power it on.
You’ll see a bunch of debug messages (white text on a black screen). Once it stops scrolling, press “Enter” to get access to the command prompt:

If you get the same thing, everything is fine, and you can move to the next step.
If it doesn’t start, or you get an error, double-check the prerequisites (especially the EEPROM update) and feel free to visit the OpenWrt forum to ask for help.
Optional: set the Ethernet IP address
As explained previously, OpenWrt will set the Ethernet adapter to 192.168.1.1 by default. If it’s fine for you, you can probably skip this step and access the web interface directly.
But in most cases (and for me), it’s not good.
My network is using the range 192.168.222.1-254, and I want access to OpenWrt from my other devices.
Or maybe 192.168.1.1 is already taken on your network, so you need to change it to another IP.
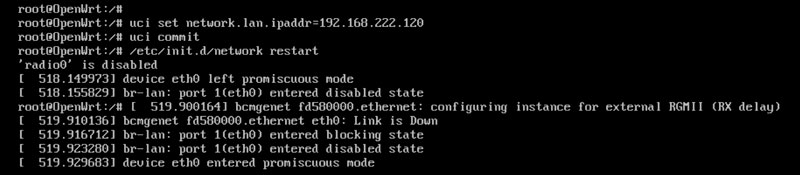
Either way, you can change the default IP address with these three commands:uci set network.lan.ipaddr=<YOUR-IP>
uci commit
/etc/init.d/network restart
Remember: the default keyboard layout is in Qwerty (US), so you might need to use the picture given previously to type these commands.
If you started with the network cable disconnected, to avoid any conflict, you can now plug it in and move on. In my case, I can now ping the Raspberry Pi, so I’m ready to configure it.
Access the web interface
All the configuration with OpenWrt can be done from a web interface. So, you won’t have to use commands anymore.
- Open a web browser on a PC connected to the same network as the Raspberry Pi, and type the Raspberry Pi IP address:
http://<YOUR-IP>It’s the IP you just set in the command line, or maybe it’s 192.168.1.1 if you didn’t change it. - The default username is root, and the password is empty.
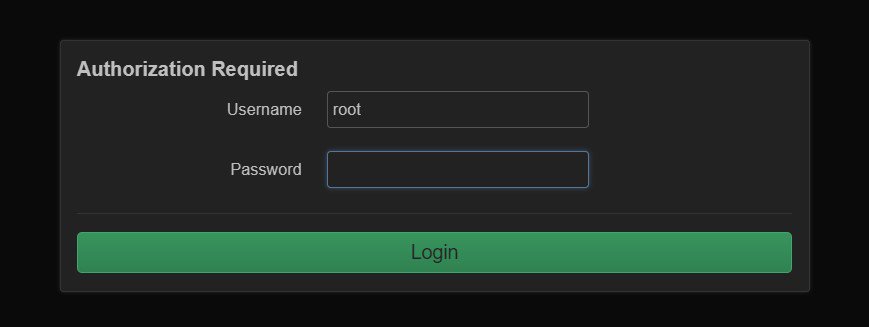
You’ll get connected to the full interface of OpenWrt, but before going any further, setting a root password is a good idea.
Set the root password
The first step once connected to the web interface will be to set a password for root.
It's a free PDF guide containing every Raspberry Pi Linux command you should know!
Download now
Find the password submenu under “System”, and you’ll get a form looking like:
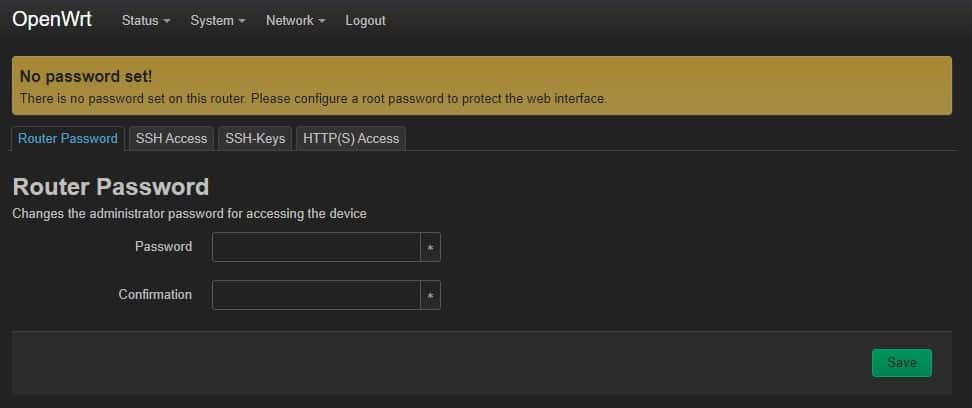
Fill it with a strong password, and click “Save” to apply the change.
It's a free PDF guide containing every Raspberry Pi Linux command you should know!
Download now
Tips to use OpenWrt on Raspberry Pi
We’re almost done, but let me give you a few tips to use OpenWrt on your Raspberry Pi.
My goal today is not to give a masterclass about OpenWrt, but at least explain the first steps to get started the right way.
Switch to SSH
As soon as you have set the IP address and the root password, the SSH service becomes available.
So, if in the future you need to run a few command lines on the Raspberry Pi, it will probably be more comfortable to use your SSH client instead of typing them directly on the Pi.
You can log in with root. On most operating systems, you can use this command from a terminal:ssh root@IP
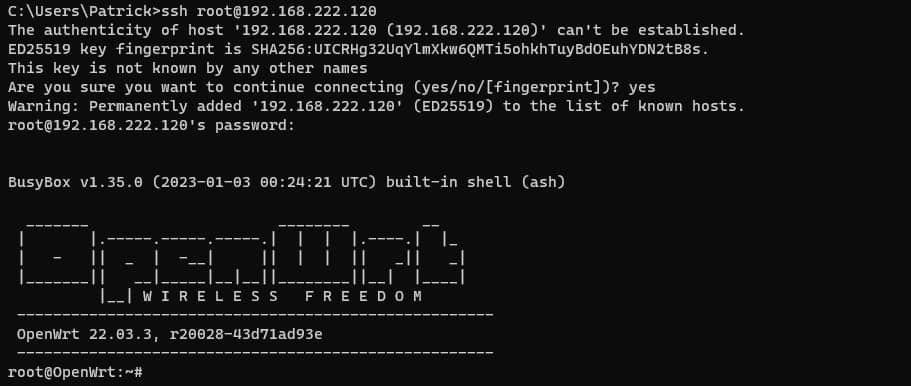
Type the password you just set, and you’ll be connected (with the correct keyboard layout as you’re using your PC!).
If you need more guidance on how to use SSH with a Raspberry Pi, click on the link to read my full guide about it. It’s mostly for Raspberry Pi OS, but the principles are the same with any distribution (and I share my favorite SSH client in it).
Configure the DNS server
I got many issues with the web interface at first, but I quickly identified the reason.
I was getting these errors:
- “Failed to download the package list from X”
- “opkg_download: Check your network settings and connectivity.”
- “Failed to send request: Operation not permitted”
That’s because we haven’t set the DNS server. So, almost everything that requires Internet access won’t work before doing this:
- In the web interface, go to “Network” > “Interfaces”.
- Click on “Edit” in front of the LAN interface.
- Click on “Advanced settings” and find the field “Use custom DNS servers”:
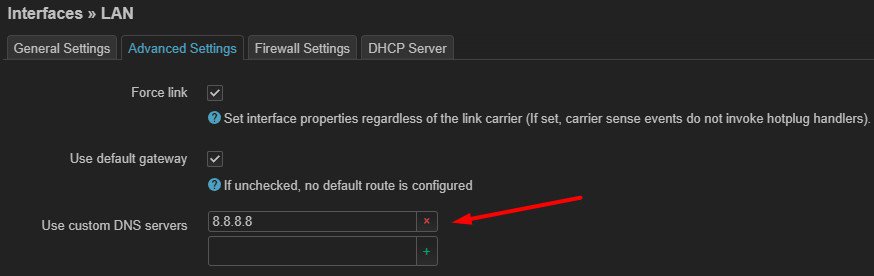
Fill it in with the address of your DNS server. You can use one on the local network if you have one, or simply a public DNS server (I’m testing with 8.8.8.8, the main DNS server from Google, for example).
Click on “Save and apply”, and it should fix all your problems.
Install add-ons
If the Internet connection is available and the DNS server is configured properly, you can now use the “Software” feature in the web interface to install new packages.
The page is pretty empty by default, click on “Update lists…” to sync with the repository.
You should get something like:
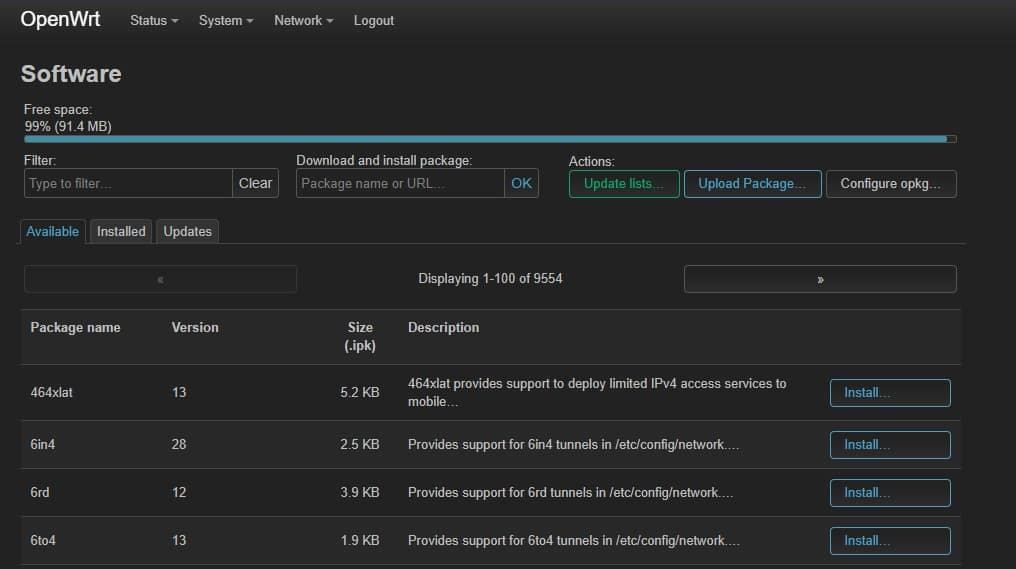
As on Raspberry Pi OS and most Linux distributions, you can easily install new packages on OpenWrt from this page (we’ll use it later).
You’ll find drivers for specific devices, as well as traditional packages (that you can use in command lines) or features for the web interface. There is a search engine you can use to quickly find something here.
Enable the wireless interface
On my Raspberry Pi 4, there is a wireless interface, and it was detected automatically. So, you can quickly configure it and use it once you get access to the web interface.
I lost a bunch of time testing this because I was trying to configure it from the “Network” > “Interfaces” menu, but in fact, it was already there under “Network” > “Wireless”.
If you use a Raspberry Pi 4, you should have something like:

Click on “Scan” to see a list of the wireless network detected.
Click on the one you want to be connected to and fill out the form with your password:
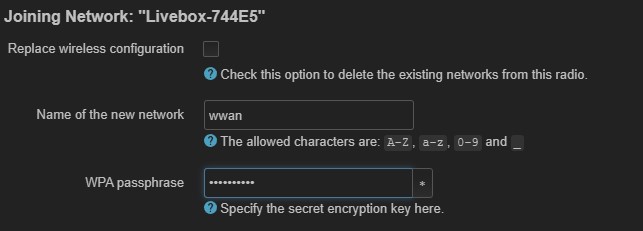
Follow the steps in the wizard to save the configuration and get connected to your Wi-Fi.
If everything goes well, you should now see both network configurations on the home page:
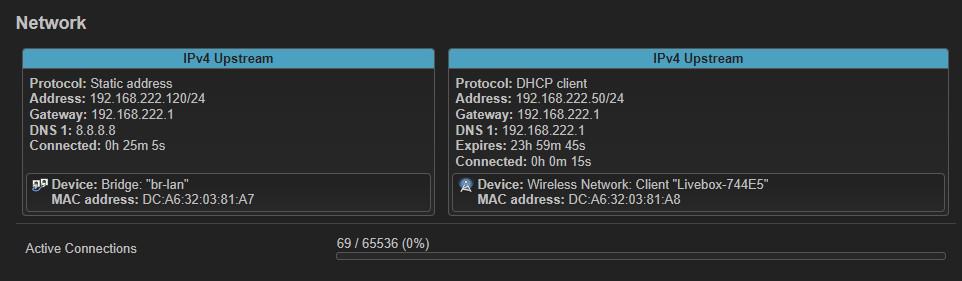
It’s a pretty bad example, as I should use two different network ranges if my goal was really to build a router. But I’m just showing you how to configure the basics. After that, you’re free to change anything to fit your needs.
For example, once connected to your Wi-Fi, you can now configure the Ethernet to use a different network range, to isolate your Ethernet network from the other computers.
How to use a USB adapter
Raspberry Pis only have an Ethernet adapter, which is not great to build a router. On some models, you have the wireless interface, but not all of them. Good news: if your case uses a USB to Ethernet adapter with OpenWrt, it’s supported!
I have one model (from a random brand from Amazon), and when I plugged it in, it was detected directly.
On the monitor, I got these messages:

Even if OpenWrt is detecting that you plugged something, it won’t necessarily have the driver installed by default (and it’s not plug & play, you’ll need to install it).
There are two things to note in the previous screenshot:
- The manufacturer is Realtek. We don’t care about the brand noted on the adapter, the important element is the network adapter manufacturer, which is generally Realtek or Intel.
- The exact model is 8153 (RTL8153).
With this info, you can go into the software installer and search for the corresponding driver. If you have a different adapter, make sure to search for your exact model.
The search engine is not perfect, though. In my case, there was no result, whatever I tried. I found online that you can use the RTL8152 driver for the 8153 model. So, I installed it, and it was then detected properly in the web interface.

But you might need to do a little bit of research to find the correct driver that is missing.
Once done, you can go to “Network” > “Devices” and you should see your USB adapter here:
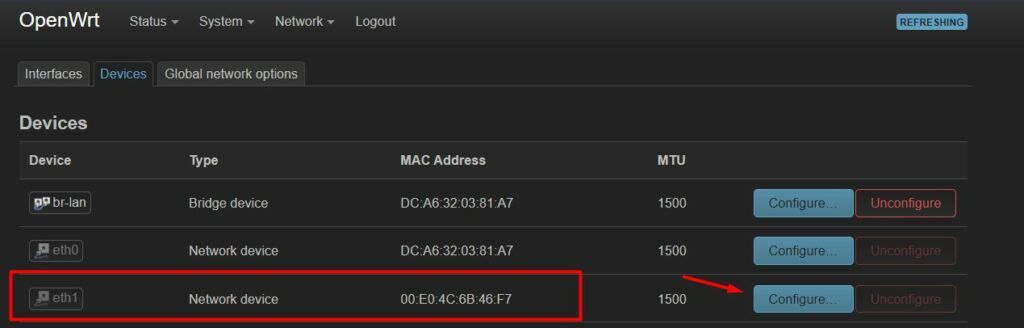
Click on “Configure” to create a new interface using this network device.
It's a free PDF guide containing every Raspberry Pi Linux command you should know!
Download now
Want to chat with other Raspberry Pi enthusiasts? Join the community, share your current projects and ask for help directly in the forums.
Going further with OpenWRT
From there, using OpenWrt on your Raspberry Pi wouldn’t be different from using it on any other device. You have access to the web interface and your hardware is properly detected (even if you use USB adapters), so you can move on and create the configuration you need.
As I told you, my goal here was to help you to get started when using a Raspberry Pi instead of a more traditional device. If you need more guidance, you can follow the official documentation or any good tutorial online, even if it’s not written for Raspberry Pi.
And if you don’t like OpenWrt and want to try the old school method (with IPTables), you can follow this other tutorial I wrote years ago, explaining how to do everything manually :-). There is also a brief introduction in it about networking in general, that might be interesting even if you do the same project with OpenWrt.
An alternative to iptables, while staying in command lines, would be to test “ufw” which stands for “Uncomplicated FireWall”. I explain everything in this article.
Whenever you’re ready, here are other ways I can help you:
The RaspberryTips Community: If you want to hang out with me and other Raspberry Pi fans, you can join the community. I share exclusive tutorials and behind-the-scenes content there. Premium members can also visit the website without ads.
Master your Raspberry Pi in 30 days: If you are looking for the best tips to become an expert on Raspberry Pi, this book is for you. Learn useful Linux skills and practice multiple projects with step-by-step guides.
The Raspberry Pi Bootcamp: Understand everything about the Raspberry Pi, stop searching for help all the time, and finally enjoy completing your projects.
Master Python on Raspberry Pi: Create, understand, and improve any Python script for your Raspberry Pi. Learn the essentials step-by-step without losing time understanding useless concepts.
You can also find all my recommendations for tools and hardware on this page.