Android TV + Google Apps On Raspberry Pi: step-by-step guide
Using Android TV on your Raspberry Pi and connecting it to your TV is an excellent alternative to Kodi (with OSMC or LibreElec). The system is more intuitive, as you can install apps directly from the Play Store, and it works well out of the box. The installation has improved over the years, but it’s still not straightforward. So, let me guide you to get it running on your Pi.
Google doesn’t release an Android TV version for the Raspberry Pi, so a custom build is required to install it. Konsta is a developer that provides Android and Android TV images. It’s based on LineageOS and can be downloaded and run on Raspberry Pi.
If it’s your first try, this might be confusing. But don’t worry, I’ll start by explaining everything before showing you how to get Android TV on your Raspberry Pi in a few minutes.
If you’re looking to quickly progress on Raspberry Pi, you can check out my e-book here. It’s a 30-day challenge where you learn one new thing every day until you become a Raspberry Pi expert. The first third of the book teaches you the basics, but the following chapters include projects you can try on your own.
Android on Raspberry Pi
Let’s start with a bit of theory first, because I’ll use references that you probably don’t know if you haven’t previously tried Android on Raspberry Pi.
Can you install Android on Raspberry Pi?
Android is not like a traditional Linux distribution that you can download and install on any device you like. The source code is available, but then each manufacturer will create a custom build for their device (ex: Samsung will install it on their phones).
The Raspberry Pi Foundation doesn’t support or promote Android in any way (they have enough jobs with Raspberry Pi OS), so there is no “official” way to get Android for your Raspberry Pi by just downloading an image and flashing it as usual.
But don’t worry, solutions exist or I wouldn’t write this article.
Emteria, LineageOS and Konstakang
I think my first try at installing Android on a Raspberry Pi was with Emteria. It’s a company that is specialized in creating customized Android releases for many devices. They support most Raspberry Pi models, but also other devices with Intel and Rockchip processors (list here).
The issue is that they are a company, with paid options (which are very expensive), and even if they have a free plan for the community, it’s pretty limited. I didn’t try recently, but at the time, you had automatic and regular reboots, for example (to encourage you to get a license).
Then LineageOS created a free alternative. You can download Android builds for many devices on their website (list here). But unlike Emteria, they do not support Raspberry Pi, it’s basically only for smartphones.
Android (Google) ⇒ LineageOS ⇒ Konsta builds
That’s where Konsta, the developer I talked about in the introduction, picked it up. He created a custom build of LineageOS for the Raspberry Pi. He has been very active lately and managed to release new updates as soon as possible.
What’s the difference between Android and Android TV?
Just before moving on to practice, there is something I need to clarify.
I wrote about Android until now, but there is a difference between Android and Android TV. The goal of this tutorial is to install Android TV (with the Play store), on a Raspberry Pi. Installing Android is almost the same thing (I have another tutorial here), but the result is entirely different.
Android TV is a version of Android customized to be used on large screens and TVs. Basically, the interface will be easier to use, with larger icons that you can reach with a remote. To give you an idea, it’s a bit like the interface of Netflix or Prime Video (and not like the one you have on your phone).
Prerequisites to install Android TV on Raspberry Pi
Let’s take a look at what you need before you start installing Android TV.
It's a free PDF guide containing every Raspberry Pi Linux command you should know!
Download now
Recommend hardware to install Android TV on Raspberry Pi
In terms of hardware, a typical installation should be enough, but here is a list of what you need:
- A Raspberry Pi 4: You’ll only find a custom build of Android TV for the Raspberry Pi 4. The Raspberry Pi 3 is supported for Android, but not for Android TV. I would recommend at least 4 GB of RAM, but I guess even 2 GB should be fine.
You can check this article to get tips on how to find a Raspberry Pi at a decent price currently. - A fast SD card: The size doesn’t matter that much if you don’t plan to keep your own movies on it, but try to find a fast one. The link goes to my favorite, and you can find my SD card benchmarks here to compare them to other models.
It’s possible to use USB boot, but there are additional steps, and I don’t think it’s really useful. An SD card should be fine. - A USB drive: Any USB stick is fine, we’ll use it to store the Google apps, you need less than 1 GB, so even an old key is OK. I link to the one I use, but it doesn’t matter, it’s temporary, just for the installation part.
- Mouse, keyboard and monitor: as usual. Even if the goal is to make it work on a TV, it’ll help with the installation. I would recommend doing the installation in your office, and then plugging it into the TV once everything is set up.
I didn’t test, but I think you can use a remote. For example, the Flirc remote control receiver is built for this. Anyway, if you have a wireless keyboard (even a mini, like the one I often use), it should be fine.
Operating system: Download Android TV
Once your hardware is ready, the first step is to download an image of Android TV from the Konstakang website. Open this page, and find the links for each version. It looks like:
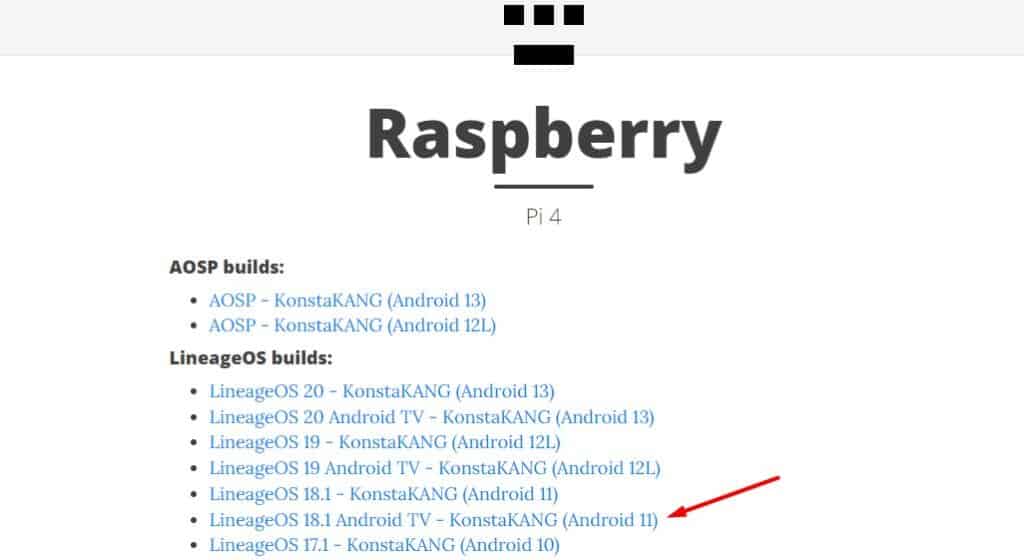
Warning:
- There are links for Android and Android TV images. We are trying to install Android TV here, so you can ignore all the other links.
- Several Android TV versions are available. They all work, but the issue is that Google Apps is not necessarily available for all of them.
For example, while doing my tests to write this tutorial, Google Apps for Android TV 12 and 13 didn’t work. Maybe I did something wrong, but if you want to play it safe, I recommend downloading an older version.
I will explain how to install Android TV 11 in this article (with the Play store). And I’ll try to update this article as soon as possible once a solution works properly for a more recent version.
Frankly, after testing all three versions, there are no significant differences between them, so save time and stay with a version where you can easily install Google Apps on it. Watching a Netflix movie on Android 11 or Android 13 is the same thing.
On the next page, scroll a bit and find the download links. Get the first one:
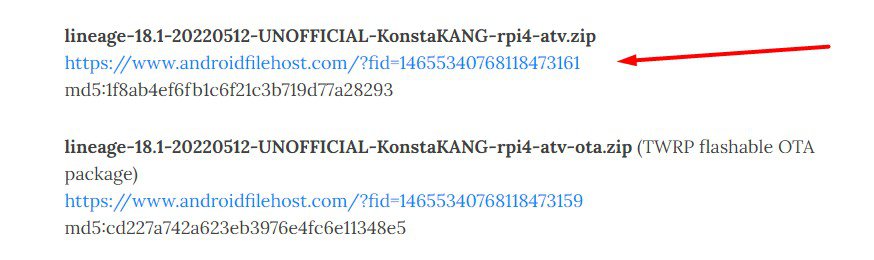
OTA means “Over The Air” update. I think it’s to update an existing system, we are starting from scratch, so we don’t need this. Once the image is downloaded on your computer, you can move to the next step.

Join Our Community!
Connect, learn, and grow with other Raspberry Pi enthusiasts. Support RaspberryTips and enjoy an ad-free reading experience. Get exclusive monthly video tutorials and many other benefits.
Learn moreApplications: Download Google Apps
I already introduced part of the issue, but I lost days trying to install Google Apps on all Android TV versions. So, I’ll try to summarize it for you:
- Google Apps is not included in the custom build provided by Konsta (for legal reasons, I think it requires a commercial agreement or license from Google to distribute it).
- You can install Google Apps manually on a custom build if you find a downloadable file that is compatible with it.
- Google Apps for Android and Android TV are not the same, so you need something for Android TV specifically.
- For years, OpenGapps has been the solution. Problem: no updates available anymore after Android 11.
- For Android, forks have been created (like NikeGapps or MindTheGapps), but I didn’t find a way to make them work on Android 12 or 13 (let me know if you find a solution).
That’s why I recommend staying with Android TV 11 in this tutorial. OpenGapps is available for it, and it’s easy to install.
On the LineageOS website, you’ll find links to the Google Apps packages they recommend for each version, which is nice:
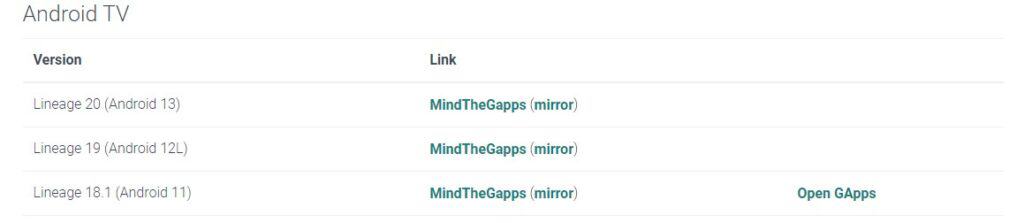
After unsuccessfully trying MindTheGapps several times, I reverted to Android TV 11 and OpenGapps.
In summary, here is what you need to do:
- Open this page on the OpenGapps website.
- Select the ARM64 platform.
- Pick the Android version you try to install (11 if you follow my guidelines).
- Then choose the “tvstock” variant, that is created for Android TV.
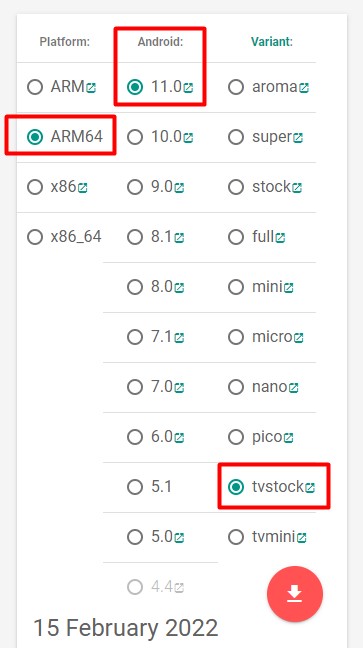
Get the file on your computer, as for the Android TV image, I’ll explain later what to do with it.
Let’s start the main installation while the file is downloading.
How to install Android TV on Raspberry Pi
There are two main steps to install Android TV with Google Play on the Raspberry Pi:
- Flash the custom build to your SD card, as for any operating system, and start it once.
- Then reboot in recovery mode to install Google Apps manually, and get access to all the applications.
Let’s start with the Android TV installation, which is pretty straightforward, and I’ll then show you how to install Google Apps on it.
Prepare the SD card
Insert the SD card in your computer, and use your favorite tool to flash the custom image to it (as for any system installation).
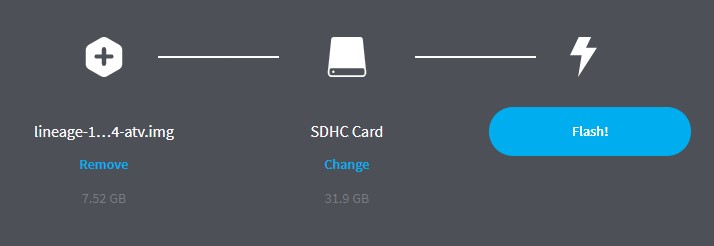
I’m using Balena Etcher for this, as it’s often slightly faster when you already have the image, but you can also use Raspberry Pi Imager (choose the “Custom” option in the OS list) or any other tool you like.
The image is pretty big (8 GB in my example), so it might take a while, just be patient.
First boot to Android TV
You can then insert the SD card into your Raspberry Pi, plug your monitor, mouse and keyboard and start it for the first time.
After a few seconds, you’ll get a welcome wizard, looking like:
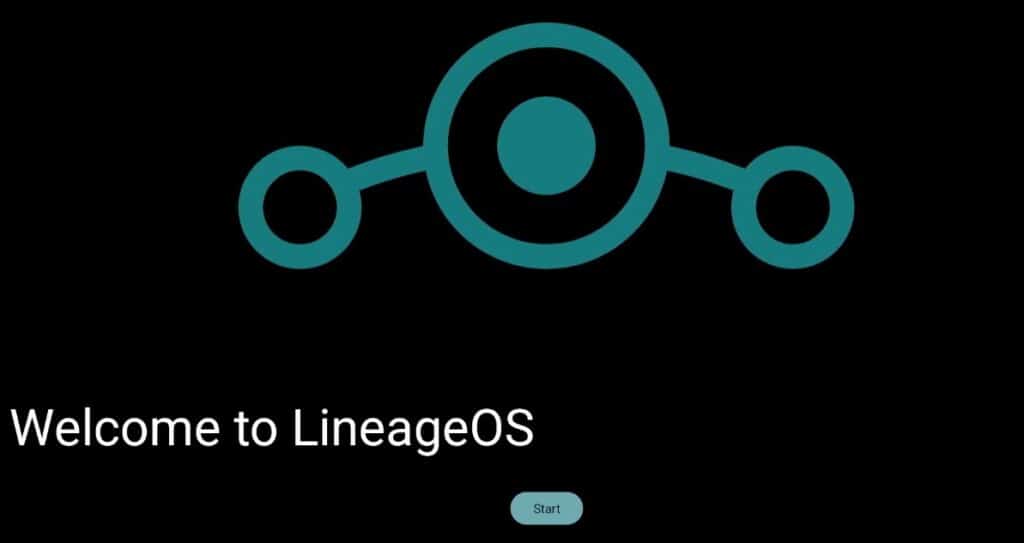
It will ask a few questions, where you can change the language and other basic things. In most cases, you can keep the default options, it’ll be fine. It also tries to detect Bluetooth devices for a long time, you can press “F2” if you don’t have any.
I guess it’s useful if you have a Bluetooth remote (like this one on Amazon), but it’s not necessary for the moment.
It's a free PDF guide containing every Raspberry Pi Linux command you should know!
Download now
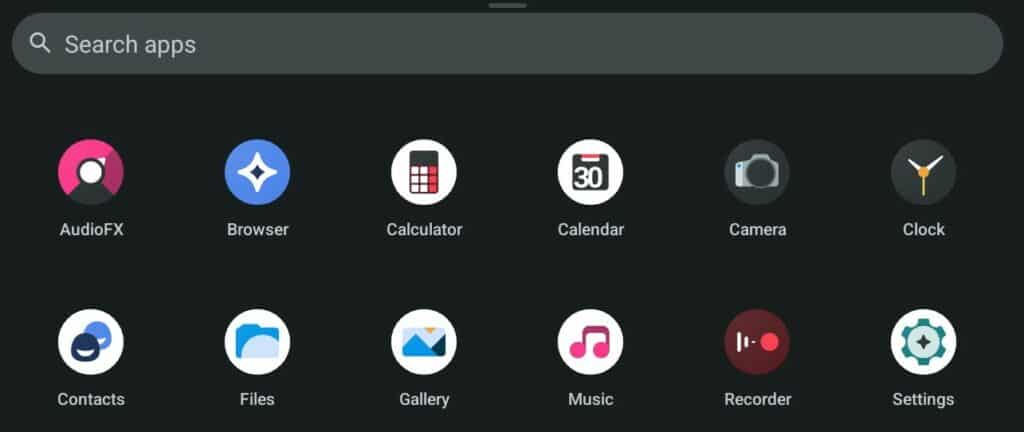
Once the wizard completed, you’ll get access to the Android TV main screen, which is completely empty for the moment:
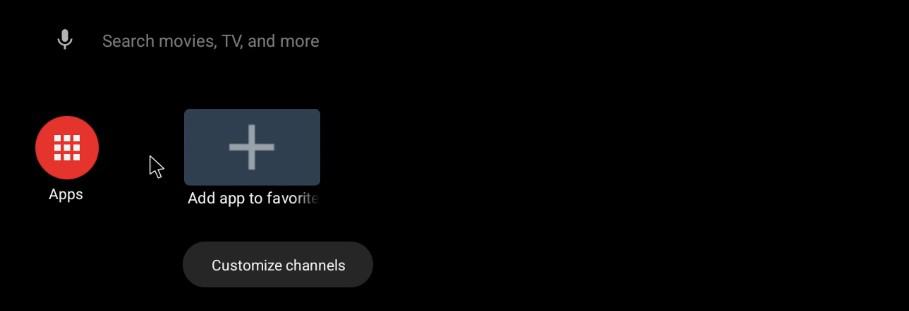
You can find the settings in the top-right corner (or under “Apps”) if you need to change anything (set up the Wi-Fi for example), but we’ll quickly move on and install Google Apps, as we can’t do anything else here.
It's a free PDF guide containing every Raspberry Pi Linux command you should know!
Download now
Add Google Apps on Android TV for Raspberry Pi
Installing Google Apps on Android TV can be done in three main steps:
- Copying the OpenGapps file to a USB drive.
- Rebooting Android TV in recovery mode.
- Installing Google Apps from the recovery mode, and then rebooting in normal mode.
Let’s do this.
Copy Google Apps to a USB key
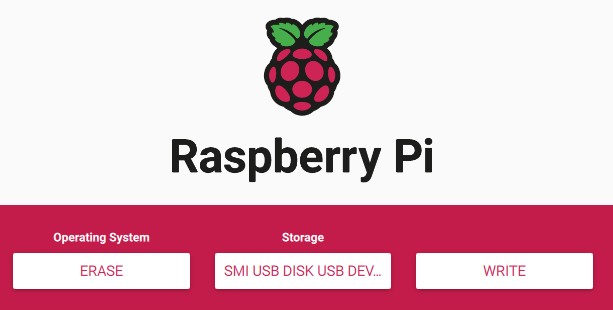
We’ll use the USB key to transfer Google Apps to your Raspberry Pi. The drive needs to be formatted in a compatible format (FAT32, for example). If you need to format your USB key before moving forward, I find that the easiest way is generally to do it with Raspberry Pi Imager.
- Plug your USB key into your computer.
- Open Raspberry Pi Imager.
- In the OS list, choose “Erase”.
- Select the USB key in the “Storage” list.
- Click Write to do it.
Warning: all the files on the USB drive will be lost.
Once done, just copy and paste the OpenGapps file you downloaded earlier to the USB drive.
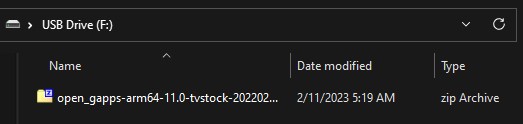
Unplug the USB drive safely (on most systems, you have an “Eject” option to do this properly) and plug it into the Raspberry Pi.
Enable reboot to recovery mode
The recovery mode is not accessible by default on Android TV. You need to enable it in the settings:
- Open the settings on the Raspberry Pi.
- Browse to “System” and then “Buttons”.
- You’ll find something like “Advanced reboot” that needs to be enabled:
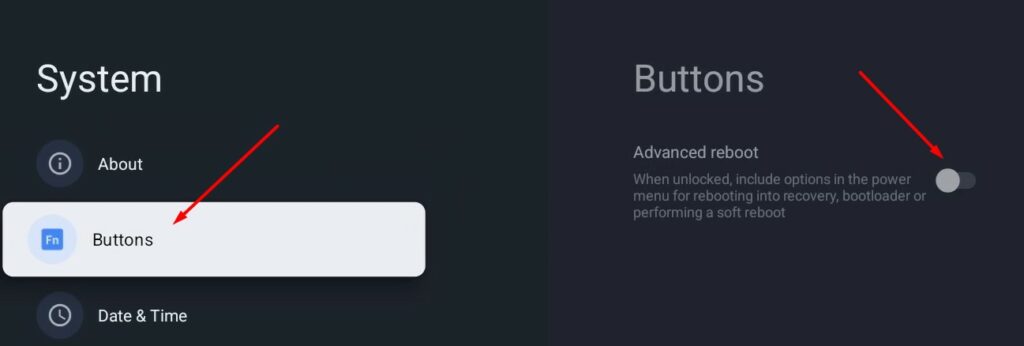
You can use the keyboard arrows to navigate in this menu if needed, it’s often easier. You can also use “F2” to get back to the previous screen (I list all the shortcuts at the end of this article).
Reboot in recovery mode
Once the advanced reboot enabled, you can get back to the system settings.
Scroll down to the bottom of the menu, and find the “Reboot” option.
A new screen shows up, where you can select “Recovery”:
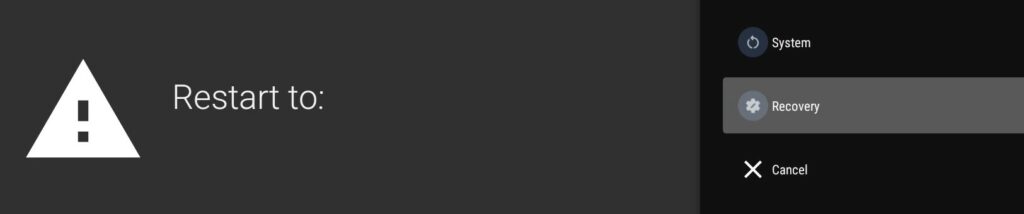
Use the arrows too, and press “Enter” to confirm (or you can use the mouse if you have one).
If everything goes as expected, the Raspberry Pi will restart, and you’ll get access to a menu looking like:
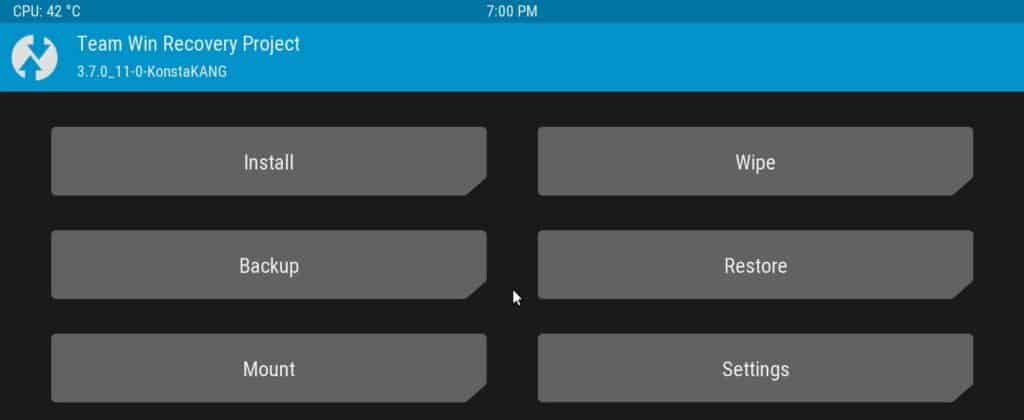
That’s the recovery mode, that we’ll use to install Google Apps manually.
Mount the USB key (optional)
- Make sure the USB key is plugged to the Raspberry Pi.
- Click on “Mount”.
- Make sure that the “USB” line is checked, or do it if it’s not the case.
If you plugged it before the reboot, it’s probably already done. - Then, click on “Select Storage” at the bottom of your screen and select the USB drive:
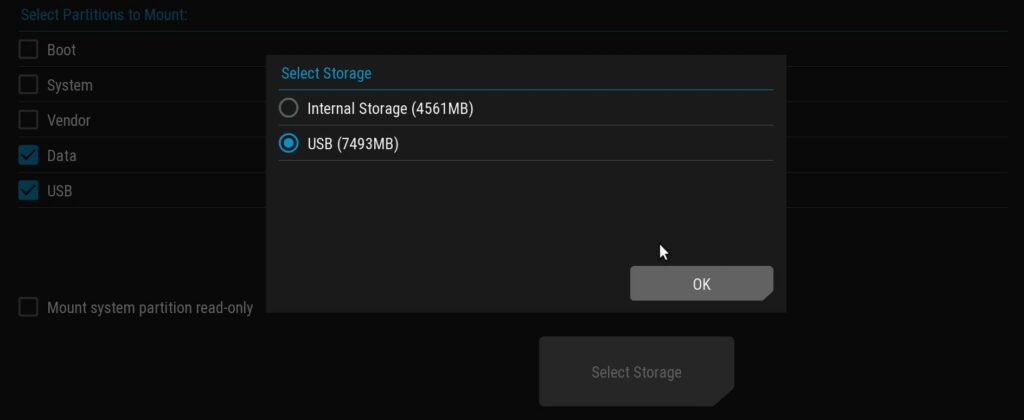
We need access to the USB drive to install Google Apps, so if you experience any issue at this stage, you won’t be able to continue. Double-check the partition format, unplug/plug the device to another port, or try to reboot once again if it doesn’t work as expected.
Install Google Apps
Once the USB drive mounted, you can get back to the main menu (use the arrow icon at the bottom) and click on “Install”. You should directly get something like:
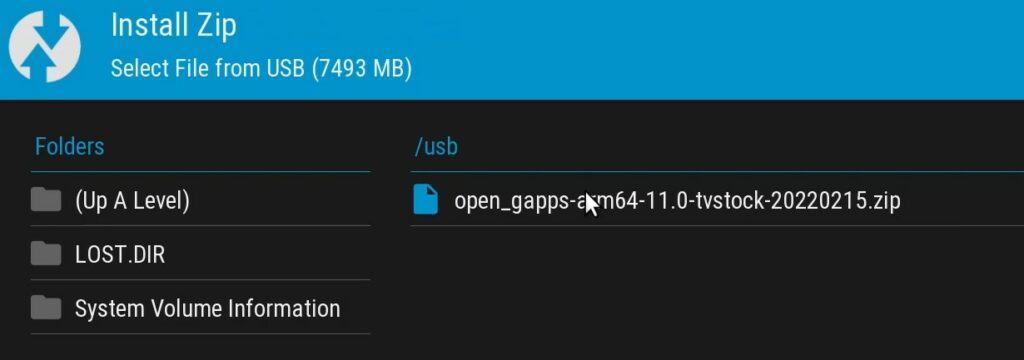
You’ll get a list of the files stored on the USB drive. In my case, I only have OpenGapps for Android TV 11. Click on it (with the mouse) to open the installation window.
You’ll need to swipe to start the installation (click on the white arrows with a blue background, and move the cursor to the right with your mouse). After a few seconds, the installation is complete, and we are almost done.
Factory reset and reboot
I don’t know if it’s mandatory, but in the documentation, they ask to do a factory reset after the Google Apps installation, so it’s probably better to do it.
Back to the main menu, go to “Wipe” and choose “Factory reset”.
You’ll get a screen looking pretty much like the previous one:
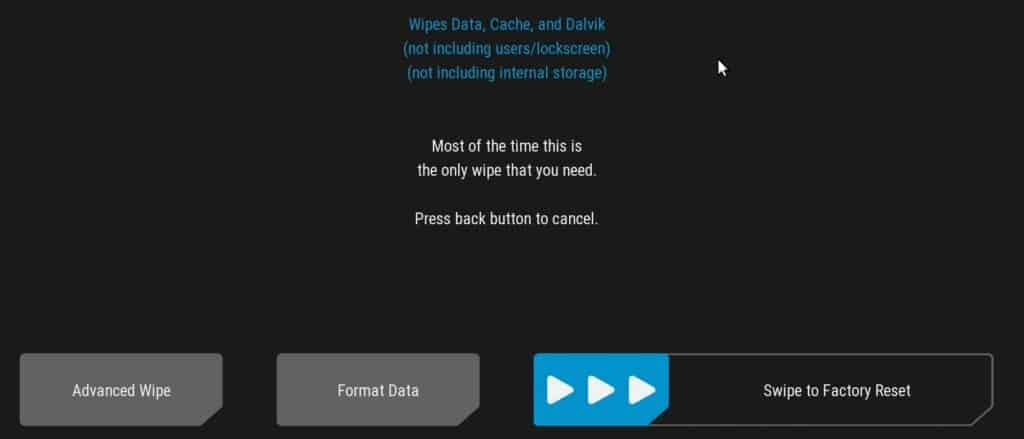
The only thing to do here is to swipe to erase the system data and cache. Once done, you can reboot to the normal system to start using Google apps.
First boot with Google Apps
On the first boot, you’ll get another wizard, branded as Google this time, asking a few questions to configure your system:
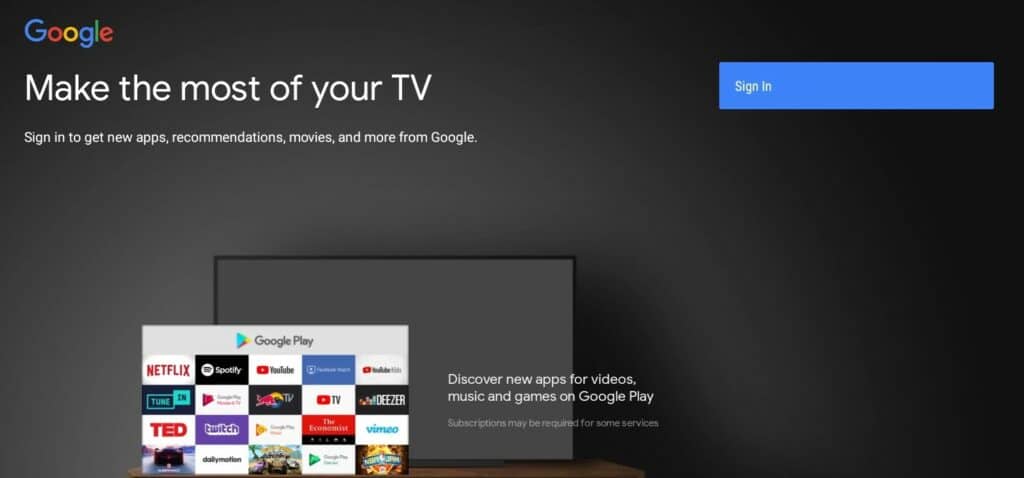
Basically, you need to sign in to your Google account, and you can customize a few things if you like. But you can change everything later, so even if you just sign in and keep the default values, it should be fine.
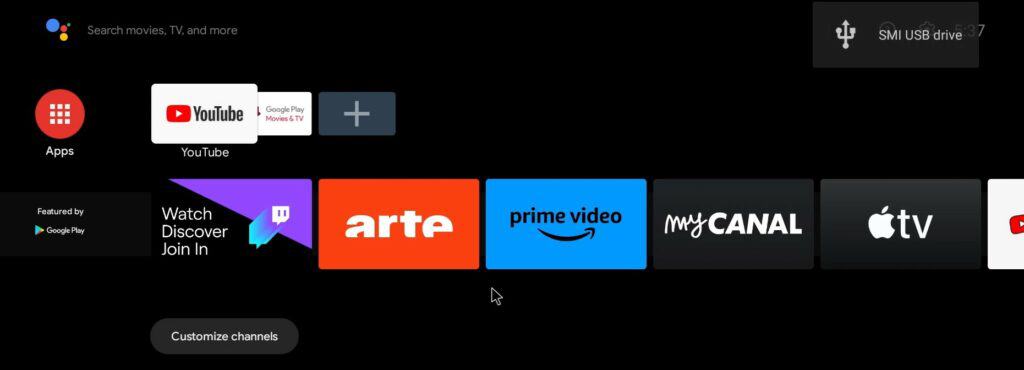
If everything goes well, you’ll finally get back to the home screen, with a lot more icons than previously:
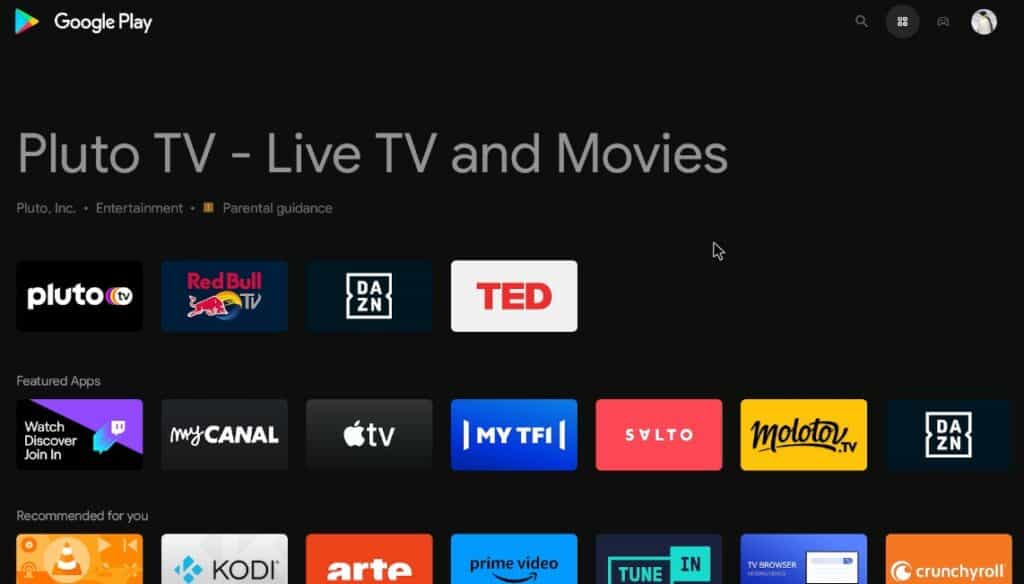
YouTube and Google Play are installed directly with the “tvstock” variant. And you have shortcuts to all the most popular applications in the home menu too.
I did a few tests here, and it was working directly, so it’s pretty good.
I think It works even better than Kodi for apps like YouTube, where you can watch high definition videos without any drop:
Feel free to check the settings once again if needed.
For example, ff you did the installation with an Ethernet cable, maybe it’s a good time to configure the Wi-Fi before plugging the Raspberry Pi to your TV.
It's a free PDF guide containing every Raspberry Pi Linux command you should know!
Download now
Want to chat with other Raspberry Pi enthusiasts? Join the community, share your current projects and ask for help directly in the forums.
Additional tips to use Android TV on Raspberry Pi
Well done, you did the most complicated part here. Android TV is installed, and you have access to Google Play to install everything!
Here are a few additional tips that might be useful.
Keyboard shortcuts
Android is not built to be used with a keyboard, so if you don’t have a fancy remote or a touchscreen, it might not be very comfortable to use. Hopefully, a few keyboard shortcuts are available, so even if you only have a keyboard it should be fine.
Here are the main shortcuts you need to know:
- F1: Home
- F2: Back
- F3: Multi-tasking
- F4: Menu
- F5: Power
- F11: Volume down
- F12: Volume up
Install new apps
Once Google Play is installed, installing new apps works the same way as on any Android Device.
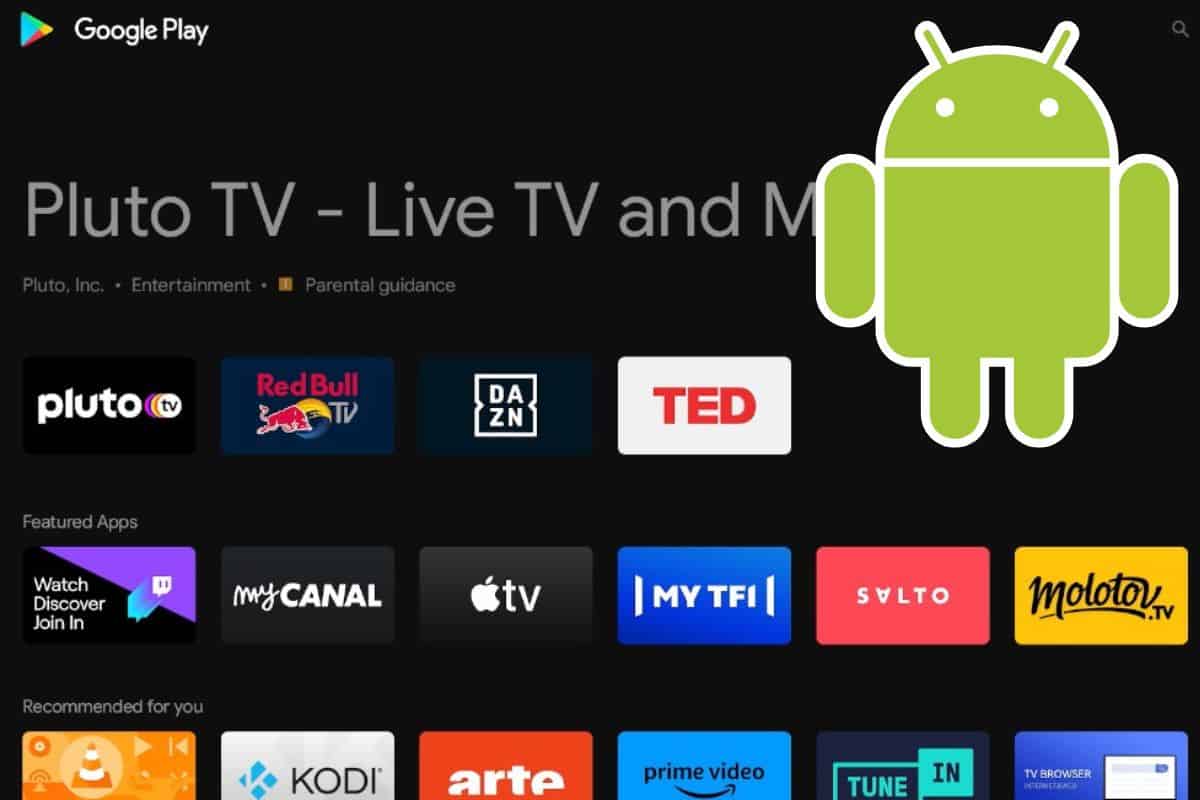
Open Google Play in the “Apps” menu or from the Home screen. You’ll get a list of suggestions, looking like:
You can then click on one of the recommended apps (or use the search engine) and install them one by one. On each app, you’ll get some details and an “Install” button:
Nothing complicated here, but it’s probably a good idea to do it while you are in “installation mode” with a keyboard, mouse, etc. Depending on your hardware, it might be more challenging to search applications or type passwords later.
Frequently asked questions
Konsta keeps an FAQ section up-to-date on the download page. If you have any specific questions about this Android TV build, I highly recommend starting from there (here is the link). You can, for example, find how to expand the partition, plug an external power button or use a remote.
For more specific questions, you can find various forums too. But as there are many components that depend on different developer teams, it’s not that easy to find answers.
Anyway, I hope this article was useful. I will try to keep it up-to-date once the new versions are fully supported, and you are welcome to reach out if you have any tips that you think I should add.
Whenever you’re ready, here are other ways I can help you:
The RaspberryTips Community: If you want to hang out with me and other Raspberry Pi fans, you can join the community. I share exclusive tutorials and behind-the-scenes content there. Premium members can also visit the website without ads.
Master your Raspberry Pi in 30 days: If you are looking for the best tips to become an expert on Raspberry Pi, this book is for you. Learn useful Linux skills and practice multiple projects with step-by-step guides.
The Raspberry Pi Bootcamp: Understand everything about the Raspberry Pi, stop searching for help all the time, and finally enjoy completing your projects.
Master Python on Raspberry Pi: Create, understand, and improve any Python script for your Raspberry Pi. Learn the essentials step-by-step without losing time understanding useless concepts.
You can also find all my recommendations for tools and hardware on this page.