How to Install Homebridge on Raspberry Pi (2024 Guide)
Homebridge is a very useful software for Raspberry Pi enthusiasts who would like to control their smart home through their mobile devices (Apple devices, in this instance) over the internet. In this tutorial, I’ll show you how to install Homebridge on the Raspberry Pi.
There are two ways to install Homebridge on your Raspberry Pi. The first way is to flash an image onto an SD card which is readily available for the Raspberry Pi. Alternatively, it can be installed as a software application on an existing system.
Let’s start by introducing Homebridge and discuss which option is best for you.
If you’re looking to quickly progress on Raspberry Pi, you can check out my e-book here. It’s a 30-day challenge where you learn one new thing every day until you become a Raspberry Pi expert. The first third of the book teaches you the basics, but the following chapters include projects you can try on your own.
What is Homebridge?
Homebridge is a free-to-use, open-source software that allows us to integrate with smart devices that do not natively support Apple HomeKit.
HomeKit is the software that controls all smart home integrations in Apple’s ecosystem) via Homebridge Plugins. In addition to this, devices can be controlled with Apple’s voice assistant: Siri.
As mentioned above, there are two major ways to install Homebridge on a Raspberry Pi:
- Flashing the official Homebridge image on the Raspberry Pi.
- Installing it as an application on the Raspberry Pi OS.
For this tutorial, we will choose the latter option as it is a much more versatile option.
I say that because if it is installed as a separate application, we can configure the same Raspberry Pi device to perform other applications as well, like acting as a NAS (network-attached storage), hosting a media center or a web server.
But if you prefer, you can use Raspberry Pi Imager to flash a dedicated Homebridge system to your SD card. Homebridge is available in the OS list with this tool.
Homebridge Installation (a step-by-step tutorial)
Before we start with the actual tutorial, let us take some time to review the hardware and software requirements for this project.
Hardware and Software Prerequisites
There aren’t many hardware or software prerequisites for this tutorial.
All you need is a Raspberry Pi (I would recommend getting the Raspberry Pi 3 or 4 with at least 1 GB RAM for this installation) with a fresh installation of the latest 64-bit version of Raspberry Pi OS.
It's a free PDF guide containing every Raspberry Pi Linux command you should know!
Download now
Here is a great article that will help you with this: Install Raspberry Pi OS on Raspberry Pi (Illustrated guide).
I would suggest using Raspberry Pi Imager for flashing the image, so you can configure the following directly via the advanced options:
- Set up Pi login credentials (i.e., username and password).
- Set up SSH (open or through key configuration).
- Connect to a Wi-Fi network if needed.
Once this is done, and you have access to your Pi and its terminal, either through a monitor (in this case, just open the terminal application) or via a headless setup, we are ready to get our hands dirty and install Homebridge on our Raspberry Pi.
Homebridge Installation process
To install Homebridge on the Raspberry Pi, we need to add the Homebridge repository to our repository list, which the Pi goes through when we request it to download a new package.
To do that, we need to run the commands shown below:

Join Our Community!
Connect, learn, and grow with other Raspberry Pi enthusiasts. Support RaspberryTips and enjoy an ad-free reading experience. Get exclusive monthly video tutorials and many other benefits.
Learn more- Add the repository’s public GPG Key (Key used to authorize apt installs from external sources):
curl -sSfL https://repo.homebridge.io/KEY.gpg | sudo gpg --dearmor | sudo tee /usr/share/keyrings/homebridge.gpg > /dev/null - Add the actual repository location to the list of available repos:
echo "deb [signed-by=/usr/share/keyrings/homebridge.gpg] https://repo.homebridge.io stable main" | sudo tee /etc/apt/sources.list.d/homebridge.list > /dev/null
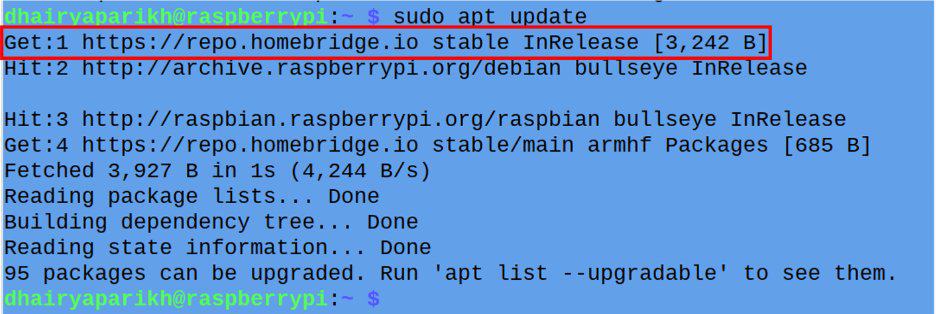
Next, we need the Pi terminal to fetch the updated list of repositories.
To do that, simply execute the update command:sudo apt update
When you run this command, you should see that the Homebridge repository is fetched in the output:
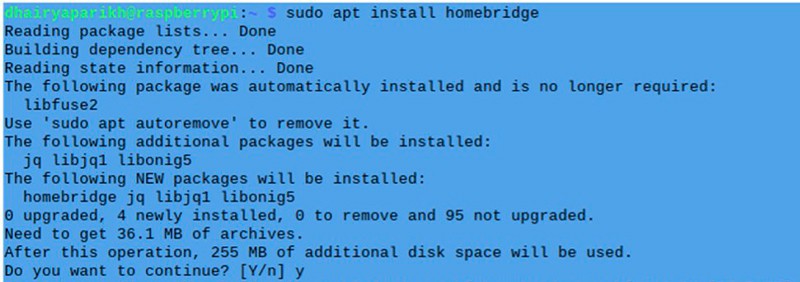
Now, to install Homebridge on our Pi, we just need to run the following command:sudo apt install homebridge
This command will install Homebridge as an application on our Raspberry Pi. This process may take a few minutes depending on the version of Pi you are using, so I would suggest grabbing a cup of coffee while it completes.
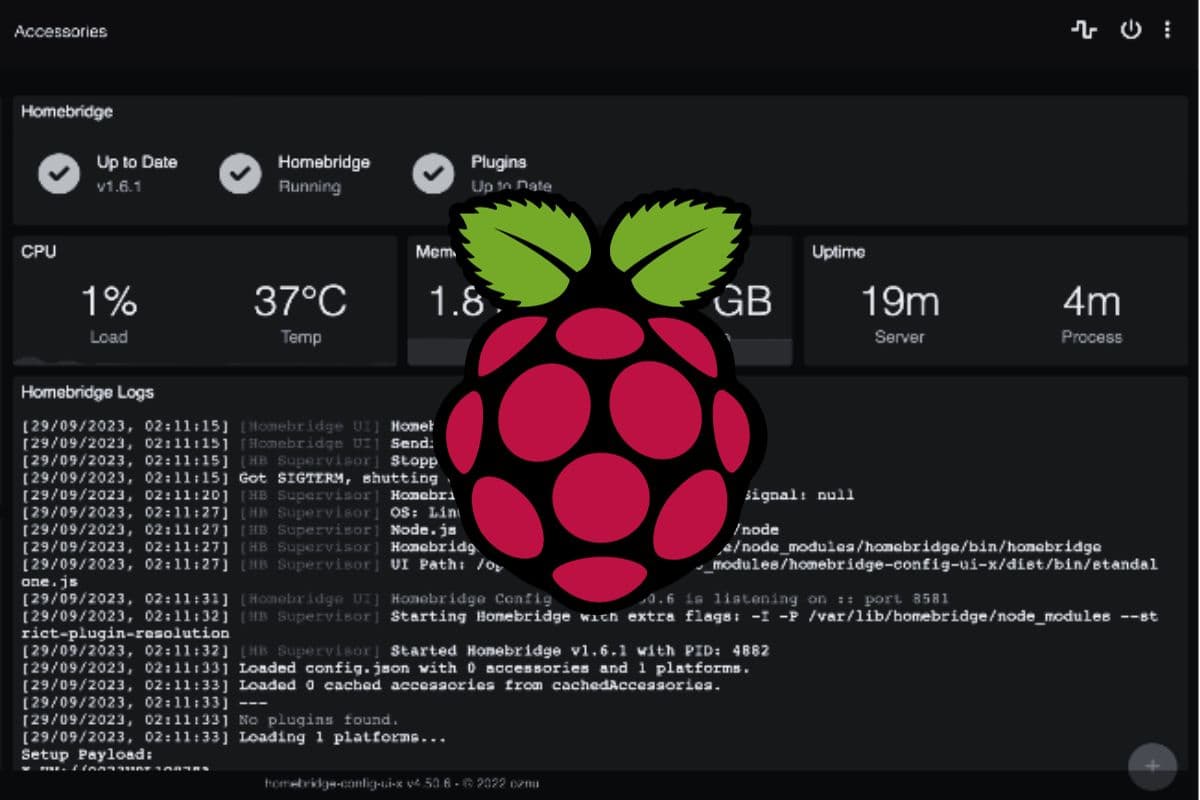
Congratulations! You have successfully installed Homebridge on your Raspberry Pi.
To access the Homebridge UI, you can use the link mentioned in the above image (blacked out). By default, the Homebridge server starts on the port 8581.
Are you a bit lost in the Linux command line? Check this article first for the most important commands to remember and a free downloadable cheat sheet so you can have the commands at your fingertips.
Accessing the Homebridge web interface for the first time
You can access the UI from any device connected to the same network as your Raspberry Pi. To open it, simply open the link given below in any browser window:
http://<Raspberry_Pi_IP_Address>:8581
Check this guide if you don’t know how to find the IP address of your Raspberry Pi.
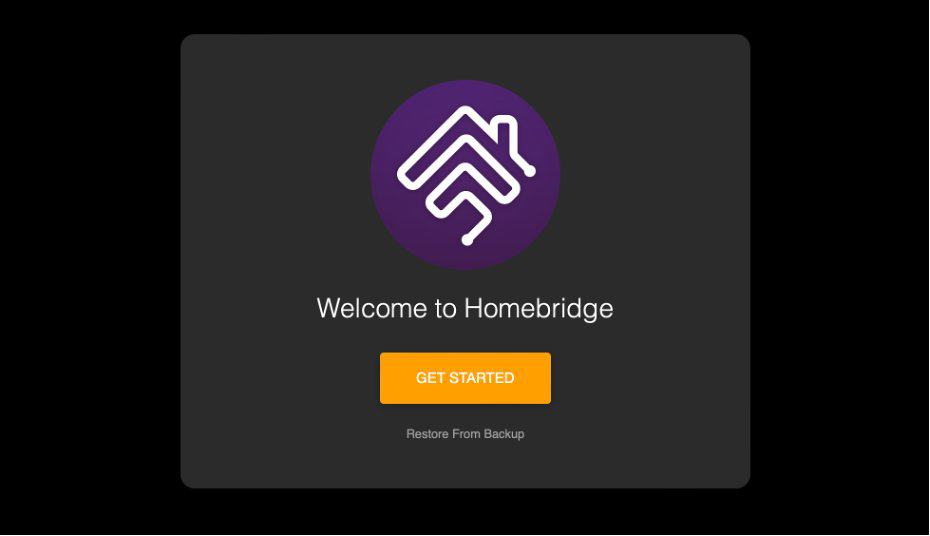
When reaching the URL, this will open the Homebridge UI setup interface as shown below:
In the next section, we will configure Homebridge on our Raspberry Pi and for this tutorial, we will add and configure a Nest Thermostat device with Homebridge.
It's a free PDF guide containing every Raspberry Pi Linux command you should know!
Download now
Homebridge configuration and demonstration
Part 1 – Configuration
As seen in the above figure, the home bridge webpage opens with a getting started page. We will follow the steps as stated.
It's a free PDF guide containing every Raspberry Pi Linux command you should know!
Download now
The first step is to create a new account, which opens once the GET STARTED button is pressed.

Once you enter the desired credentials, just press the CREATE ACCOUNT button and then press the GO TO DASHBOARD button to open the Homebridge dashboard.
The UI provides a lot of consolidated information like logs, system stats, application status, etc.

This is all for the configuration. We are ready to add and configure devices to the Homebridge application running on the Raspberry Pi.
As an example, we will add a Google Nest device to Homebridge, which will cover the complete end-to-end process of how to add a plugin and configure it.
Before we start with this process, let’s discuss a bit more about what a plugin is. I have created a figure to better explain the concept of plugins.
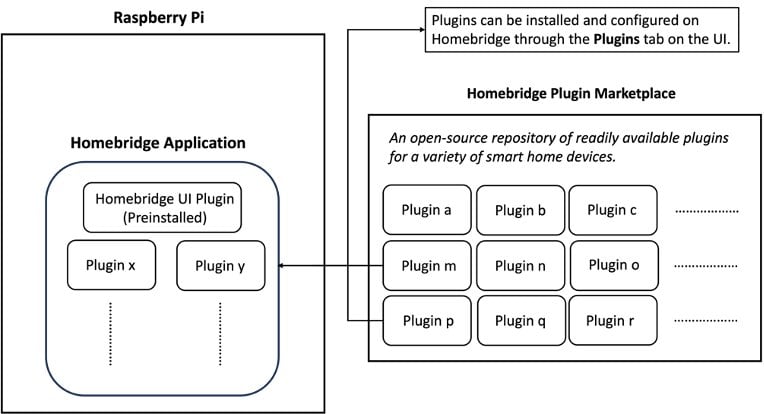
Homebridge can be considered as an application in which each plugin can be configured and run independently.
There are a lot of community-supported plugins available on GitHub, and they can be installed directly on our Homebridge through a button click. Interesting, right?
Let’s see a live demonstration of this. For this tutorial, I will configure my home’s Nest Thermostat with Homebridge and control it from an iPhone.
Part 2 – Demonstration
As discussed above, we will now set up a device with Homebridge and see a live demonstration:
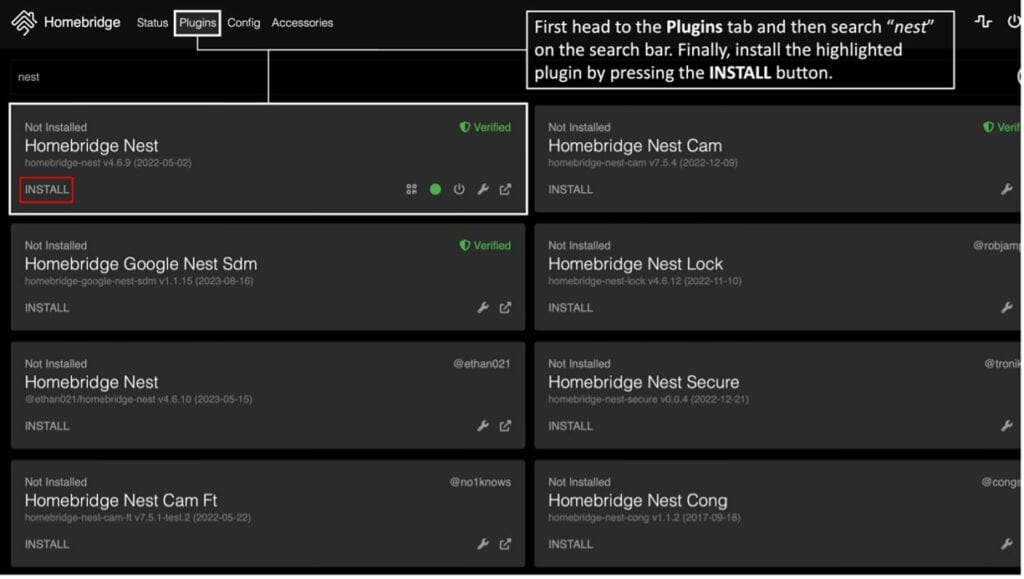
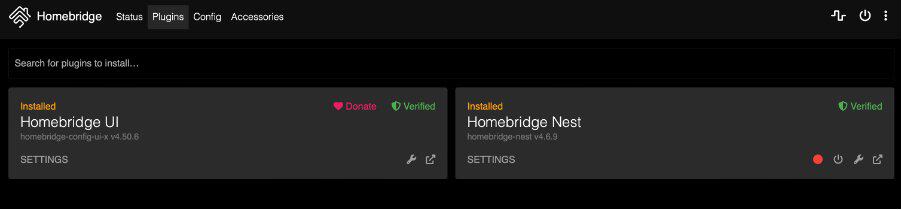
To configure a Nest device to work with Homebridge, we first need to install its corresponding plugin:
- Open the Homebridge UI in a browser window.
- Head on to the Plugins tab from the top-left side of the screen.
- Then, just search “nest” and install the first plugin named Homebridge Nest:
Once you press the installation button, it will open a new window in which the installation logs are printed.
Let this process complete without any interruptions.
Once this is done, you will see a new Settings: homebridge-nest window open.
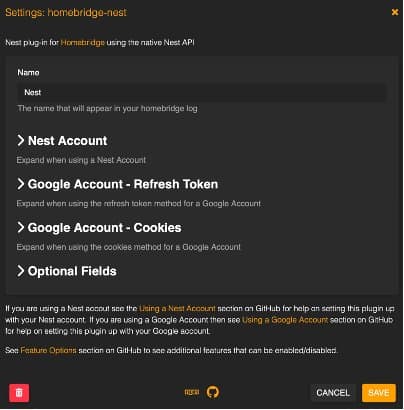
Next, we will set it up to work with my Nest device. Note that for this tutorial, you will need a smart device whose plugin is available for Homebridge (Google Nest in my case). For this, there are 2 options to set it up:
- Using a Nest Account Token: All you need is to sign in to your Nest account and then grab the token. More details about this can be found here.
- Using Google Account Cookies: Firstly, please note that the “Google Account – Refresh Token” option no longer works after October 2022. Hence, the only other option is to use cookies. A detailed write-up on how to do that can be found here.
I used a Nest Account token to configure my device. Once you get the token, all you need to do is paste it in the text box under the Nest Account section.
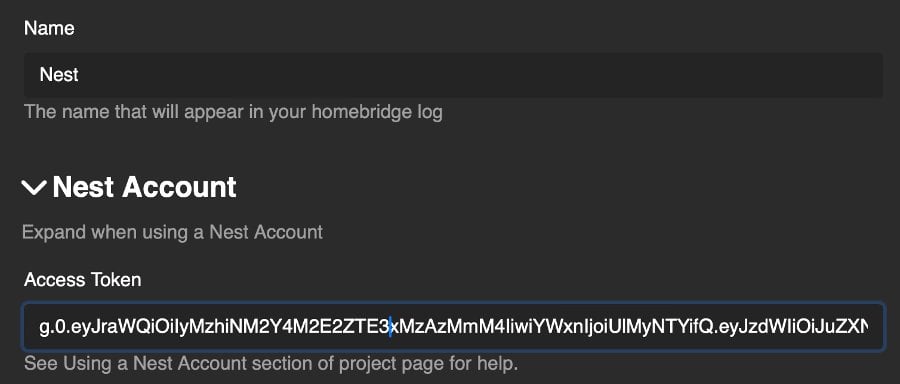
Please take note that the token will be a long string, so please confirm that you paste the correct string to avoid any issues. (On a side note, the token shown in the image is not a valid token, so please do not try to copy it).
Finally, press the Save button to complete the configuration.
Once that is done, the Homebridge Nest plugin will be available in the Plugins section.
The next thing to do is enable the Nest device (which enables something called Child Bridges), which can be done by simply enabling it from the Nest plugin settings.
What it will essentially do is let us connect to the Nest device as a separate Apple Home accessory, which provides us with more flexibility.
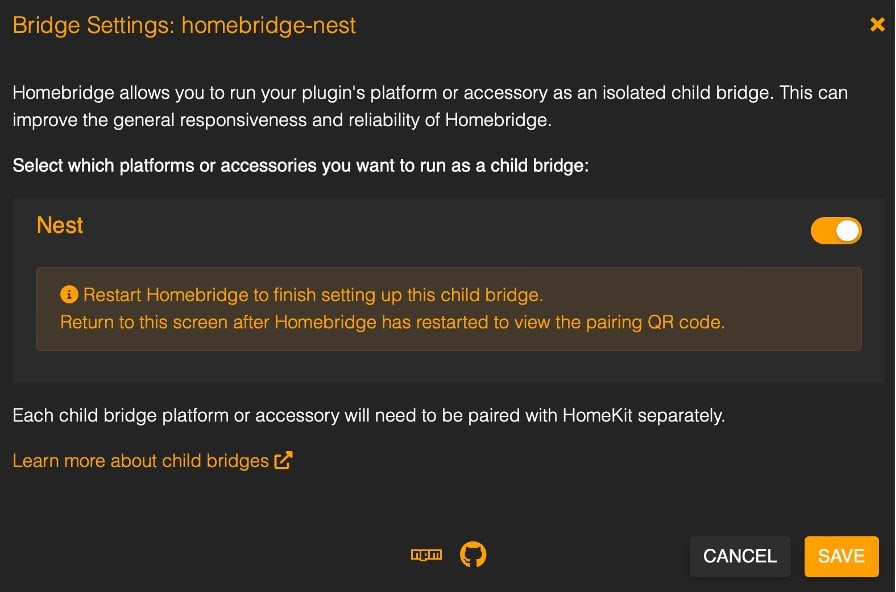
Note that it will need a restart of your Homebridge server, which takes a few seconds to complete.
Finally, once everything is done, you will be able to see that the Nest plugin is online, active and has a QR code icon beside it. Now comes the fun part; we will set up our Nest device as a smart home accessory in our Apple Home app.
Just click on the QR icon to open a QR code, and on the iPhone, press on the + Add Accessory button and scan the QR code available on the screen:

Once you scan the code, just follow the steps in the application. After everything is complete, the Thermostat device will be visible in the Home app of your iPhone.
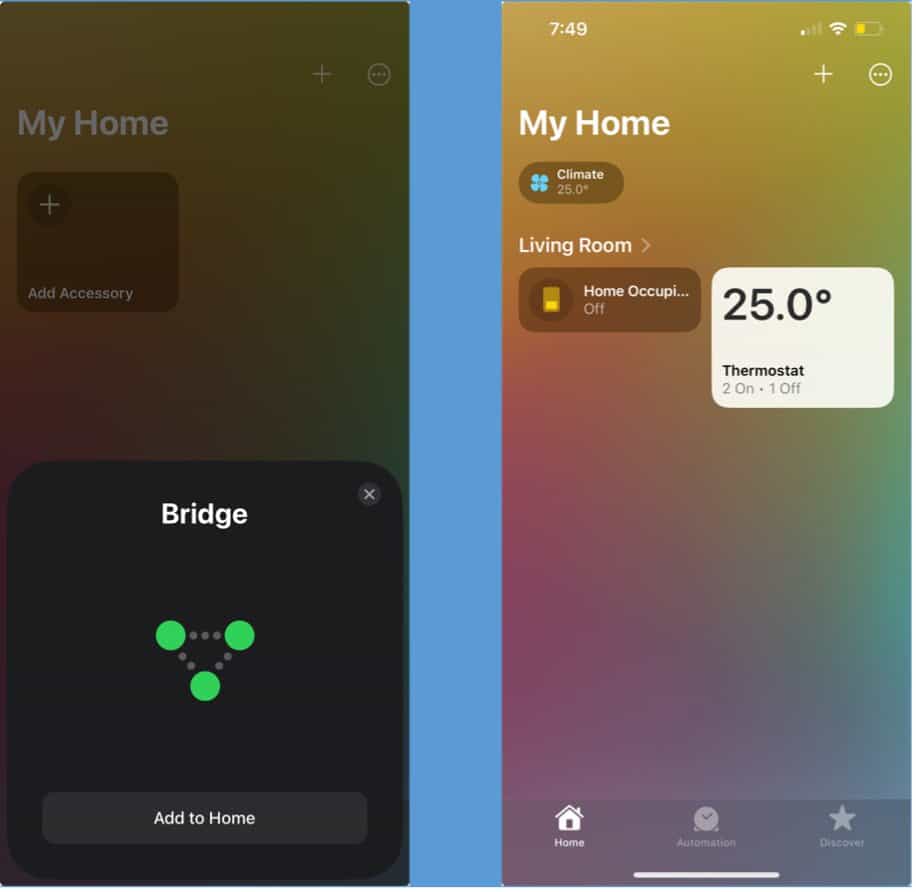
Now, you can control your thermostat through your phone and in addition to that, with the Siri voice assistant as well. This marks the end of this tutorial!
It's a free PDF guide containing every Raspberry Pi Linux command you should know!
Download now
Reminder: Remember that all the members of my community get access to this website without ads, exclusive courses and much more. You can become part of this community for as little as $5 per month & get all the benefits immediately.
Conclusion – What’s next?
This article gives you a glimpse of what can be done with Homebridge. So, what to do now? How to proceed?
I would suggest you go through the Homebridge documentation and do a hands-on exercise of configuring any device using Homebridge. It will give you an idea of how everything works.
Next, you can develop some more complex projects, involving multiple devices and systems running together in harmony. Apart from this, you can even explore some alternative software for smart home control using the Raspberry Pi.
Here are some great articles that will help you get familiarized with popular open-source home automation applications:
- Getting Started With Home Assistant on Raspberry Pi (2 ways)
- How To Install Domoticz on Raspberry Pi (Step-by-step guide)
- Install HOOBS on Your Raspberry Pi in 10 Minutes or Less
Whenever you’re ready, here are other ways I can help you:
The RaspberryTips Community: If you want to hang out with me and other Raspberry Pi fans, you can join the community. I share exclusive tutorials and behind-the-scenes content there. Premium members can also visit the website without ads.
Master your Raspberry Pi in 30 days: If you are looking for the best tips to become an expert on Raspberry Pi, this book is for you. Learn useful Linux skills and practice multiple projects with step-by-step guides.
The Raspberry Pi Bootcamp: Understand everything about the Raspberry Pi, stop searching for help all the time, and finally enjoy completing your projects.
Master Python on Raspberry Pi: Create, understand, and improve any Python script for your Raspberry Pi. Learn the essentials step-by-step without losing time understanding useless concepts.
You can also find all my recommendations for tools and hardware on this page.