Install a Camera on your Raspberry Pi: The Ultimate Guide
A camera is a must-have for any Raspberry Pi owner, as it allows you to try dozens of interesting new projects. But I remember being puzzled with my first camera, having no idea how to plug it in and configure it on my Raspberry Pi. If you are now in the same situation, this article will answer all your questions.
Here are the main steps required to use a camera module on a Raspberry Pi:
- Plug the module into the camera port of the Raspberry Pi.
- Enable the camera port in the Raspberry Pi configuration tool (Interfaces tab).
- Confirm the camera is working with: libcamera-still -o test.jpg.
In this guide, I’ll also show you how to choose the camera. I will then explain every step of the installation and give you a few tips you need to know to enjoy your new device right away.
If you’re looking to quickly progress on Raspberry Pi, you can check out my e-book here. It’s a 30-day challenge where you learn one new thing every day until you become a Raspberry Pi expert. The first third of the book teaches you the basics, but the following chapters include projects you can try on your own.
What you need to install a camera
Hardware prerequisites
If you already have a camera for the Raspberry Pi, perfect, you’re ready to go. But if you have not already ordered your accessories, here are a few tips for you.
Camera models
Unlike USB cameras on a computer, the number of available products for Raspberry Pi is quite limited, but there is still a choice to make between these main options:
| Official Raspberry Pi Camera Module | Raspberry Pi NoIR Camera Module | Raspberry Pi HQ Camera | |
|---|---|---|---|
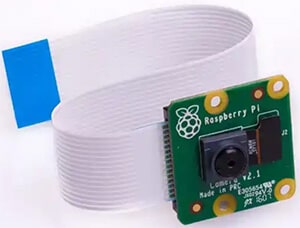 | 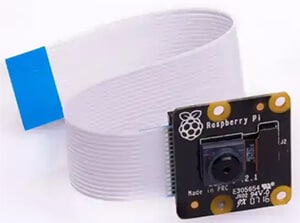 | 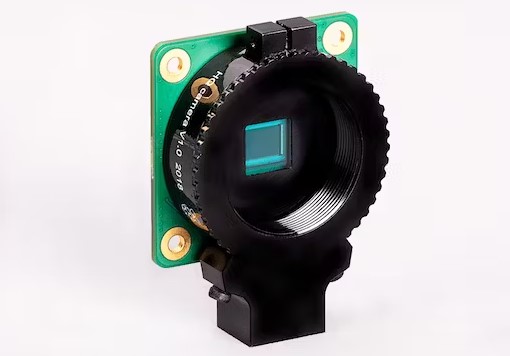 | |
| Specs | 8 Megapixel 3280 x 2464 1080p | 8 Megapixel 3280 x 2464 1080p30 Infrared Night Vision | 12.3 Megapixel Lens required 1080p |
| Price | Check on Amazon | Check on Amazon | Check on Amazon |
The Raspberry Pi Foundation offers three camera models:
- The first one was the first available and has been updated in 2016 (for v2).
It’s a high-quality camera with an 8-megapixel sensor that allows you to get HD pictures (3280 × 2464 pixels) and videos (1080p max). This model is compatible with any Raspberry Pi model and easy to install on Raspberry Pi OS (we’ll see that later). - The second one (NoIR) is almost the same. The only difference is the ability to take infrared photographs. The price is also a bit higher, but if you have a few extra dollars available, take this one. It’s often used for security cameras or to take photos in a low-light environment.
- Also, the Raspberry Pi Foundation released a new high-quality camera model more recently. It’s like a tiny reflex camera, and you can put additional lenses on it.
Are there other options available?
If you are looking for an affordable solution, there isn’t a better model than these. If you just want to have one for educational purposes, you can absolutely find a cheaper camera.
For example, this one was my first camera, it’s perfect to learn how to use a camera on Raspberry Pi, but the quality is lower. It’s half the price, but if you have to buy another one a few months later, it’s not worth it.
Additional accessories that might be useful
A camera is an external device which will often stay outside the case, so depending on what your projects are, you may need other accessories.
I will just give you a few extra links to look at, so you can do your research easily:
- Some cases are compatible with the camera module.
For example, the “Argon Neo” has a built-in support for the camera on the case (check the picture on Amazon). For more details, you can read my full review of this case here. - Another solution is to keep your current case for the Raspberry Pi and use a simple holder to keep the camera standing properly.
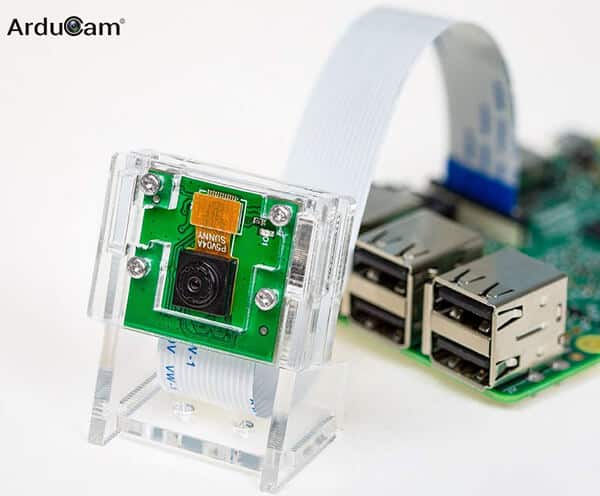
There are many similar products, you can check this one for example.
Along with the benefit of keeping your current case, it’s also easier to use the camera if you can just put it on a table (for example), instead of trying to keep it in the right place and orientation. - The last thing you may need is another camera cable.
The included cable is 15 cm long, that’s fine for basic use, but you may need to have a shorter or longer cable to fit your needs.
In this pack on Amazon, you have a few cable lengths you can use and change for each project (from 30 cm to 1 m).
Software requirement
Raspberry Pi OS (formerly known as Raspbian) is the recommended operating system to install and use a camera on Raspberry Pi.
Everything is included and especially if you choose the official model, it will work right away. I don’t know exactly which systems are compatible, you may want to try them later but start with Raspberry Pi OS for now.
It's a free PDF guide containing every Raspberry Pi Linux command you should know!
Download now
I already wrote a guide on how to install Raspberry Pi OS on Raspberry Pi, feel free to check it if you’re not confident with the installation.
You can use the Desktop or Lite version, both work fine with any compatible camera, so choose the one you prefer for your project.
After the installation, make sure you made these steps:
- Raspberry Pi OS installed with anything you need (applications, Wi-Fi network, …).
- Raspberry Pi OS configured with all your favorites settings (keyboard layout and language, for example).
- The system updates with the latest version of all packages:
sudo apt update
sudo apt upgrade - SSH is enabled to allow remote access for the first tests:
sudo service ssh start
If this is new for you, you should check my SSH guide here. - If you choose the Desktop version, you can also install a remote desktop app to do everything from your computer.
Are you a bit lost in the Linux command line? Check this article first for the most important commands to remember and a free downloadable cheat sheet so you can have the commands at your fingertips.
How to Install a Camera on a Raspberry Pi
Now that you have everything you need, we can start the camera installation in itself.
Hardware installation
The camera installation on the Raspberry Pi is straightforward once you find the port location:
Join Our Community!
Connect, learn, and grow with other Raspberry Pi enthusiasts. Support RaspberryTips and enjoy an ad-free reading experience. Get exclusive monthly video tutorials and many other benefits.
Learn more- Take the Raspberry Pi board in hand.
Unplug all cables, the Raspberry Pi must be turned off and disconnected from the power supply. - Find the camera port on the Raspberry Pi (between the HDMI and audio ports).
You’ll find it easily because it’s the only one that fits the cable width, and it should be written “CAMERA” on the main board.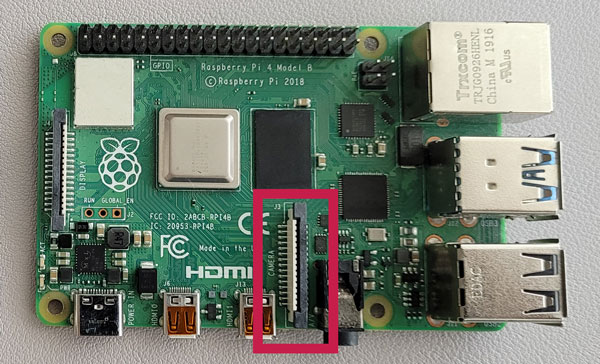
- Before plugging in the cable, you may need to remove the plastic film and lightly pull the black plastic.
- Plug the cable and push the black plastic to hold the cable inside.
Make sure to align both connectors on the same side (cable connectors on the HDMI port side, blue side of the ribbon towards the USB ports):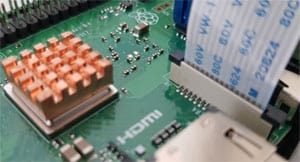
- Then I recommend starting with a rapid test before putting everything back into the case and/or in the holder, just to be sure that it’s working.
Plug all cables back (power, HDMI, network, USB …) and start the Raspberry Pi.
If you have any doubts, you can watch the first minute of this video to see how to plug your camera:
Enable the camera port on Raspberry Pi OS
Update: If you are using the latest version of Raspberry Pi OS, you no longer need to do anything, the camera port is enabled by default. I keep the instructions for the archives, but you can skip this step for a new installation.
Before using the camera on your Raspberry Pi, you need to enable it in your system. The camera port is disabled by default.
- Connect to the Raspberry Pi via SSH (you can find useful tips here to connect via SSH from your computer).
If you prefer, you can use a terminal on the Raspberry Pi OS desktop, or even use the Lite version. - Start the raspi-config tool:
sudo raspi-config - Go to “Interface options” > “Camera”:
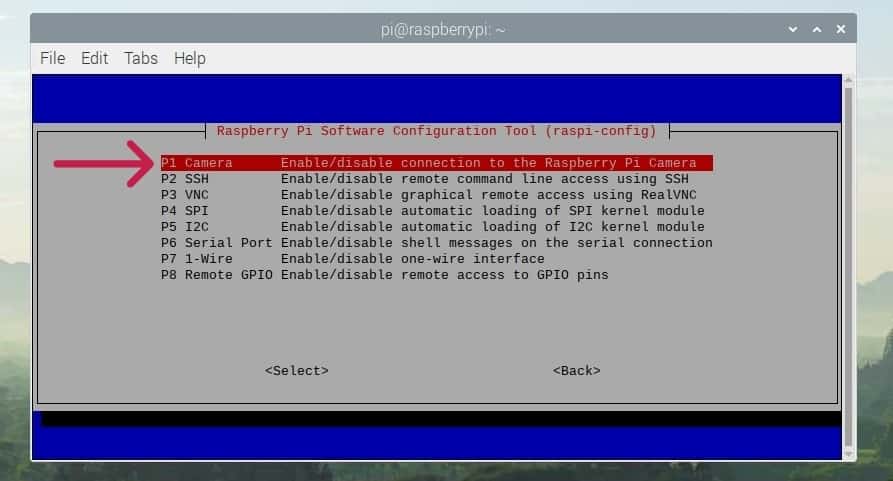
- “Would you like the camera interface to be enabled?”.
Yes! - Exit raspi-config and accept to reboot the device.
That’s all you need to do.
After the reboot, the camera is ready to use.
Note: If you are new to this and use the Desktop version, you don’t need to type any command. Just open the Raspberry Pi configuration tool (under Preferences in the main menu). Click on the “Interfaces” tab and enable the camera.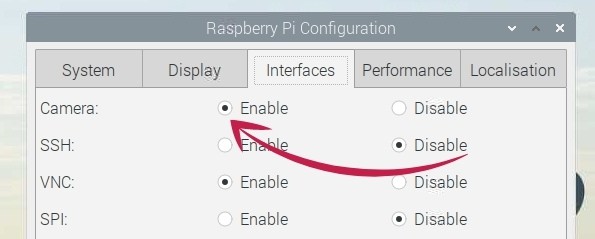
If you experience any issues with the camera installation, or for any reason, it doesn’t work as expected, please check this troubleshooting guide for the Raspberry Pi camera module.
Commands to Interact with the Raspberry Pi Camera
I will now introduce two useful commands to record and see what happens to your camera.
Note that raspistill and raspivid commands are no longer supported on Raspberry Pi Bullseye and future versions. Try to use the new commands as soon as possible, it’s basically the same. But if you are still using an old version (RPI OS Legacy) or have enabled legacy support, you still have access to them.
Take a photo
The first thing you can try is to simply take a picture of the image seen by the camera.
“libcamera-still” is the corresponding command on Raspberry Pi OS (replacing “raspistill”).
It’s already installed on your system.
To use it, the basic command line is:libcamera-still -o image.jpg
With -o you define the target file name (where the pictures will be saved).
It’s possible to use a file name including the path, for example:libcamera-still -o ~/Pictures/mypicture.jpg
It's a free PDF guide containing every Raspberry Pi Linux command you should know!
Download now
Use the -h parameter to display all the possible options for this command:libcamera-still -h
Here are a few interesting options you can try:
--width arg (=0) Set the output image width (0 = use default value)
--height arg (=0) Set the output image height (0 = use default value)
-t [ --timeout ] arg (=5000) Time (in ms) for which program runs
-o [ --output ] arg Set the output file name
-n [ --nopreview ] =arg(=1) Do not show a preview window-p [ --preview ] arg (=0,0,0,0) Set the preview window dimensions, given as x,y,width,height e.g. 0,0,640,480
-f [ --fullscreen ] =arg(=1) Use a fullscreen preview window
--qt-preview =arg(=1) Use Qt-based preview window (WARNING: causes heavy CPU load, fullscreen not
supported)
--rotation arg (=0) Request an image rotation, 0 or 180
--brightness arg (=0) Adjust the brightness of the output images, in the range -1.0 to 1.0
--contrast arg (=1) Adjust the contrast of the output image, where 1.0 = normal contrast
--saturation arg (=1) Adjust the colour saturation of the output, where 1.0 = normal and 0.0 =
greyscale
-q [ --quality ] arg (=93) Set the JPEG quality parameter
For your information, on the Legacy edition of Raspberry Pi OS, it will be:raspistill -o image.jpg
Record a video
To record a video, the command is almost the same.
“libcamera-vid” is the corresponding command name (replacing “raspivid”).
So like for pictures, to record a video use:libcamera-vid -o video.h264
Use the CTRL+C shortcut to stop the recording, or add the -t option to specify the recording duration.
H264 files are compatible with VLC.
If needed, you can install it on Raspberry Pi OS Desktop with: sudo apt install vlc
It’s the same to see all the parameters available, use libcamera-vid -h to get all options with a short description. Useful options are:
- –t: to choose the video duration in ms (ex: 6000 for a 6s video). This way you don’t need to use CTRL+C and can schedule the video capture with a script or cron.
- -w and -h: video size (width and height).
Transfer pictures and videos to your computer (Raspberry Pi OS Lite)
You may be asking how to download pictures on your computer after this.

The easiest way is to use software like FileZilla or WinSCP:
- FileZilla is a free tool available on Windows, Linux and macOS.
It’s mostly used to connect to FTP servers, but there is an option to use it for SCP transfers.
You can download the setup files here. - SCP is a secured protocol to copy files on the network over SSH.
So, you don’t need anything else on the Raspberry Pi (just make sure SSH is enabled). - Open FileZilla
- To try it quickly, you can use the quick connect option under the menu:

But there is also a “Site manager” to store all your servers and connect without entering anything. - Fill the host with the Raspberry Pi IP address.
Then your username and password (the one you created during the installation). - Click “Quickconnect” when ready.
- On the left side, this is your computer, browse to the path where you want to download files to (C:\Users\username\Pictures for example).
- On the right side, it’s the Raspberry Pi, browse to the location where you saved the pictures or video.
- Double-click on a file to download it.
Or select multiple files, right-click and “Download files”.
Control the camera with Python
The last interesting thing I want to show you is to use an advanced programming language (Python), to go further with your camera and include it in bigger projects.
If you are new to Python and want to do more things on Raspberry, I think you may need to learn the basics first (I wrote a book especially to help you do this, check it out if you’re interested in Python).
Python is the main programming language on Raspberry Pi. And the good news is that everything is available by default to use Python directly on Raspberry Pi OS (editors, compilers, basic libraries, …).

In this section, I will not teach you everything about Python, that’s not the goal, but just how to use your camera with it.
First script with Python
OK, let’s start with the first script to take pictures with Python. In the following steps, I continue with Raspberry Pi OS Lite. If you are on Raspberry Pi OS Desktop, there are many editors you can use like Thonny (pre-installed) or others available with apt.
Warning: If you are using the latest version of Raspberry Pi OS, please check this full tutorial here with the updated version of this script. Things have changed with Python and the Raspberry Pi camera in the latest versions, I only keep this for the archives and the Legacy edition.
Create your first script :
- Install the Python camera library if needed (installed by default on Desktop):
sudo apt install python3-picamera - Create a new Python file:
nano first_script.py - Paste the following sample code into the file:
import picamera
with picamera.PiCamera() as camera:
     camera.start_preview()
     camera.capture('/home/pi/Images/python.jpg')
     camera.stop_preview()
- Save and exit (CTRL+A, CTRL+D).
- Create the Images folder if needed:
mkdir /home/pi/Images - Run the script.
python3 first_script.py - Check the result in /home/pi/Images.
You can see the python.jpg file with the picture you just took (Use WinSCP, FileZilla or scp to copy the file on your computer and check the picture).
It’s only a basic script where you get the basics of how to take a picture in Python. If you already know Python, you can do everything from here (All available functions are in the documentation here).
Improve the script
Now, I’ll show you another example, with more advanced features.
The goal here is to give you an extra delay after starting the script, to prepare your best smile before the photo.
We’ll do this in two steps, a basic one and a slightly improved one.
- Create a new file (you can also edit the previous one as almost nothing changes for the first sample):
nano picture_delay.py - Paste these lines :
import time
import picamera
with picamera.PiCamera() as camera:
     camera.start_preview()
     time.sleep(5)
     camera.capture('/home/pi/Images/python2.jpg')
     camera.stop_preview()
- That’s almost the same script for now.
The sleep function allows you to wait a few seconds (5 in the example) before continuing. - Save and Exit (CTRL+A, CTRL+D).
- Try it :
python picture_delay.py - Did you have the time to do your best smile?
Probably, but you have to keep it for a few seconds without knowing if the shot was taken.
We’ll improve that now, and add a sound when the script takes the picture.
- Edit the previous file (or create a new one):
nano picture_delay_sound.py - Paste these lines into the file:
import pygame
import time
import picamera

with picamera.PiCamera() as camera:
     camera.start_preview()
     time.sleep(4)
     pygame.mixer.init()
     pygame.mixer.music.load("flash.wav")
     pygame.mixer.music.play()
     time.sleep(1)
     camera.capture('/home/pi/Images/python.jpg')
     camera.stop_preview()
- Save and exit.
- You’ll probably need to install the pygame library:
sudo apt install python-pygame
I have a more detailed article about Pygame on Raspberry Pi here if you are interested. - You may also need to find the flash.wav file, or use something else.
For basic sounds, Soundbible offers direct downloads, for example, this one: Soundbible clicking sound.
Many sites offer many sounds, but most of them require a free account, Soundbible allows direct download without an account. - Once you find it, rename the wav file or edit the script, and run the script:
python3 picture_delay_sound.py - With an audio output on the Raspberry Pi, you’ll hear the sound one second before the shot.
That’s it for my second script. You now need to code the script corresponding to your needs. This documentation might help you.
It's a free PDF guide containing every Raspberry Pi Linux command you should know!
Download now
Conclusion
I hope you enjoyed this introduction to how to install and configure a camera on Raspberry Pi. If you make bigger projects with your camera, it would be nice to share them here with us, I’ll love it!
If you are looking for project ideas you can do with a camera, click on the link to find my recommendations, and you will see that everything is possible.
And if you would like to try a web interface to control your Raspberry Pi camera (but also standard security cams), you can try MotionEye or ZoneMinder (links to my tutorials).
It's a free PDF guide containing every Raspberry Pi Linux command you should know!
Download now
Want to chat with other Raspberry Pi enthusiasts? Join the community, share your current projects and ask for help directly in the forums.
Related questions
How to fix the error “raspistill: command not found”?
Raspistill and raspivid are no longer available on recent Raspberry Pi OS versions. They have been replaced with libcamera commands like “libcamera-still” and “libcamera-vid”.
Check the section below about commands to interact with your camera to learn how to use them. Don’t try to enable raspistill or raspivid, they are commands of the past :-).
Can I plug a camera into a Raspberry Pi Zero?
A camera module can also be used with a Raspberry Pi Zero, but a different ribbon is required. Make sure to buy a camera module where a ribbon corresponding to your Raspberry Pi model is provided (this one for example).
How do I know if the camera module is properly connected to the Raspberry Pi?
There is no detector or tool to know if a camera is correctly plugged in. Just follow the installation procedure and make a test to see if it works or if you encounter any errors.
Can I use a USB camera on my Raspberry Pi?
As a whole, Raspberry Pi supports most USB cameras, so it should be possible to use one instead of the camera module. Just plug it into a USB port and start a compatible application.
You can, for example, use it in OBS Studio, to record or stream the video.
Whenever you’re ready, here are other ways I can help you:
The RaspberryTips Community: If you want to hang out with me and other Raspberry Pi fans, you can join the community. I share exclusive tutorials and behind-the-scenes content there. Premium members can also visit the website without ads.
Master your Raspberry Pi in 30 days: If you are looking for the best tips to become an expert on Raspberry Pi, this book is for you. Learn useful Linux skills and practice multiple projects with step-by-step guides.
The Raspberry Pi Bootcamp: Understand everything about the Raspberry Pi, stop searching for help all the time, and finally enjoy completing your projects.
Master Python on Raspberry Pi: Create, understand, and improve any Python script for your Raspberry Pi. Learn the essentials step-by-step without losing time understanding useless concepts.
You can also find all my recommendations for tools and hardware on this page.



Great tutorial, it helped me a lot.
Thanks Richard!
Dear Sir,
can you write the commands which doesnt replace the picture in Image file, but take another picture with automatic naming. i mean that when we take the second picture it doesnt replace the first picture.
Best Regards
Hi,
I would say something like that:
raspistill -o “image_$(date +%s).jpg”
can you use with a usb camera?
how link camera with google meet